Thesis and Dissertation Guide
- « Thesis & Dissertation Resources
- The Graduate School Home
- Introduction
- Copyright Page
- Dedication, Acknowledgements, Preface (optional)
- Table of Contents
- List of Tables, Figures, and Illustrations
- List of Abbreviations
- List of Symbols

Non-Traditional Formats
Font type and size, spacing and indentation, tables, figures, and illustrations, formatting previously published work.
- Internet Distribution
- Open Access
- Registering Copyright
- Using Copyrighted Materials
- Use of Your Own Previously Published Materials
- Submission Steps
- Submission Checklist
- Sample Pages

II. Formatting Guidelines
All copies of a thesis or dissertation must have the following uniform margins throughout the entire document:
- Left: 1″ (or 1 1/4" to ensure sufficient room for binding the work if desired)
- Right: 1″
- Bottom: 1″ (with allowances for page numbers; see section on Pagination )
- Top: 1″
Exceptions : The first page of each chapter (including the introduction, if any) begins 2″ from the top of the page. Also, the headings on the title page, abstract, first page of the dedication/ acknowledgements/preface (if any), and first page of the table of contents begin 2″ from the top of the page.
Non-traditional theses or dissertations such as whole works comprised of digital, artistic, video, or performance materials (i.e., no written text, chapters, or articles) are acceptable if approved by your committee and graduate program. A PDF document with a title page, copyright page, and abstract at minimum are required to be submitted along with any relevant supplemental files.
Fonts must be 10, 11, or 12 points in size. Superscripts and subscripts (e.g., formulas, or footnote or endnote numbers) should be no more than 2 points smaller than the font size used for the body of the text.
Space and indent your thesis or dissertation following these guidelines:

- The text must appear in a single column on each page and be double-spaced throughout the document. Do not arrange chapter text in multiple columns.
- New paragraphs must be indicated by a consistent tab indentation throughout the entire document.
- The document text must be left-justified, not centered or right-justified.
- For blocked quotations, indent the entire text of the quotation consistently from the left margin.
- Ensure headings are not left hanging alone on the bottom of a prior page. The text following should be moved up or the heading should be moved down. This is something to check near the end of formatting, as other adjustments to text and spacing may change where headings appear on the page.
Exceptions : Blocked quotations, notes, captions, legends, and long headings must be single-spaced throughout the document and double-spaced between items.
Paginate your thesis or dissertation following these guidelines:
- Use lower case Roman numerals (ii, iii, iv, etc.) on all pages preceding the first page of chapter one. The title page counts as page i, but the number does not appear. Therefore, the first page showing a number will be the copyright page with ii at the bottom.
- Arabic numerals (beginning with 1, 2, 3, 4, etc.) start at chapter one or the introduction, if applicable. Arabic numbers must be included on all pages of the text, illustrations, notes, and any other materials that follow. Thus, the first page of chapter one will show an Arabic numeral 1, and numbering of all subsequent pages will follow in order.
- Do not use page numbers accompanied by letters, hyphens, periods, or parentheses (e.g., 1., 1-2, -1-, (1), or 1a).
- Center all page numbers at the bottom of the page, 1/2″ from the bottom edge.
- Pages must not contain running headers or footers, aside from page numbers.
- If your document contains landscape pages (pages in which the top of the page is the long side of a sheet of paper), make sure that your page numbers still appear in the same position and direction as they do on pages with standard portrait orientation for consistency. This likely means the page number will be centered on the short side of the paper and the number will be sideways relative to the landscape page text. See these additional instructions for assistance with pagination on landscape pages in Microsoft Word .

Format footnotes for your thesis or dissertation following these guidelines:

- Footnotes must be placed at the bottom of the page separated from the text by a solid line one to two inches long.
- Begin at the left page margin, directly below the solid line.
- Single-space footnotes that are more than one line long.
- Include one double-spaced line between each note.
- Most software packages automatically space footnotes at the bottom of the page depending on their length. It is acceptable if the note breaks within a sentence and carries the remainder into the footnote area of the next page. Do not indicate the continuation of a footnote.
- Number all footnotes with Arabic numerals. You may number notes consecutively within each chapter starting over with number 1 for the first note in each chapter, or you may number notes consecutively throughout the entire document.
- Footnote numbers must precede the note and be placed slightly above the line (superscripted). Leave no space between the number and the note.
- While footnotes should be located at the bottom of the page, do not place footnotes in a running page footer, as they must remain within the page margins.
Endnotes are an acceptable alternative to footnotes. Format endnotes for your thesis or dissertation following these guidelines:

- Always begin endnotes on a separate page either immediately following the end of each chapter, or at the end of your entire document. If you place all endnotes at the end of the entire document, they must appear after the appendices and before the references.
- Include the heading “ENDNOTES” in all capital letters, and center it 1″ below the top of the first page of your endnotes section(s).
- Single-space endnotes that are more than one line long.
- Number all endnotes with Arabic numerals. You may number notes consecutively within each chapter starting over with number 1 for the first note in each chapter, or you may number notes consecutively throughout the entire document.
- Endnote numbers must precede the note and be placed slightly above the line (superscripted). Leave no space between the number and the note.
Tables, figures, and illustrations vary widely by discipline. Therefore, formatting of these components is largely at the discretion of the author.
For example, headings and captions may appear above or below each of these components.
These components may each be placed within the main text of the document or grouped together in a separate section.
Space permitting, headings and captions for the associated table, figure, or illustration must be on the same page.
The use of color is permitted as long as it is consistently applied as part of the finished component (e.g., a color-coded pie chart) and not extraneous or unprofessional (e.g., highlighting intended solely to draw a reader's attention to a key phrase). The use of color should be reserved primarily for tables, figures, illustrations, and active website or document links throughout your thesis or dissertation.
The format you choose for these components must be consistent throughout the thesis or dissertation.
Ensure each component complies with margin and pagination requirements.
Refer to the List of Tables, Figures, and Illustrations section for additional information.
If your thesis or dissertation has appendices, they must be prepared following these guidelines:

- Appendices must appear at the end of the document (before references) and not the chapter to which they pertain.
- When there is more than one appendix, assign each appendix a number or a letter heading (e.g., “APPENDIX 1” or “APPENDIX A”) and a descriptive title. You may number consecutively throughout the entire work (e.g., 1, 2 or A, B), or you may assign a two-part Arabic numeral with the first number designating the chapter in which it appears, separated by a period, followed by a second number or letter to indicate its consecutive placement (e.g., “APPENDIX 3.2” is the second appendix referred to in Chapter Three).
- Include the chosen headings in all capital letters, and center them 1″ below the top of the page.
- All appendix headings and titles must be included in the table of contents.
- Page numbering must continue throughout your appendix or appendices. Ensure each appendix complies with margin and pagination requirements.
You are required to list all the references you consulted. For specific details on formatting your references, consult and follow a style manual or professional journal that is used for formatting publications and citations in your discipline.

Your reference pages must be prepared following these guidelines:
- If you place references after each chapter, the references for the last chapter must be placed immediately following the chapter and before the appendices.
- If you place all references at the end of the thesis or dissertation, they must appear after the appendices as the final component in the document.
- Select an appropriate heading for this section based on the style manual you are using (e.g., “REFERENCES”, “BIBLIOGRAPHY”, or “WORKS CITED”).
- Include the chosen heading in all capital letters, and center it 1″ below the top of the page.
- References must be single-spaced within each entry.
- Include one double-spaced line between each reference.
- Page numbering must continue throughout your references section. Ensure references comply with margin and pagination requirements.
In some cases, students gain approval from their academic program to include in their thesis or dissertation previously published (or submitted, in press, or under review) journal articles or similar materials that they have authored. For more information about including previously published works in your thesis or dissertation, see the section on Use of Your Own Previously Published Materials and the section on Copyrighting.
If your academic program has approved inclusion of such materials, please note that these materials must match the formatting guidelines set forth in this Guide regardless of how the material was formatted for publication.
Some specific formatting guidelines to consider include:

- Fonts, margins, chapter headings, citations, and references must all match the formatting and placement used within the rest of the thesis or dissertation.
- If appropriate, published articles can be included as separate individual chapters within the thesis or dissertation.
- A separate abstract to each chapter should not be included.
- The citation for previously published work must be included as the first footnote (or endnote) on the first page of the chapter.
- Do not include typesetting notations often used when submitting manuscripts to a publisher (i.e., insert table x here).
- The date on the title page should be the year in which your committee approves the thesis or dissertation, regardless of the date of completion or publication of individual chapters.
- If you would like to include additional details about the previously published work, this information can be included in the preface for the thesis or dissertation.
Previous: Order and Components
Next: Distribution

Formatting your Thesis and Dissertation:Tools,Tips and Troubleshooting
- I am a new Graduate Student at Florida Tech!
- Thesis and Dissertation Templates
- Learn About Zotero
- Formatting Landscape Pages
- Line Spacing
- Page Numbers
- Page Break and Section Breaks
- Table of Contents or Figures
- Figures Turning Black
- Margin issues with Tables
- Page numbers not appearing
- PDF to PDF/A
- Section Breaks
- Landscape Page Numbers
- Troubleshoot LaTeX formatting issues
- Copyright and Creative Commons Licenses Primer
- Do I need to embargo my thesis or dissertation?
- I'm ready to submit my electronic copy - now what do I do?
- What is the process for obtaining print copies of my thesis or dissertation?
Adjust Spacing Between Lines
Spacing Issues on Signature Page
Highlight the text you are wanting to change then on the Home Ribbon, choose the line spacing symbol, select the desired spacing typically 1.5 for Thesis and 2.0 for Dissertations. Using the Add Space or Remove Space options as needed.
For the Signature page copying and pasting one of the signature lines is usually the easiest method.
Then removing any excess lines so the pages stays single paged.

If issues persist there are some alternative layouts in the Thesis Manual and Style Guide
Page 79 (OGP Manual)

- << Previous: Formatting Landscape Pages
- Next: Page Numbers >>
- Last Updated: Jun 14, 2024 9:22 AM
- URL: https://libguides.lib.fit.edu/formattingyourthesisanddissertationtoolstipstroubleshooting

- Library Catalogue
Formatting your thesis: Overall layout and specifications

On this page
Formatting requirements, parts of a thesis, file format, file size, and page size, line spacing, citation style, cumulative theses, extended essays, personal information, blank pages.
The Library's Theses Office assists with formatting theses, projects and extended essays for submission to the Library. You are encouraged to use the Library's thesis template to help format your thesis. The requirements stated on this page are default settings for the thesis template
| Title page - | Required | |
(Lower-case Roman numeral page numbers) | Declaration of Committee page – | Required |
| Ethics Statement | Required if the research was subject to ethics approval | |
| Abstract | Required | |
| Dedication | Optional | |
| Acknowledgements | Optional | |
| Table of Contents | Required | |
| List of Tables | Required if the document contains tables | |
| List of Figures | Required if the document contains figures | |
| Other lists | Optional | |
| List of Acronyms | Optional | |
| Glossary | Optional | |
| Preface/Executive Summary/Image | Optional | |
(Arabic page numbers) | Chapters— | Chapters and subsections may be numbered or unnumbered |
| References | You may use a single reference section at the end of the document or include references at the end of each chapter | |
| Appendix(es) | Optional |
Optional pages in the thesis template may be removed if not used.
The final copy of the thesis must be converted to .pdf (PDF/A format) for submission to the Library (maximum 600 mb). See the guide Saving your thesis in PDF/A format for instructions.
Theses must be formatted for US Letter (8.5X11) pages. Landscape 8.5X11 and 11X17 pages are permitted. Legal, A4, or other paper sizes are not permitted.
| Arial 11 point | Word template default |
| Times New Roman 12 point | Recommended serif font for Word |
| Computer Modern | LaTeX template default |
Arial is the preferred font for SFU thesis submissions. See the Thesis Template Instructions for directions to change the default template font.
Please contact the Theses Office at [email protected] if you would like to use any fonts in your thesis other than the ones recommended.
The default template line spacing is 1.5 for text, with single-spaced block quotations.
Margins should be set to:
- 1.25" left/right
- 1" top/bottom
All pages must be numbered sequentially as outlined below, with the exception of the title page. Page numbers should appear at the bottom centre of each page, at a minimum of 0.5” from the edge of the page.
Preliminary pages of the thesis must be numbered with Roman numerals. On the first page of the main body, page numbers must restart with 1. The thesis template is preset with this numbering style.
SFU Library does not require a specific citation style. Consult your supervisor, your department’s graduate handbook, or a liaison librarian for help with determining which style is appropriate for your research.
The default formatting in the library’s thesis template may differ from some requirements of your citation style, but it is acceptable for SFU library submission.
Cumulative, or paper-based, theses must use the same general format as other submissions. Consult your supervisor or your department's graduate handbook for more information. If including published papers in a thesis, please consult the Copyright and your thesis FAQ .
Extended essays should be combined into a single document and single submission. For an example of an extended essays title page, see the Title page formatting information .
For theses written in a language other than English, the Library requires a second complete English title page and abstract. Supporting documentation must be in English.
Individual personal information must be removed from the thesis before publication, including signatures, email addresses, and phone numbers. For example, if you are including a survey instrument or consent form, your own contact information must be removed.
Blank pages in the thesis must be removed before publication.
Have a language expert improve your writing
Run a free plagiarism check in 10 minutes, generate accurate citations for free.
- Knowledge Base
Dissertation layout and formatting
Published on October 21, 2015 by Koen Driessen . Revised on February 20, 2019.
The layout requirements for a dissertation are often determined by your supervisor or department. However, there are certain guidelines that are common to almost every program, such as including page numbers and a table of contents.
If you are writing a paper in the MLA citation style , you can use our MLA format guide .
Table of contents
Font, font size, and line spacing, tables and figures, referencing, paragraph marks, headers and footers, page numbering, dissertation printing.
Use a clear and professional font. Some examples include Verdana, Times New Roman, and Calibri (which is the default font in Microsoft Word). Font size is best set to 10 or 11.
In scientific articles and theses, a line spacing of 1.15 or 1.5 is generally preferred, as it makes the document more readable and enables your supervisor to post comments between the lines of text.
Prevent plagiarism. Run a free check.
With tables, the number and title should be placed above; with figures and all other illustrations, the number and title should be placed below.
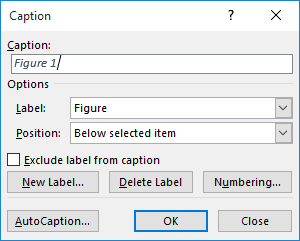
Microsoft Word has a feature that can help you to automatically place these numbers and titles in the correct position. Select the graphic, right-click, and choose “Insert Caption…” In the dialogue box that appears, specify whether it is a table or figure and enter a title. Once you click “Okay,” the number and the title will be generated in the right place.
Another advantage of using this Word feature to label your graphics is that you will later be able to generate lists of tables and figures with a push of a button.
Different heading styles are frequently used to help the reader differentiate between chapters, sections, and subsections of your dissertation. For instance, you may choose to bold all chapter headings but to italicize all lower-level headings.
Once you decide on the scheme you will use, it is important that you apply it consistently throughout your entire dissertation. Using the “Styles” feature of Microsoft Word can be very helpful in this regard. After you have created a heading, just highlight it and select a style (such as Heading 1 or Heading 2) from the home tool bar. Keeping a list may help you keep track of what style to use when.
Citing sources in a correct and appropriate manner is crucial in a dissertation, as failing to do so can make you guilty of plagiarism . It is important that these references follow certain standards.
The APA standard is most commonly used. After realizing how difficult it is to create correctly formatted citations manually, we developed the APA Citation Generator to assist you. You can use this free and simple tool to easily generate citations that follow the official APA style.
We also recommend that you use a plagiarism scanner to check for unintended plagiarism.
Receive feedback on language, structure, and formatting
Professional editors proofread and edit your paper by focusing on:
- Academic style
- Vague sentences
- Style consistency
See an example

Using the “Show paragraph marks” feature can help you to avoid this scenario. To turn it on, click on the paragraph symbol in your home tool bar (as shown in the above illustration). A black paragraph symbol will then be shown after every paragraph and “hard return” in your document, which allows you to see how the layout is constructed.
This can be very helpful when you are trying to determine the cause of mysterious jumps and other problems.
Headers and footers can give your dissertation a very professional look. They also make it immediately clear to readers what document is before them.
A header or footer can be added by double-clicking respectively at the top or bottom of a page in your document. There are generally no firm rules about what you must include; the following are common choices:
- The name/logo of your home educational institution
- The name/logo of the company or organization where you completed a placement
- The title of your dissertation (which may be shortened if necessary)
- Page numbers
Page numbers are commonly placed in the lower right-hand corner of the page. They can easily be added by simply creating a footer. Bear in mind that a page number is usually not included on the title page of a dissertation.
- To ensure that the page numbering doesn’t start on the cover page, but the numbering begins on page 1, place the cursor on the bottom of the page where you want to start with page numbering (if you want to start on page 2, click at the bottom of the first page).
- Next go to “Page layout” and then “Breaks”. Next, choose the submenu “Next page”.
- Switch to the side, where the numbering should begin (in this case, page 2). In the edit mode of the header or footer, choose “link to previous”, after that click on “Move to footer” and click on the “Link to previous” again.
- Now, to add a page number, click on the “Insert” tab, then on the “Header and footer” group, and then click “Page number”. Now you can also choose where the page number should be (top of the page, bottom of the page or page margins) and you can choose a design.
- Finally select the option “format page number” and enter the page numbers, in what page you want the numbering to begin. After you have pressed “ok”, the page number then begins with the number from the previously selected break.
A clear and well-presented title page is a nice finishing touch for your dissertation. Certain information should be included here by default. We have prepared a separate article on title pages that includes a handy checklist you can use to make sure you don’t forget anything.
Always make sure that everything in your dissertation is in the correct order and placed in the appropriate chapter. More information on how to put your document together can be found in our article on structure a dissertation .
If you are interested in seeing how other students have tackled preparing their theses, you may find it useful to check out these dissertation examples .
The last step is usually to prepare a hardcopy of your final document. There are many issues to think about, such as whether you will make it single- or double-sided.
Before you print, however, we recommend that you check one last time that your document meets all of the below requirements!
Cite this Scribbr article
If you want to cite this source, you can copy and paste the citation or click the “Cite this Scribbr article” button to automatically add the citation to our free Citation Generator.
Driessen, K. (2019, February 20). Dissertation layout and formatting. Scribbr. Retrieved August 5, 2024, from https://www.scribbr.com/tips/dissertation-layout-and-formatting/
Is this article helpful?

Koen Driessen
"i thought ai proofreading was useless but..".
I've been using Scribbr for years now and I know it's a service that won't disappoint. It does a good job spotting mistakes”

Formatting Your Dissertation: 8 Helpful Tips for a Polished Presentation
Formatting your dissertation is an important aspect of perfecting your dissertation writing. This blog will provide you with the important technical knowledge that you need to format your dissertation. Even though most of the formatting requirements are decided by the style guide (such as APA or MLA citation style) that you follow for your dissertation, there are certain common formatting options followed by all of them.
Knowing the dissertation tips and tricks will better equip you for easily formatting your dissertation. These are the most important formatting tips you need to know if you are working on a Word document.
Table of Contents
Here are 8 valuable tips for effectively formatting your dissertation, 1. font, font size, and line and paragraph spacing.
These are the basic formatting features that you need to decide on before starting your dissertation . Most style guides require you to use some clear font throughout your dissertation. Times New Roman, Calibri, and Verdana are the commonly used fonts, while 11 or 12 are the commonly used font sizes.
When it comes to scientific dissertations, a line spacing of 1.15 or 1.5 is usually preferred, while a line spacing of 2 is prescribed for papers in the field of humanities. Paragraph spacing is used to space out one paragraph from another or one paragraph from a new title.
2. Familiarizing yourself with the styles feature in MS Word
Use styles feature in MS Word: If you are working on a dissertation, you will probably end up working on more than one word file. The styles feature would help you set the formatting you have done for one file to be reproduced in another, especially if you are writing different chapters of your dissertation in different word files and combining them only at the end.
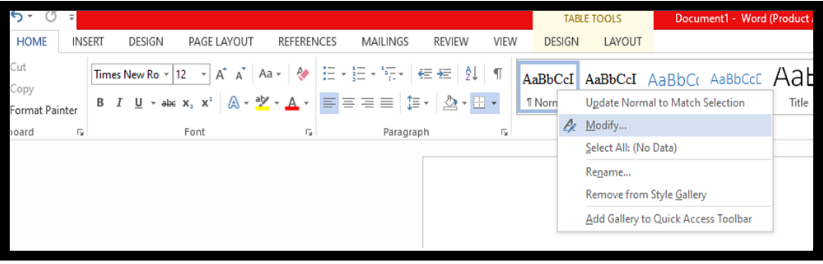
For example, if you need Times New Roman and font 12 with a certain paragraph spacing in every word file you open in the future, you can make those the default by going to Home and modifying the Normal style template of your current word document. After choosing the formatting options, you can select the “New documents based on this template” feature if you want it repeated in new documents.

3. Creating a Table of Contents
If you are working on your dissertation , this is one of the most important formatting tricks you need to know. MS Word allows you to create an automatic table, instead of making one manually. Making a table manually is not only a lot of work, but it will also require you to update it every time one of the headings shifts to another page, or if page numbers change as you work further. Therefore, it is important to know how to create an automatic table in MS Word.
First, you have to format your document with the Styles option in MS Word. Then, change the main headings (The names of Chapters, Acknowledgements, References, etc.) to Heading 1. The subheading and the sub-sub headings can be changed to Heading 2, Heading 3, etc. If these have different default styles, go to the modify option and apply the preferred font and font size options for each heading.

After you have made these format changes, go to the “References” tab and select the “Table of Contents” option from there. The table will be created automatically as Word can now understand which are your main headings and subheadings.
4. Using the Split View feature
These options are extremely useful when you are in the process of writing your dissertation. The split view helps you refer to two portions of your document at once. For example, if you want to refer to some points you wrote in Chapter 2 while writing the following chapter, you can use a split screen instead of scrolling back and forth.
To use a split screen, you can click on the “Split” option on the “View tab” of the MS Word. Or, to use the shortcut, you can press Ctrl+Alt+S. You can press the three keys again to disable the feature.

5. Using the Split Screen feature
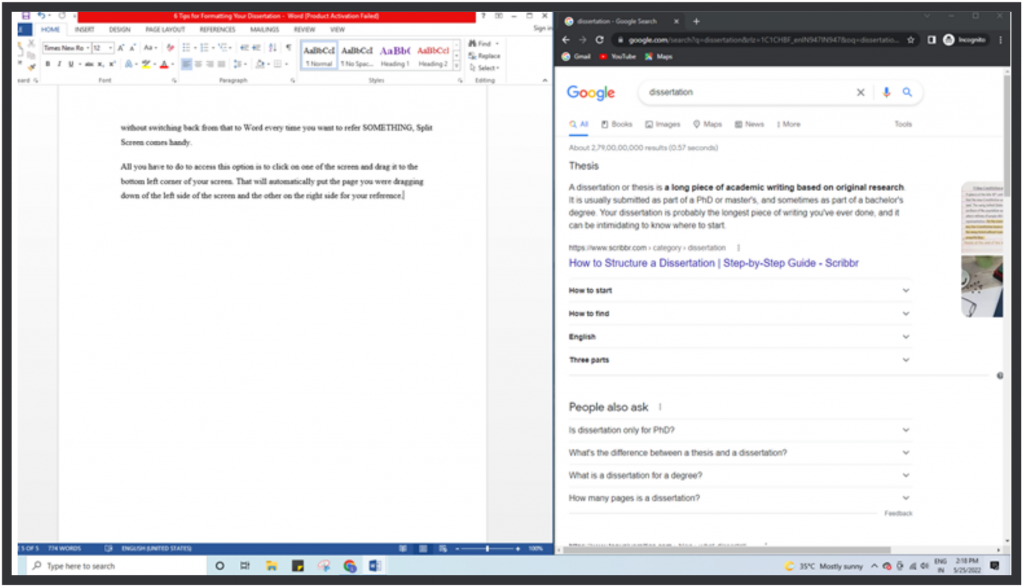
If you are a researcher, there is a chance that you might already be familiar with this feature. Split screens enable you to have two different screens at once in front of you. For example, if you are writing on your word document, but you want another page to be open next to you, without switching back from that to Word every time you want to refer to something, Split Screen comes in handy.
All you have to do to access this option is to click on one of the screens and drag it to the bottom left corner of your screen. That will automatically put the page you were dragging down to the left side of the screen and the other on the right side for your reference.
6. Page numbering
Numbering the pages of your MS Word document can be challenging, especially in consideration with the page number formatting requirements of most style guides for dissertations. For example, most of the time, the page numbers don’t start from the first page of your document.
The page break option is used to start numbering your pages from any section you want the numbers to begin from. If you have to start numbering your page after the title page, you will have to put a page break by the end of the title page. For this go to the “Page layout” option and choose “Breaks” and the submenu, “Next Page”.
After this, you have to go to the page where you want the page number to begin and in the edit mode of the header or the footer, click on the “link to previous” option. After this, be on the page where you want the page numbers to begin, and select the page number option as you would do normally.
7. Referencing
Citing sources in the right way is an important part of any dissertation . It is important to be thorough with the citation style you are going to use for your dissertation before you start writing. Check the formatting requirements for the in-text citations, such as whether there is a comma used between the author(s) names and the year of publishing, the formatting requirements of block quotations, footnotes, etc.
When you create a References heading, make sure it complies with the rest of the formatting requirements of the document. Check if each entry in the reference needs to be indented after the first line (as it is followed in the APA style guide) or not.
8. Understanding Track feature in Word
This is a handy feature to know if you are collaborating with others while working on your dissertation. For example, you may want another person to go through your document and leave comments or feedback to help you better your dissertation. This person could be your colleague, supervisor, editor, or another author you are working with.
Track feature enables you to see the changes another person has made to your original document and allows you to accept or reject those changes. To make sure you can see all the changes another person has made to your document, go to the “Review” tab, and choose “Lock tracking” from the drop-down menu of ‘Track Changes”.

Let’s Sum Up
Every researcher needs to know the tricks and tips of formatting to not end up sweating too much over certain Word functionalities. These formatting tips provided above are based on the common formatting requirements one needs to know while working on a dissertation. Dissertation formatting won’t be as daunting if you keep these in mind. Good luck, you!
-Lily Brooke
Leave a Comment Cancel reply
Save my name, email, and website in this browser for the next time I comment.
- KU Libraries
- Subject & Course Guides
- KU Thesis and Dissertation Formatting
- Fonts and Spacing
KU Thesis and Dissertation Formatting: Fonts and Spacing
- Formatting Specifics
- Title and Acceptance Pages
- Page Numbering
- Table of Contents
- List of Figures
- Rotating Charts or Tables
- Working with Footnotes
- Converting to PDF
- Embedding Fonts
- Completed KU Dissertations & Theses
- About: Survey of Earned Doctorates
- Copyright and ETD Release Form
- Resources for KUMC Students
- Thesis/Dissertation Filenames
- LaTeX/BibTeX Support
Office of Graduate Studies Thesis and Dissertation Formatting Guidelines
These rules are taken from the KU Office of Graduate Studies Thesis or Dissertation Formatting Guidelines. To see the full thesis or dissertation formatting requirements, visit https://graduate.ku.edu/submitting
- Students should use the same font size (11- or 12-point) and style (typically Times New Roman) through the thesis, including labels and references.
- Tables, captions, and footnotes should use the same font style but may be smaller in size (usually 10-point).
- Chapter and section headings may be bold and no more than 2 points larger than the text size.
- Non-standard typefaces, such as script, are generally not acceptable except for commonly used symbols.
- The Office of Graduate Studies recommends that students get their font choice approved by their department and their graduate division before the thesis defense.
- Lettering and symbols in tables and figures should be no less than 10 points.
- Normally theses and dissertations use double-spaced formatting.
- Single-spaced formatting is acceptable in the table of contents, footnotes, end notes, charts, graphs, tables, block quotations, captions, glossary, appendices and bibliography.
- Students may use singe- or one-and-a-half-spacing for the body of the text with prior written approval of their thesis committee and graduate division.
Subject Guide

- << Previous: Title and Acceptance Pages
- Next: Page Numbering >>
- Last Updated: May 9, 2024 9:48 AM
- URL: https://guides.lib.ku.edu/etd
University of South Florida
Office of Graduate Studies
Main navigation, line spacing.
The majority of your thesis/dissertation should be double-spaced. There are sections, however, that can and/or must be single-spaced.
Double-Spaced:
- Acknowledgments
- Body of Manuscript
Single-Spaced:
- Title Page (see Example for specific manually input spaces)
- Table of Contents (an extra space is added before each level one heading)
- List of Tables (an extra space is added before each new Table)
- List of Figures (an extra space is added before each new Figure)
- List of Abbreviations (an extra space is added before each new Abbreviation)
- Footnotes (no double-spaced elements)
- Long (Block) Quotations
- Figure captions
- Table captions
- Tables, Lists, Graphs
- Lists in the Appendices
Common Issues with Single-Spacing
Using the Template to create a Table of Contents (TOC) in Word always results in issues with the line spacing. For this reason, create the TOC manually.

Manual Double-Spacing
For the sections that should be single-spaced, where indicated, add a manual double-space by hitting the enter/return key once.
Don't worry if this all seems complicated - in the Section-Specific Formatting Guidelines, we note the line spacing needed for each section.
Paragraph Button
Turn on the Paragraph button to view spaces, tabs, and hidden formatting details about the manuscript.

A step-by-step guide for creating and formatting APA Style student papers
The start of the semester is the perfect time to learn how to create and format APA Style student papers. This article walks through the formatting steps needed to create an APA Style student paper, starting with a basic setup that applies to the entire paper (margins, font, line spacing, paragraph alignment and indentation, and page headers). It then covers formatting for the major sections of a student paper: the title page, the text, tables and figures, and the reference list. Finally, it concludes by describing how to organize student papers and ways to improve their quality and presentation.
The guidelines for student paper setup are described and shown using annotated diagrams in the Student Paper Setup Guide (PDF, 3.40MB) and the A Step-by-Step Guide to APA Style Student Papers webinar . Chapter 1 of the Concise Guide to APA Style and Chapter 2 of the Publication Manual of the American Psychological Association describe the elements, format, and organization for student papers. Tables and figures are covered in Chapter 7 of both books. Information on paper format and tables and figures and a full sample student paper are also available on the APA Style website.
Basic setup
The guidelines for basic setup apply to the entire paper. Perform these steps when you first open your document, and then you do not have to worry about them again while writing your paper. Because these are general aspects of paper formatting, they apply to all APA Style papers, student or professional. Students should always check with their assigning instructor or institution for specific guidelines for their papers, which may be different than or in addition to APA Style guidelines.
Seventh edition APA Style was designed with modern word-processing programs in mind. Most default settings in programs such as Academic Writer, Microsoft Word, and Google Docs already comply with APA Style. This means that, for most paper elements, you do not have to make any changes to the default settings of your word-processing program. However, you may need to make a few adjustments before you begin writing.
Use 1-in. margins on all sides of the page (top, bottom, left, and right). This is usually how papers are automatically set.
Use a legible font. The default font of your word-processing program is acceptable. Many sans serif and serif fonts can be used in APA Style, including 11-point Calibri, 11-point Arial, 12-point Times New Roman, and 11-point Georgia. You can also use other fonts described on the font page of the website.
Line spacing
Double-space the entire paper including the title page, block quotations, and the reference list. This is something you usually must set using the paragraph function of your word-processing program. But once you do, you will not have to change the spacing for the entirety of your paper–just double-space everything. Do not add blank lines before or after headings. Do not add extra spacing between paragraphs. For paper sections with different line spacing, see the line spacing page.
Paragraph alignment and indentation
Align all paragraphs of text in the body of your paper to the left margin. Leave the right margin ragged. Do not use full justification. Indent the first line of every paragraph of text 0.5-in. using the tab key or the paragraph-formatting function of your word-processing program. For paper sections with different alignment and indentation, see the paragraph alignment and indentation page.
Page numbers
Put a page number in the top right of every page header , including the title page, starting with page number 1. Use the automatic page-numbering function of your word-processing program to insert the page number in the top right corner; do not type the page numbers manually. The page number is the same font and font size as the text of your paper. Student papers do not require a running head on any page, unless specifically requested by the instructor.
Title page setup
Title page elements.
APA Style has two title page formats: student and professional (for details, see title page setup ). Unless instructed otherwise, students should use the student title page format and include the following elements, in the order listed, on the title page:
- Paper title.
- Name of each author (also known as the byline).
- Affiliation for each author.
- Course number and name.
- Instructor name.
- Assignment due date.
- Page number 1 in the top right corner of the page header.
The format for the byline depends on whether the paper has one author, two authors, or three or more authors.
- When the paper has one author, write the name on its own line (e.g., Jasmine C. Hernandez).
- When the paper has two authors, write the names on the same line and separate them with the word “and” (e.g., Upton J. Wang and Natalia Dominguez).
- When the paper has three or more authors, separate the names with commas and include “and” before the final author’s name (e.g., Malia Mohamed, Jaylen T. Brown, and Nia L. Ball).
Students have an academic affiliation, which identities where they studied when the paper was written. Because students working together on a paper are usually in the same class, they will have one shared affiliation. The affiliation consists of the name of the department and the name of the college or university, separated by a comma (e.g., Department of Psychology, George Mason University). The department is that of the course to which the paper is being submitted, which may be different than the department of the student’s major. Do not include the location unless it is part of the institution’s name.
Write the course number and name and the instructor name as shown on institutional materials (e.g., the syllabus). The course number and name are often separated by a colon (e.g., PST-4510: History and Systems Psychology). Write the assignment due date in the month, date, and year format used in your country (e.g., Sept. 10, 2020).
Title page line spacing
Double-space the whole title page. Place the paper title three or four lines down from the top of the page. Add an extra double-spaced blank like between the paper title and the byline. Then, list the other title page elements on separate lines, without extra lines in between.
Title page alignment
Center all title page elements (except the right-aligned page number in the header).
Title page font
Write the title page using the same font and font size as the rest of your paper. Bold the paper title. Use standard font (i.e., no bold, no italics) for all other title page elements.
Text elements
Repeat the paper title at the top of the first page of text. Begin the paper with an introduction to provide background on the topic, cite related studies, and contextualize the paper. Use descriptive headings to identify other sections as needed (e.g., Method, Results, Discussion for quantitative research papers). Sections and headings vary depending on the paper type and its complexity. Text can include tables and figures, block quotations, headings, and footnotes.
Text line spacing
Double-space all text, including headings and section labels, paragraphs of text, and block quotations.
Text alignment
Center the paper title on the first line of the text. Indent the first line of all paragraphs 0.5-in.
Left-align the text. Leave the right margin ragged.
Block quotation alignment
Indent the whole block quotation 0.5-in. from the left margin. Double-space the block quotation, the same as other body text. Find more information on the quotations page.
Use the same font throughout the entire paper. Write body text in standard (nonbold, nonitalic) font. Bold only headings and section labels. Use italics sparingly, for instance, to highlight a key term on first use (for more information, see the italics page).
Headings format
For detailed guidance on formatting headings, including headings in the introduction of a paper, see the headings page and the headings in sample papers .
- Alignment: Center Level 1 headings. Left-align Level 2 and Level 3 headings. Indent Level 4 and Level 5 headings like a regular paragraph.
- Font: Boldface all headings. Also italicize Level 3 and Level 5 headings. Create heading styles using your word-processing program (built into AcademicWriter, available for Word via the sample papers on the APA Style website).
Tables and figures setup
Tables and figures are only included in student papers if needed for the assignment. Tables and figures share the same elements and layout. See the website for sample tables and sample figures .
Table elements
Tables include the following four elements:
- Body (rows and columns)
- Note (optional if needed to explain elements in the table)
Figure elements
Figures include the following four elements:
- Image (chart, graph, etc.)
- Note (optional if needed to explain elements in the figure)
Table line spacing
Double-space the table number and title. Single-, 1.5-, or double-space the table body (adjust as needed for readability). Double-space the table note.
Figure line spacing
Double-space the figure number and title. The default settings for spacing in figure images is usually acceptable (but adjust the spacing as needed for readability). Double-space the figure note.
Table alignment
Left-align the table number and title. Center column headings. Left-align the table itself and left-align the leftmost (stub) column. Center data in the table body if it is short or left-align the data if it is long. Left-align the table note.
Figure alignment
Left-align the figure number and title. Left-align the whole figure image. The default alignment of the program in which you created your figure is usually acceptable for axis titles and data labels. Left-align the figure note.
Bold the table number. Italicize the table title. Use the same font and font size in the table body as the text of your paper. Italicize the word “Note” at the start of the table note. Write the note in the same font and font size as the text of your paper.
Figure font
Bold the figure number. Italicize the figure title. Use a sans serif font (e.g., Calibri, Arial) in the figure image in a size between 8 to 14 points. Italicize the word “Note” at the start of the figure note. Write the note in the same font and font size as the text of your paper.
Placement of tables and figures
There are two options for the placement of tables and figures in an APA Style paper. The first option is to place all tables and figures on separate pages after the reference list. The second option is to embed each table and figure within the text after its first callout. This guide describes options for the placement of tables and figures embedded in the text. If your instructor requires tables and figures to be placed at the end of the paper, see the table and figure guidelines and the sample professional paper .
Call out (mention) the table or figure in the text before embedding it (e.g., write “see Figure 1” or “Table 1 presents”). You can place the table or figure after the callout either at the bottom of the page, at the top of the next page, or by itself on the next page. Avoid placing tables and figures in the middle of the page.
Embedding at the bottom of the page
Include a callout to the table or figure in the text before that table or figure. Add a blank double-spaced line between the text and the table or figure at the bottom of the page.
Embedding at the top of the page
Include a callout to the table in the text on the previous page before that table or figure. The table or figure then appears at the top of the next page. Add a blank double-spaced line between the end of the table or figure and the text that follows.
Embedding on its own page
Embed long tables or large figures on their own page if needed. The text continues on the next page.
Reference list setup
Reference list elements.
The reference list consists of the “References” section label and the alphabetical list of references. View reference examples on the APA Style website. Consult Chapter 10 in both the Concise Guide and Publication Manual for even more examples.
Reference list line spacing
Start the reference list at the top of a new page after the text. Double-space the entire reference list (both within and between entries).
Reference list alignment
Center the “References” label. Apply a hanging indent of 0.5-in. to all reference list entries. Create the hanging indent using your word-processing program; do not manually hit the enter and tab keys.
Reference list font
Bold the “References” label at the top of the first page of references. Use italics within reference list entries on either the title (e.g., webpages, books, reports) or on the source (e.g., journal articles, edited book chapters).
Final checks
Check page order.
- Start each section on a new page.
- Arrange pages in the following order:
- Title page (page 1).
- Text (starts on page 2).
- Reference list (starts on a new page after the text).
Check headings
- Check that headings accurately reflect the content in each section.
- Start each main section with a Level 1 heading.
- Use Level 2 headings for subsections of the introduction.
- Use the same level of heading for sections of equal importance.
- Avoid having only one subsection within a section (have two or more, or none).
Check assignment instructions
- Remember that instructors’ guidelines supersede APA Style.
- Students should check their assignment guidelines or rubric for specific content to include in their papers and to make sure they are meeting assignment requirements.
Tips for better writing
- Ask for feedback on your paper from a classmate, writing center tutor, or instructor.
- Budget time to implement suggestions.
- Use spell-check and grammar-check to identify potential errors, and then manually check those flagged.
- Proofread the paper by reading it slowly and carefully aloud to yourself.
- Consult your university writing center if you need extra help.
About the author

Undergraduate student resources
- Link to facebook
- Link to linkedin
- Link to twitter
- Link to youtube
- Writing Tips
What Is Standard Line Spacing for a Formal Document?

- 3-minute read
- 20th June 2022
When you’re writing an article, essay, report, or any other formal document, formatting elements like line spacing and font size can seem inconsequential. However, it’s important to make your writing as easy to read as possible; and clear, consistent formatting will help with this. Academic journals usually have very strict formatting rules to speed up the peer review process. Your article could be instantly rejected if you ignore these rules. Similarly, you could lose marks on your assignments if you fail to follow your university’s formatting guidelines.
To make it easier for you, we’ve summarized below the line spacing rules for the most common style guides. If your institution uses a different guide than the ones listed here, be sure to check what it says about line spacing.
Line Spacing in APA
APA style was created by the American Psychological Association for its own publications. Now in its 7th edition, APA is used by many universities, publishers, and scientific journals.
Any paper written in APA style should use double line spacing throughout. This includes the abstract, reference list, and block quotes, as well as the main body of text. However, this rule is flexible when it comes to information in tables, figures, and footnotes. Here, you may use single or one-and-a-half-line spacing if you prefer, as long as the data is presented effectively.
Line Spacing in MLA
The MLA Handbook is published by the Modern Languages Association. It’s used primarily within the human sciences (e.g., economics and geography).
Like APA, MLA style calls for double line spacing throughout the document, including the Works Cited list.
Line Spacing in Chicago Style
Published by the University of Chicago Press, the Chicago Manual of Style is widely used in the humanities.
Find this useful?
Subscribe to our newsletter and get writing tips from our editors straight to your inbox.
Chicago style calls for double line spacing for the main text. However, block quotes should be formatted with single line spacing. If your document includes a bibliography or reference list, this should also have single line spacing with a blank line between each entry.
Line Spacing in MHRA
The MHRA style guide, published by the Modern Humanities Research Association, is used mostly in the humanities, especially in the UK.
MHRA style requires double line spacing throughout documents, including footnotes, endnotes, and block quotes. You should not insert any extra spaces between paragraphs. Instead, indicate a new paragraph by indenting the first line by one tab character.
Summary: Line Spacing in Formal Documents
The choice of line spacing may seem irrelevant in academic and other formal writing, but it’s essential that you follow any formatting criteria set out by your university or institution. If you’re not required to follow a specific style guide, we recommend adopting one of the above styles that aligns with your field of study.
Comprehensive formatting is one of the services you can add when you upload a document to us for proofreading . If you’re confident that your writing is already error-free, and you’d just like us to format it to your exact specifications, contact us today for a quote.
Share this article:
Post A New Comment
Got content that needs a quick turnaround? Let us polish your work. Explore our editorial business services.
5-minute read
Free Email Newsletter Template (2024)
Promoting a brand means sharing valuable insights to connect more deeply with your audience, and...
6-minute read
How to Write a Nonprofit Grant Proposal
If you’re seeking funding to support your charitable endeavors as a nonprofit organization, you’ll need...
9-minute read
How to Use Infographics to Boost Your Presentation
Is your content getting noticed? Capturing and maintaining an audience’s attention is a challenge when...
8-minute read
Why Interactive PDFs Are Better for Engagement
Are you looking to enhance engagement and captivate your audience through your professional documents? Interactive...
7-minute read
Seven Key Strategies for Voice Search Optimization
Voice search optimization is rapidly shaping the digital landscape, requiring content professionals to adapt their...
4-minute read
Five Creative Ways to Showcase Your Digital Portfolio
Are you a creative freelancer looking to make a lasting impression on potential clients or...
Make sure your writing is the best it can be with our expert English proofreading and editing.
The Graduate School
University information technology (uit), main navigation, formatting requirements: text.
- Submission Procedure
- Policies for Theses and Dissertations
- Coauthored Theses and Dissertations
- Approval Requirements
- Publication Requirements
- Copyright Page
- Statement of Thesis/Dissertation Approval
- Dedication, Frontispiece, and Epigraph
- Table of Contents and List of Figures/Tables
- Acknowledgements
General Formatting Requirements
Parts composed of related chapters, headings and subheadings, tables and figures, footnote and reference citations, appendix or appendices, references or selected bibliography.
- Documentation Styles
- Writing Styles
- Print Quality
- Accessibility in the PDF
- Electronic Version Submitted for Thesis Release
- Distribution of Theses and Dissertations
- Alternate Text
- Color Contrast
- Accessibility Issues in Table Construction
- Heading Space
- Double Space
- Single Space
- Previously Published, Accepted, and Submitted Articles as Chapters of a Dissertation
- Alternate Figure/Table Placement
The text follows the preliminary pages and is numbered with Arabic numerals. Page numbers of the text are in the upper right corner of the page centered between the top of the page and the bottom of the top margin. The number is placed so that it does not extend into the right margin. Pages with MAIN HEADINGS (the first page of chapters or main sections that are used in the place of chapters) are counted in sequence with the rest of the text (beginning with page 1); however, no number appears on main heading pages.
The organization of the text is the responsibility of the student and the supervisory committee and varies by discipline and subject. The text must be well organized and must adhere to standards in the student’s field. The text may begin with a separate introduction, or the introduction may form all or a portion of the first chapter or main section.
It is the student’s responsibility to ensure that all language used follows Standard American English grammar and punctuation rules (some exceptions may apply for creative works). Manuscripts submitted with extensive grammar and punctuation deficiencies will be returned unprocessed. Please use Grammarly on your Thesis or Dissertation prior to submitting it to the Thesis Office for review . Using Grammarly can speed up the approval of your manuscript and make the Thesis Release process smoother and more efficient.
Text may be divided into chapters, numbered with Roman or Arabic numerals (but not both), each chapter having its own title. Another option is to divide the text into main sections. If this option is chosen, the section divisions may or may not be numbered. For example, if the text is divided into INTRODUCTION, REVIEW OF LITERATURE, METHODS, RESULTS, and DISCUSSION (or other similar divisions), the INTRODUCTION may be assigned the number “1” and other sections numbered sequentially or only the word INTRODUCTION may stand as the section title. Note that such section titles are in all capital letters. See Figure 2.8.
The heading of each chapter or main section (e.g., CHAPTER 1, CHAPTER 2, INTRODUCTION) is placed 2 inches from the top of the page in all capital letters. If the word chapter is used, the title for numbered chapters appears in all capital letters a heading space below the word chapter. Following another heading space, the text begins. If chapter numbers are not used, a heading space separates the title from the first paragraph of text.
The text must be double-spaced throughout (except for entries in the table of contents, references, lists of figures and tables, and block quotes, all of which are single spaced as illustrated in this handbook). No additional space is inserted between paragraphs. All paragraphs must be uniformly indented. *Please note that some word processing software will automatically add extra space between each paragraph and care must be taken to ensure that the double spaces between paragraphs are the same size as all other double spaces within the manuscript.
For helpful hints in formatting refer to the FAQ and Student Resources on the Thesis Office website.
On rare occasions, long manuscripts may be divided into separate parts composed of related chapters. Individual parts may or may not be titled, but they must be numbered. Each part is then preceded by a part-title page (see the Appendices at the end of the handbook). The part number and title (if used) are typed in all capital letters, centered within the thesis margins and between the top and bottom margins of the page. If both part number and title are used, there is a heading space after the number and before the title. The page is counted in sequence with the rest of the manuscript, but no number appears on the page. The chapter number or title of the first titled section of the first part begins on the page following the part-title page 2 inches below the top of the page. The chapters or titled sections, if numbered, are numbered consecutively throughout the text. The numbering does not begin over with new parts. Page numbering is also consecutive.
If part-title pages are used to designate separate parts in a manuscript, they also must be used before each appendix (if used) and before the references (or selected bibliography). Format and numbering are the same as described in the preceding paragraph. When part-title pages are used with appendices and references, the title of each section is not repeated on the following page, and the text begins 1 inch from the top of the page.
If a reprint of a previously published article is incorporated as a chapter, a part-title page will precede the first page of the reprint. The chapter title is placed on the part-title page. A full credit line (stating “Reprinted with permission from” followed by the source) must be placed on the part-title page. Publishers will frequently require specific wording. See Figure 2.9 for an example.
Quotations three lines of print or fewer require double quotation marks. They also must have citation and page numbers listed for them. Quotations longer than three lines of print must be in block quote form. They are indented from the left margin the same amount that the first line of new paragraphs are indented. They may be single or double spaced. Whether double or single spaced, they are separated from the text by a double space. Quotation marks are not used with a block quotation unless quotation marks appear within the source quoted. Citation and page numbers must be listed for block quotations.
Headings establish the organization of the manuscript. There are two types of headings in any manuscript: main headings and subheadings.
Main Headings
Main headings always begin on a new page, are centered 2 inches down from the top of the page, printed in all capital letters, and used for chapters or main sections (e.g., CHAPTER 1, INTRODUCTION), the titles of the preliminary divisions of the paper (i.e., ABSTRACT, TABLE OF CONTENTS, LISTS, ACKNOWLEDGMENTS), and other major sections of the paper (APPENDIX, REFERENCES).
Main headings start 2 inches from the top of the page and are always followed by a heading space. Main headings more than two lines are always double spaced. If the main heading is preceded by the word “CHAPTER” and its numerical designation, the word “CHAPTER” and the Roman or Arabic numeral following it begin 2 inches from the top of the page. After a heading space, the title of the chapter follows. The text begins after a heading space if no subheadings are used. If a subheading follows the main heading, the text begins after a double space.
Main headings over 5 inches in length are split and placed on two or more lines so that the lines appear visually balanced.
Subheadings
Subheadings are used for divisions of the various chapters or sections of the manuscript. There are two types of subheadings: freestanding and paragraph. Freestanding subheadings are always higher in level than paragraph subheadings. See the glossary for the definitions of freestanding and paragraph subheadings.
Appearance and Order
Subheadings must be used in hierarchical order, levels cannot be skipped (e.g., a first-level subhead followed by a third-level subhead would be incorrect), they and must be used consistently throughout the manuscript. Many students use no more than one or two levels of subheadings. Some, however, require additional levels (see Figure 2.10 for a description and illustration of main headings, subheadings, and spacing). Subheadings must follow the subheading scheme as outlined in Figure 2.10. If the student wants to use paragraph subheadings, they may eliminate some of the higher levels of subheadings as long as the new scheme is done consistently throughout the manuscript.
Capitalization
Unlike main headings, subheadings are not printed in all capital letters. Either a headline style or sentence style capitalization scheme is used for subheadings. Although capitalization schemes may vary across subheading levels, within each level capitalization schemes must be consistent (e.g., all first-level subheadings could be headline style while all second-level subheadings could be sentence style).
For a subheading to end the page there must be room for the heading space, the subheading and at least two lines of text. If there is not enough room, the subheading moves to the top of the next page. This is the only time a gap is allowed in the text when it is not the end of a chapter or before an equation too long to fit at the bottom of a page.
Freestanding subheadings (i.e., all subheadings except paragraph headings) are preceded by a heading space and followed by a double space. Two or more freestanding subheadings in a row are separated only by a double space. Paragraph subheadings are preceded by a double space only and are indented the same amount as the regular paragraphs in the manuscript. (See Appendix B for a comparison of spacing requirements.) Subheadings of two or more lines are double spaced.
Heading Spaces
A heading space is a space that is larger than the double spaces used in a document. Heading spaces are used below main headings (a title in ALL CAPS) and above freestanding subheadings . Regardless of the word processing program being used to write the document, the heading spaces must be created consistently throughout the document so that they are always the same size. There are only a few instances when a heading space is not required:
- When a freestanding subheading begins the page
- Above a paragraph subheading
- When two or more subheadings are in a row (without text between). In this case, the subheadings are separated by a double space (not a heading space)
Again, all heading spaces must be the same size. Please see Figure 2.10 for an example.
In some disciplines, subheadings are numbered with a local numbering system. If this system is used, chapters or main sections must be numbered with Arabic numerals. The first subheading is then numbered 1.1 followed by the title, the second 1.1.1, and so on. If this system is used, all chapters/main sections and all levels of subheads (including paragraph subheadings) must be numbered.
Accessibility of Headings and Subheadings
In order to ensure that our publications are accessible to readers and researchers who are visually impaired, headings and subheadings must be tagged or styled as headings so that screen reading software can distinguish the headings and subheadings from the rest of the text of the manuscript. This function is built into the official Word template offered by the Thesis Office. If students wish to use a different word processing or layout program to create their manuscript, they must use the accessibility tools within the program to ensure accessibility.
A table is a compilation of data in columns or rows (tabular form). A figure is a visual or graphic presentation or illustration. Photographs, maps, diagrams, plates, or schematic presentations all are figures. Tables and figures must be referred to by number in numerical order in the text. The expressions “the following table/figure” or “the table/figure below” or “see the table/figure on p.##” may not be used. It is incorrect to refer to the placement of a table or figure in a manuscript.
Accessibility Issues for Figure and Tables
It is necessary to create tables and figures that are accessible to readers who are visually impaired. Print within a figure must be sharp and legible. Figure captions and table titles should be coded in such a way that a screen reader parsing the converted PDF can distinguish the figure caption and table title from the rest of the text. The official Word template provided by the Thesis Office has this function built in. If students use a different word processing or layout program, they should utilize the accessibility tools within the program. Color should not be relied upon to convey information in a figure unless it is necessary. If color is necessary, high contrast colors must be used. Alternate text must be inserted within the manuscripts for any images and tables. Further information about color and suitable alt text for figures and tables can be found in Appendix A.
Table and figure order
The first reference to a table or figure must be in numerical order (e.g., Table 1.1, Table 1.2, Table 1.3, and so forth). Once the table/figure has been referred to, it can be mentioned again out of its numerical order (e.g., it would be perfectly appropriate at this point in the handbook to refer to Figure 2.1 because it has been mentioned previously. It is not appropriate to refer to Figure 2.13, however, because Figure 2.12 has not been mentioned yet). Each table and figure must be mentioned in the text . Each figure or table appears only once; a figure or table cannot be used twice. Refer to previous tables and/or figures if relevant.
Table and figure placement
The easiest placement of tables and figures is by type (all figures grouped together and all tables grouped together) in numerical order at the end of the chapter or main section in which they are first referenced. They appear after the first-level subheading “Figures” and/or “Tables. Whether you place figures first or tables first is at the student’s discretion but must be consistent from chapter to chapter. Each table and figure must be accompanied by a title or caption. In other words, a list of titles or captions may not be placed prior to the tables and figures, as is common in some journal submission formats.
A large table or figure is placed by itself on the page, centered within the thesis margins. Although it is not necessary for large tables or figures to be centered precisely between the top and bottom margins of the paper, tables and figures should be placed so that they look balanced on the page. If the entire caption cannot fit on the same page with its figure, create a part-title page for the caption and place the figure on the page following (see the section on Part-title pages later in this chapter, as well as Figure 2.10).
If two or more items are placed on a page, they must be separated by a space larger than a double space to separate the items visually.
When a table or figure continues to a second page, the number and the word “continued” are placed at the bottom of the figure or at the top of the table. On continued tables, column heads should also be repeated.
See Appendix D for other methods of figure and table placement.
Figure numbering and captions
All figures must be numbered consecutively (1, 2, 3 . . .) throughout the manuscript and appendices or numbered locally with decimals (1.1, 1.2 . . . 3.1 . . . A.1) by chapter. If figures are numbered locally with decimals, the divisions of the manuscript must be numbered with Arabic numerals. Figures cannot be numbered by subsection (within subheadings). The number and caption are placed below the figure within the thesis margins (note that this is different from tables, where the title is placed above). In the case of long captions or captions for figures with parts, the first sentence needs to be a general caption that describes the whole figure. Subsequent sentences explain the individual parts. The first sentence of the caption appears in the list of figures, if used. Parts must be labeled (a, b, c, d). Figure captions must be in one consistent format throughout the manuscript. All captions for figures should be single spaced. If there are super- or subscript numbers in the figure captions, however, lines may be double spaced. All figure captions must be in the same font style and size as the text. Figures should not be enclosed in thick-lined boxes if they can be avoided.
Table numbering and titles
Tables also are numbered consecutively (1, 2, 3 . . .) throughout the manuscript and appendices or numbered locally with decimals (1.1, 1.2 . . . 3.1 . . . A.1) by chapter or numbered section. Tables cannot be numbered by subsection (within subheadings). The number and title of each table is placed above the table (note that this is different from figures, where the caption is below). Table titles may be double- or single-spaced, but the spacing should be consistent throughout the manuscript. One consistent format must be used throughout. All table titles must be in the same font style and size as the text. Table titles are separated from the table by a double space. Regardless of the style guide selected, there are solid, horizontal lines spanning the data presented, below the title, after the column headings, and at the end of the table. Generally, vertical lines are not necessary in a table. Tables should not be enclosed in thick-lined boxes. Spacing between entries in a table is dependent on the best method of presenting the material. When a table continues to a second page, the table number and the word “continued” are placed above repeated column headers before the table continues. While text within the table may be in a different font or font size than the rest of the text in the manuscript, print within a table must be crisp and legible regardless of size. To increase accessibility, color should not be relied upon to convey meaning in a table (see Appendix A for more information).
Local numbering
If tables and figures are numbered locally with decimals (i.e., within each chapter or main section), the first table or figure within the first main heading is given the number 1.1, the second 1.2, and so on. If local numbering is used for figures, it also is used for tables. If local numbering is used, the main divisions of the manuscript must be numbered with Arabic (1, 2, 3) numerals. Tables or figures in the appendices of a manuscript numbered locally are numbered A.1, A.2, B.1 and so on. Local numbering of tables and figures never exceeds one decimal place (i.e., tables and figures are never numbered according to the number assigned to a subheading).
Landscape (broadside) placement
Tables and figures may be placed on landscape-oriented pages to better accommodate width. If the title or caption to a full-page landscaped table or figure is on a separate page, however, the title or caption is placed on a portrait-oriented page.
Page number placement
Page numbers are placed in the upper right corner on all pages with figures or tables. Page numbers throughout should be placed in the same position.
Tables and figures may be reduced to fit within the thesis margins, but the title or caption must be the same size print as the rest of the manuscript. Print size in a reduced table or figure must be crisp and legible.
Oversize tables and figures
Oversize tables and figures can be reproduced electronically, but the print may not be readable. Therefore, two hard copies of any oversize table or figure are required: one to be submitted to the Thesis Office to be forwarded to Special Collections in the Marriott Library and one students submit to their department.
Part-title pages
A long table title or a long figure caption may be placed on a part-title page preceding the item if the table or figure is so large that the caption or title cannot be accommodated on the page. When a part-title page is used, the caption or title begins at or slightly above mid-page (depending on length) and is single spaced. (The caption or title may be double spaced if there are super- or subscript numbers within.)
If part-title pages are used for titles or captions, the pages are counted and numbered in sequence with the manuscript. Page numbers appear in the upper right corner in the same position as page numbers in the text. The page number that is listed in the List of Tables or List of Figures is the number of the part-title page.
Format of display equations is dictated by the style guide the student is following. Short equations are centered within the thesis margins. All equations are set off from preceding and following text by a double space.
In general, equations that are numbered should be numbered at the right margin of the manuscript with the number either in brackets or parentheses. Equations may be numbered consecutively or locally with decimals. If they are locally numbered, the main divisions of the manuscript must be numbered with Arabic numerals. Local numbering of equations never exceeds one decimal place (i.e., equations are never numbered according to the number assigned to a subheading). Equation numbers must be aligned with each other throughout the manuscript.
Whether a student uses a footnote or a reference citation system depends upon the discipline. The format of footnotes or reference citations should adhere to the format specified in the department-approved style manual the student has selected. Footnotes must adhere to the same margins as the rest of the text. Font should be a minimum of 2 millimeters.
If a number reference citation system is employed, numbers in the text may be superscript, in brackets, or in parentheses on the line of text depending on the style guide used. Superscript numbers always are placed outside all punctuation marks; if more than one reference is cited at a time, the numbers are separated by commas (e.g., many 6,7,10−12 agree with the findings of Einstein. 4). Numbers in brackets or parentheses on the line of text are placed inside or outside punctuation depending on the style guide followed. A comprehensive reference list in numerical order is placed at the end of the manuscript or, in cases where the manuscript is comprised of journal articles as chapters, at the end of each chapter.
Note that the Latin term “et al.” stands for “et alii” (and others). “Et” is not an abbreviation; it is never followed by a period. “Al.,” however, is an abbreviation and is followed by a period. The style guide dictates whether “et al.” is italicized.
Spacing of footnotes and endnotes
Whether footnotes appear at the foot of the pages on which they occur or as notes at the end of each chapter or main section (endnotes), they must be single-spaced within each entry with a double space between entries. If print quality is clear, the footnote entries may be single spaced rather than separated by a double space. The choice of spacing must be consistent from chapter to chapter. Notes at the end of each chapter begin with a new page of text. The word “Notes” or “Endnotes” should appear as a first- level subheading on the page listing them. Entries are single spaced and there is a double space between entries. Notes are not placed at the end of the manuscript; they are more accessible at the end of each chapter or at the foot of the page. In case of error, many notes would have to be renumbered if all were placed at the end of the manuscript. Notes (endnotes) must be listed in the table of contents as a first-level subheading.
Placement of footnotes
Footnotes placed at the bottom of the page appear in numerical order. If multiple references occur on the same page of text, all the notes referred to must begin on the same page as the reference. In the case of lengthy footnotes, what will not fit above the bottom 1-inch margin should be carried over to the area reserved for footnotes on the following page.
Footnotes are separated from the text by a solid 20-space line. This line does not extend into the left margin. The first line of the note begins a double space below the solid line and is indented using the same size indent as used in the text. The numeral is raised above the line and the note is not followed by a period or a space before the note begins (see example at foot of page). 1 Multiple footnote entries have no space between lines, with a double or single between entries (see example at the foot of the page). 2
If used, an appendix follows the text but precedes the references or bibliography. The pages of the appendix are numbered consecutively with the rest of the text. There is considerable flexibility in the kind of material that may be placed in appendices: computer programs, tables of raw data, questionnaires, letters, original historical source material, etc. Each appendix should be sequenced with upper-case letters of the alphabet (APPENDIX A, APPENDIX B). If there is only one appendix, no letter is used; one appendix may or may not have an explanatory title. If there is more than one appendix, each has an explanatory title. The appendix title(s) must be listed in the table of contents in all upper-case letters. Subheadings in an appendix, however, are not listed in the table of contents. Subheads in an appendix follow the same subhead scheme selected for the main text.
1 Footnote sample. Note the font style is the same as the rest of the text. The size of the font may be the same size as the text or smaller, so long as it is consistent for all the footnotes.
2 Footnote sample. Style guide used determines whether the footnote is inside or outside punctuation such as periods, commas, etc.
The enumeration of any illustrative material (tables, figures, etc.) in the appendix is continuous with the text (e.g., if Table 20 is the last table in the text, the first table in the appendix is Table 21). Or if illustrative materials are locally numbered by chapter or section, the tables, figures, and so forth in the appendix are also locally numbered (e.g., Table A.1 for Appendix A, Table B.1 for Appendix B, etc.). The format and type font used in the appendix must be consistent with the rest of the manuscript. Exceptions are computer programs, reproduced documents, or similar items. Consult with the manuscript editor if there are questions concerning appendix materials.
Material in the appendix must adhere to the same margin specifications and print size specifications (characters may be no smaller than 2 millimeters) as the rest of the manuscript.
A separate page for the title of each appendix (i.e., part-title page) is often used when diverse, previously printed materials (e.g., computer printouts, letters used in questionnaire surveys, questionnaires, etc.) are included. If a part-title page is used with one appendix, part-title pages must be used with all appendices. The first line of the title (e.g., APPENDIX A) is centered within the left and right thesis margins and begins either at mid-page or 2 inches from the top of the page in the same spot as the chapter headings or section titles; the choice of placement must be the same for each appendix. The title of the appendix (e.g., QUESTIONNAIRES) follows below a heading space and is centered within the thesis margins. The part-title page is counted in sequence with the rest of the manuscript, but no number appears on the page. The part-title page is considered the first page of the appendix for the purposes of the table of contents (see appendices herein).
Sometimes students will have large tables or data sets or large numbers of schemes that they want to include as supplementary information, but which are not necessary for inclusion in the main text and increase the length of the manuscript. These appendices can be uploaded directly to ProQuest after the rest of the manuscript is processed through the Thesis Office. In these instances, a part-title page is added to the manuscript as an appendix that lists the titles and file names of the appendices that will be uploaded as supplementary files to ProQuest. Consult with the manuscript editors if you are in doubt about whether something should be included in the final manuscript or as a supplementary file uploaded directly.
Some departments require submission of a DVD. DVDs may not be submitted electronically because of copyright issues. However, students in departments with this requirement must submit two DVDs: one to the Thesis Office to be forwarded to Special Collections in the Marriott Library and one the students submit to their department.
The style of the references or selected bibliography must be patterned after the department-approved style guide the student has selected from the list of department- approved journals and manuals of style on the Thesis Office website (see also Chapter 3 herein). Please note that reference management software, such as EndNote, do not necessarily follow the chosen style guide correctly. It is the students’ responsibility to make sure that all references are correct according to their selected style guides.
The list of references is placed at the end of the manuscript in numerical or alphabetical order depending upon the system used. Scientific papers usually do not list any material in the references that has not been referenced in the text. The reference section is generally entitled “REFERENCES,” or less commonly, “LITERATURE CITED.” The references must be placed at the end of each chapter or section in manuscripts composed of a series of articles previously published or accepted for publication. In this case, the subtitle “references” is treated as a first-level subheading.
Writers in the humanities often consult background material that is not directly cited but is included in a bibliography. The compilation of direct and indirect reference material is entitled “SELECTED BIBLIOGRAPHY.”
The first page of the references or selected bibliography begins 2 inches from the top of the page with the main heading typed in all capital letters. A heading space follows. Entries are single spaced within an entry and double spaced between each entry. The reference section is listed as the last item in the table of contents (unless a vita is used).
If a separate part-title page is used with the reference section, the first reference begins 1 inch below the top of the page and no major heading is used on the page with the references (see “Parts Composed of Related Chapters”).
Citation of Web-accessed Information
Web citations must include name of author, title of publication, and date of publication. These items are formatted according to the style guide selected. In addition, the Uniform Resource Locator (URL) must be provided in the following form:
- protocol or access-mode identifier (i.e., http, https), followed by a colon and two forward slashes (e.g., http://)
- host name, always typed in lower case (e.g., http://www.ieee.org)
- pathway to the document, including file names, typed exactly as it appears, including upper and lower case and punctuation
- A sample URL is: http://www.ieee.org/Policy/Submis/Abstract/pabs587.cfm
URLs may be broken only after a slash or double slash or after a period. Never insert a hyphen, and never break a URL at a hyphen.
A vita may be included but is not required. If used, it follows the references or selected bibliography and is listed in the table of contents as the last main heading of the manuscript. The author should use a standard short curriculum vita format that includes professionally relevant information such as name, colleges and universities attended, degrees and certificates, professional organizations, positions held, and publications. Do not include personal information such as birthdate, home address, or social security number.
Note that the spelling of the title of this section may be VITA or CURRICULUM VITA. Vitae is incorrect.
TAFT COLLEGE
MLA Style Guide, 9th Edition: Formatting Your MLA Paper
- Works Cited entries: What to Include
- Title of source
- Title of container
- Other contributors
- Publication date
- Optional Elements
- Book with Personal Author(s)
- Book with Editor(s)
- Book with Organization as Author
- Parts of Books
- Government Publication
- Journal Article
- Magazine Article
- Multivolume Works
- Newspaper Article
- Other Formats
- Websites, Social Media, and Email
- Works Cited Practice
- About In-text Citations
- In-text Examples
- How to Paraphrase and Quote
- Formatting Your MLA Paper
- Formatting Your Works Cited List
- MLA Annotated Bibliography
MLA recommends using 12-point Times New Roman font or another readable typeface (e.g. serif ).
Use double-spacing throughout the entire paper.
Leave 1 inch margins on the top, bottom, and each side.
Indent the first line of each paragraph half an inch from the left margin.
Quotes longer than 4 lines should be written as a block of text a half an inch from the left margin.
Heading and Title
An MLA research paper does not need a title page, but your instructor may require one. If no instructions are given, follow the MLA guidelines below:
Type the following one inch from the top of the first page, flush with the left margin (double spacing throughout).
Your Instructor's Name
Course Number or Name
Center the title on the next line. Follow the rules for capitalization. Do not italicize, underline, or bold the title. An exception is when your title includes a title. Example: The Attitude toward Violence in A Clockwork Orange
Indent the next line and begin typing your text.
Include your last name and page numbers in the upper right-hand corner of every page. The page numbers will be one-half inch from the top and flush with the right margin. If your instructor prefers no page number on the first page, begin numbering from 2 on the second page.
Formatting first page MLA MS Word using a MAC
Formatting first page mla goggle.dox, formatting first page mla ms word using pc, mla format setup in word 2013.
The links below provide step by step instructions on setting up your paper using MLA Style guidelines.
- Formatting Your Paper using MS Word - PC
- Formatting Your Paper using MS Word - MAC
Sample MLA Paper
- MLA Research Paper Template Properly formatted MLA Style research paper. Download and save to your computer so that you will always have the correct format for writing.

There are three sample papers available in the MLA Style Center. Check them out to see the correct formatting.
- << Previous: How to Paraphrase and Quote
- Next: Formatting Your Works Cited List >>
- Last Updated: Mar 24, 2022 5:10 PM
- URL: https://lib.taftcollege.edu/c.php?g=628017
Guidelines for the General Format of a Ph.D. Thesis
The production of a thesis should follow the following guidelines. For further details, or in case of uncertainty, please refer to the administrative assistant who organizes the defence. Researchers should send the thesis as one PDF file .
General format and layout
Page format Use the standard A4 format and set the same margins all around (e.g. 2.5 cm, top/bottom, right/left). Remember that the thesis will be printed and boud and that margins should thus be large enough
Text size and line spacing The text should be in 11 or 12 point character and 1.5 spaced lines. Footnotes should be in 10 point character and single spaced lines. Text and footnotes should be justified
Font Choose a commonly used font that provides a full character set, for example Arial or Times (especially when using languages other than English)
Tables & pictures Insert tables, graphs and other images directly where they belong in the text. Should it be necessary to introduce coloured pictures, contact the organizing admin. assistant. Tables should always be on one page: never divide a table between different pages. Do not use colours in tables or graphs: use instead bold, punctuated or dashed lines for graphical images
Pagination : The text should be paginated throughout (including notes, bibliographies, annexes). The final thesis will be printed double-sided so you must ensure that blank pages are inserted where necessary in order that new chapters, sections, bibliography etc. fall on the right hand side, on an odd-numbered page (i.e. if the last page of a chapter is 171, insert page 172 as a blank page before starting the new chapter with 173). The page numbering for the title, table of contents and acknowledgements is ususally in Roman numbers. The page numbering in Arabic letters should start with page 1 on the first page of the text. If you have an automatized Table of Contents, check carefully that it is correct, otherwise you may have to insert additional blank pages
Cover-pages The title-pages should be produced according to the rules of the Institute using a specific template: download the template cover-page for PhD theses in English , or ask the administrative assistant if the thesis is in a language other than English. It is important to respect the font type and paragraph formatting of these cover-pages. Remember that theses should be sent in as one pdf file: it is advisable to format the thesis and the title-pages independently, then transform them into pdf and merge them into a single file
Language correction Theses that have been submitted for language correction should specify this in the 'Researcher declaration to accompany the submission of written work' that is part of the cover-page template
Thesis abstract Insert the thesis summary (up to 300 words) after the 'Researcher declaration to accompany the submission of written work' and before the Table of Contents
Table of contents Use capital letters, highlighting or indenting to differentiate between main and sub-chapters. Page numbering should be always in the same size.
Acknowledgements Acknowledgements follow the Table of contents. Before writing the acknowledgements you may want to read this blogpost by Prof. Nouwen
Style-sheets It is advisable to prepare the general style-sheets and formatting of the thesis in a sample chapter and then write/insert the text into the pre-defined files. This is more consistent and makes it easier to handle the work, rather than having to format each chapter.
Note: The final title of the thesis has to be agreed upon together with the Supervisor
While proofreading the thesis, it may be useful to double-check our Brief Guide for Academic English
Page last updated on 27 July 2023

- Get started with computers
- Learn Microsoft Office
- Apply for a job
- Improve my work skills
- Design nice-looking docs
- Getting Started
- Smartphones & Tablets
- Typing Tutorial
- Online Learning
- Basic Internet Skills
- Online Safety
- Social Media
- Zoom Basics
- Google Docs
- Google Sheets
- Career Planning
- Resume Writing
- Cover Letters
- Job Search and Networking
- Business Communication
- Entrepreneurship 101
- Careers without College
- Job Hunt for Today
- 3D Printing
- Freelancing 101
- Personal Finance
- Sharing Economy
- Decision-Making
- Graphic Design
- Photography
- Image Editing
- Learning WordPress
- Language Learning
- Critical Thinking
- For Educators
- Translations
- Staff Picks
- English expand_more expand_less
Word - Line and Paragraph Spacing
Word -, line and paragraph spacing, word line and paragraph spacing.

Word: Line and Paragraph Spacing
Lesson 9: line and paragraph spacing.
/en/word/indents-and-tabs/content/
Introduction
As you design your document and make formatting decisions, you will need to consider line and paragraph spacing . You can increase spacing to improve readability and reduce it to fit more text on the page.
Optional: Download our practice document .
Watch the video below to learn how to adjust line and paragraph spacing in your document.
Line spacing
Line spacing is the space between each line in a paragraph. Word allows you to customize the line spacing to be single spaced (one line high), double spaced (two lines high), or any other amount you want. The default spacing in Word is 1.08 lines , which is slightly larger than single spaced.
In the images below, you can compare different types of line spacing. From left to right, these images show default line spacing, single spacing, and double spacing.

Line spacing is also known as leading (pronounced to rhyme with wedding ).
To format line spacing:

Adjusting line spacing
Your line spacing options aren't limited to the ones in the Line and Paragraph Spacing menu. To adjust spacing with more precision, select Line Spacing Options from the menu to access the Paragraph dialog box. You'll then have a few additional options you can use to customize spacing.
- Exactly : When you choose this option, the line spacing is measured in points , just like font size. For example, if you're using 12-point text, you could use 15-point spacing.
- At least : Like the the Exactly option, this lets you choose how many points of spacing you want. However, if you have different sizes of text on the same line, the spacing will expand to fit the larger text.

Paragraph spacing
Just as you can format spacing between lines in your document, you can adjust spacing before and after paragraphs. This is useful for separating paragraphs, headings, and subheadings.
To format paragraph spacing:
In our example, we'll increase the space before each paragraph to separate them a bit more. This will make it a little easier to read.
From the drop-down menu, you can also select Line Spacing Options to open the Paragraph dialog box. From here, you can control how much space there is before and after the paragraph.

You can use Word's convenient Set as Default feature to save all of the formatting changes you've made and automatically apply them to new documents. To learn how to do this, read our article on Changing Your Default Settings in Word .
- Open our practice document .
- Select the the date and the address block. This starts with April 13, 2016 , and ends with Trenton, NJ 08601 .
- Change the spacing before the paragraph to 12 pt and the spacing after the paragraph to 30 pt .
- Select the body of the letter. This starts with I am exceedingly and ends with your consideration .
- Change the line spacing to 1.15.

/en/word/lists/content/
COMMENTS
Footnotes. Format footnotes for your thesis or dissertation following these guidelines: Footnotes must be placed at the bottom of the page separated from the text by a solid line one to two inches long. Begin at the left page margin, directly below the solid line. Single-space footnotes that are more than one line long.
Spacing Issues on Signature Page . Highlight the text you are wanting to change then on the Home Ribbon, choose the line spacing symbol, select the desired spacing typically 1.5 for Thesis and 2.0 for Dissertations. Using the Add Space or Remove Space options as needed.
At 'Style for following paragraph', select Normal [2]. Select the same formatting that you applied previously to your Heading 1 style [3]. Click on the Format button [4] to access the Paragraph box, where you can amend paragraph 'Spacing' and 'Line spacing' as required [5].
On the first line of this section, indicate whether you are completing a thesis, project or dissertation. Section 3: Author Name(s) and Graduation Date. Insert your full name on line 2 of this section. Write your name exactly as it is written on the title page. If there are multiple authors, list each author's full name on a separate line. On the
Indent the first line of every paragraph of text 0.5 in. using the tab key or the paragraph-formatting function of your word-processing program. Page numbers: Put a page number in the top right corner of every page, including the title page or cover page, which is page 1. Student papers do not require a running head on any page.
Line Spacing. In general, double-space all parts of an APA Style paper, including the abstract; text; block quotations; table and figure numbers, titles, and notes; and reference list (including between and within entries). Do not add extra space before or after paragraphs. Exceptions to double line spacing are as follows:
The final copy of the thesis must be converted to .pdf (PDF/A format) for submission to the Library (maximum 600 mb). See the guide Saving your thesis in PDF/A format for instructions. Theses must be formatted for US Letter (8.5X11) pages. Landscape 8.5X11 and 11X17 pages are permitted. Legal, A4, or other paper sizes are not permitted.
Next go to "Page layout" and then "Breaks". Next, choose the submenu "Next page". Switch to the side, where the numbering should begin (in this case, page 2). In the edit mode of the header or footer, choose "link to previous", after that click on "Move to footer" and click on the "Link to previous" again.
Paragraph Settings box and click on the Line and Paragraph spacing icon. Select 1.5 or 2.0. General Spacing Requirements for UBC Theses: Lines of text must be 1.5 or double spaced Quotations of more than one line can be single-spaced Acknowledgements, footnotes, table, figure and illustration captions and the
When it comes to scientific dissertations, a line spacing of 1.15 or 1.5 is usually preferred, while a line spacing of 2 is prescribed for papers in the field of humanities. Paragraph spacing is used to space out one paragraph from another or one paragraph from a new title. 2. Familiarizing yourself with the styles feature in MS Word
Information for University of Kansas graduate students on required content order, page numbering, creating headings, formatting table of contents, adding captions, creating a table of figures and embedding fonts for theses and dissertations. Information about fonts and spacing for theses and dissertations.
Line Spacing. The majority of your thesis/dissertation should be double-spaced. There are sections, however, that can and/or must be single-spaced. Double-Spaced: Dedication; ... To fix this in Word, go into the Paragraph Options and change any added pt. numbers under Spacing to 0. In this example, we would change that 8 pt, to 0 pt: Manual ...
In this tutorial, we'll guide you through the process of formatting your master dissertation to meet the required academic standards. We'll cover important f...
For paper sections with different line spacing, see the line spacing page. Paragraph alignment and indentation. Align all paragraphs of text in the body of your paper to the left margin. Leave the right margin ragged. Do not use full justification. Indent the first line of every paragraph of text 0.5-in. using the tab key or the paragraph ...
Adjusting Paragraph and Line SpacingThe entire dissertation should be double spaced with no extra spac. between paragraphs or sections. If you adjust your spacing according to this tutorial before you begin typing, the. ragraph group on the Home. b.Select double spacing (2.0).If available, click "Remove space before paragraph" and .
In this video, you'll learn the basics of working with line and paragraph spacing Word 2019, Word 2016, and Office 365. Visit https://edu.gcfglobal.org/en/wo...
Line Spacing in MHRA. The MHRA style guide, published by the Modern Humanities Research Association, is used mostly in the humanities, especially in the UK. MHRA style requires double line spacing throughout documents, including footnotes, endnotes, and block quotes. You should not insert any extra spaces between paragraphs.
The text must be double-spaced throughout (except for entries in the table of contents, references, lists of figures and tables, and block quotes, all of which are single spaced as illustrated in this handbook). No additional space is inserted between paragraphs. All paragraphs must be uniformly indented.
Use double-spacing throughout the entire paper. Leave 1 inch margins on the top, bottom, and each side. Indent the first line of each paragraph half an inch from the left margin. Quotes longer than 4 lines should be written as a block of text a half an inch from the left margin. Heading and Title.
Use the standard A4 format and set the same margins all around (e.g. 2.5 cm, top/bottom, right/left). Remember that the thesis will be printed and boud and that margins should thus be large enough. Text size and line spacing. The text should be in 11 or 12 point character and 1.5 spaced lines. Footnotes should be in 10 point character and ...
Paragraphs are separated by a space equivalent to one empty line. This spacing is pre-formatted in the Normal and Body text styles. Leave a space equivalent to two empty lines at the end of a section, before the next heading.This spacing is pre-formated in the Heading 1, Heading 2 and Heading 3 styles of the template. A page should never end in ...
Optional: Download our practice document.. About line spacing. Line spacing is the space between each line in a paragraph. Microsoft Word allows you to customize the line spacing to be single spaced (one line high), double spaced (two lines high), or any other amount you want.The default spacing in Word 2013 is 1.08 lines, which is slightly larger than single spaced.
Line spacing. Line spacing is the space between each line in a paragraph. Word allows you to customize the line spacing to be single spaced (one line high), double spaced (two lines high), or any other amount you want. The default spacing in Word is 1.08 lines, which is slightly larger than single spaced.. In the images below, you can compare different types of line spacing.