MS Word Help
Tips and tricks for Microsoft Word Users
- About MS Word Help
- Make A Speech Bubble In Word
Speech bubbles are a good way to help your document deliver its message. You’d be surprised at just how easy it is to make a speech bubble in Word .
Let’s get straight to it and add one now. On the Insert tab, click Shapes (in the Illustrations group) > Oval Callout . The shapes are not visibly named, but the Oval Callout shape is in the Callouts section near the bottom.
Clicking the shape doesn’t insert it; it simply activates the tool. You still need to draw the shape on the page by clicking and dragging in your document. Once you’ve clicked and dragged, you should get something like this:
This is all well and good if you want something quick. We, on the other hand, are genteel and sophisticated. We desire a speech bubble that has a curved bit like this:
We can make that curve by manipulating the points on the shape. If you’ve used image editors like Adobe Illustrator or Fireworks, this should be a doddle. If you haven’t, don’t worry because it’s quite easy anyway.
With the speech bubble still selected, make sure you’re working on the Format tab of the Drawing Tools contextual tab (it pops up whenever a shape is selected).
Click Edit Shape (in the Insert Shapes group) > Edit Points . You’ll notice that the bounding box for the shape has gone. Each point that defines the shape is also now selectable and able to be manipulated.
Click on the point right at the bottom and drag it further down. Because this point is now selected, you should see some yellow handles that you can drag around to alter the curve of the lines coming out of that point.
Try it. Drag those handles around to get a feel for how they affect the curvature. Those handles affect the curve of the lines near the selected point. To change the curvature of a line near the point at the other end, select that point and repeat the process. This is often necessary to achieve a nice smoothe curve.
To get the following speech bubble, drag the yellow handle on the right upwards and to the right. Do the same with the yellow handle on the left.
The curve looks fine as it leaves the bottom point, but it soon goes awry further up. We can fix that by selecting the point (click on it) and then by dragging the leftmost yellow handle to the right. You can even drag the point itself over to the right to get something like this:
Categories: Uncategorized - Tags: bezier curves , curves , insert shape , speech bubble

Recent Posts
- Word 2010 AutoCorrect
- The Toolbar In Word 2010
- Soft Return In Word
- Vertical Text In Word
- Number Of Occurrences Of A Particular Word
- Changing Case In Word
- Autosave Documents In Microsoft Word
- Word Default Save Location
- Remove Borders From A Table In Word
- How To Convert Table To Text In Microsoft Word 2007
- How To Password Protect Microsoft Word 2007 document
- Insert Page Numbers In Microsoft Word 2002
- Numbered List With Only Odd Numbers
- Change Font Colour In Microsoft Word 2002
- Compatibility Mode In Word 2016
- Word 2016 AutoText
- Make Diagonal Text In Word
- Start A Numbered List With A Number Other Than One
- Insert Comments In Word
Admin Login
Powered by Catalyst
Copyright © 2015 MS Word Help
How to Create Text Bubbles in Microsoft Word: A Step-by-Step Guide
Creating text bubbles in Microsoft Word is a breeze once you get the hang of it. You’ll be using the Shapes feature, found in the Insert tab, to draw a text box and then customize it to look like a speech or thought bubble. Here’s a quick rundown: click on the Insert tab, choose a shape that resembles a bubble, draw it onto the document, and then type your text inside it. Simple, right?
After completing these steps, you’ll have a text bubble that you can resize, move around, and edit just like any other text in your Word document. Whether you’re designing a comic strip, creating a presentation, or just want to make your document more visually appealing, text bubbles can add a fun and engaging element to your work.
Introduction
Ever felt like your Word documents are a bit drab? Well, spice things up with text bubbles! They’re not just for comic books and messaging apps; text bubbles can be a creative way to highlight information or add a touch of whimsy to your projects. From presentations to newsletters, text bubbles can help bring attention to quotes, thoughts, or even instructions.
Think about it, wouldn’t it be cool to have a character “speak” a quote in your school assignment? Or maybe you’re creating a how-to guide, and you want to make it more interactive with thought bubbles that contain tips. That’s where Microsoft Word’s nifty shapes feature comes in handy. It’s not just for boring rectangles and circles; there’s a whole array of shapes that can be turned into text bubbles.
Now, before you start thinking that this is some high-tech, complicated process, let me assure you, it’s not. Anyone can create text bubbles in Word, and it’s a skill that can come in handy more often than you might think. Whether you’re a student, a teacher, a business professional, or just someone who likes to get creative with their documents, knowing how to make text bubbles is a valuable addition to your Microsoft Word toolkit. So, let’s dive in and get those bubbles popping!
Step by Step Tutorial: Creating Text Bubbles in Microsoft Word
Before we start, make sure you’ve got Microsoft Word open and a document ready to go. The steps we’ll go through will help you add some personality to your text with customizable bubbles.
Step 1: Open the Insert Tab
Click on the Insert tab at the top of the screen.
This is where all the magic begins. The Insert tab is like the entrance to a treasure trove of features that can enhance your document.
Step 2: Find and Select the Shapes Menu
Locate and click on the Shapes menu, which is usually found in the Illustrations group.
You’ll see a variety of shapes. Some look like clouds, others like callouts – these are the ones you’re looking for.
Step 3: Choose a Bubble Shape
Scroll through the options and select a shape that resembles a speech or thought bubble.
There are different styles to choose from, so go ahead and pick one that suits your needs. Remember, you can always change it later.
Step 4: Draw the Bubble on Your Document
Click and drag your mouse on the document to draw the bubble.
Don’t worry about getting it perfect the first time. You can always adjust the size and shape later.
Step 5: Type Your Text Inside the Bubble
With the bubble selected, start typing your text directly into it.
The text will adjust to fit inside the bubble. You can change the font, size, and color to make it stand out.
| Benefit | Explanation |
|---|---|
| Customization | Text bubbles in Microsoft Word are highly customizable, allowing you to change the shape, size, color, and font of the bubble and the text inside it. |
| Engagement | Adding text bubbles to your document can make it more engaging and visually appealing, which is especially useful for presentations or educational materials. |
| Emphasis | Using a text bubble can draw the reader’s attention to important information or quotes, making sure they don’t miss out on key details. |
| Drawback | Explanation |
|---|---|
| Overuse | It’s easy to get carried away and overuse text bubbles, which can make a document look cluttered and unprofessional. |
| Distraction | If not used carefully, text bubbles can distract from the main content rather than enhance it. |
| Learning Curve | For those new to Microsoft Word, there may be a bit of a learning curve in figuring out how to properly create and customize text bubbles. |
Additional Information
When creating text bubbles in Microsoft Word, there are a few extra tips and tricks that can help you take your bubbles to the next level. For example, did you know you can add effects to your text bubbles? Yes, that’s right! Word allows you to add shadows, reflections, and even 3D effects to make your bubbles pop off the page.
Another useful tip is to use text bubble shortcuts. If you find yourself using text bubbles frequently, you can save your favorite bubble shape to the Quick Access Toolbar. This means you can insert your preferred text bubble with just one click, saving you time and effort.
Remember, while text bubbles are a fun and unique way to enhance your document, they should be used sparingly and with purpose. The goal is to add value to your content, not to distract from it. So go ahead, get creative, but stay focused on your document’s overall message.
- Open the Insert tab.
- Select the Shapes menu.
- Choose a speech or thought bubble shape.
- Draw the bubble on your document.
- Type your text inside the bubble.
Frequently Asked Questions
Can i change the color of my text bubble.
Yes, you can change the color of your text bubble by selecting the bubble, clicking on the Format tab, and choosing a new color from the Shape Fill menu.
How do I resize my text bubble?
Click on the text bubble to select it, then click and drag any of the handles on the corners or sides to resize it.
Can I copy and paste my text bubble into another document?
Absolutely! Just select the text bubble, copy it, and then paste it into the other document where you want it to appear.
Is it possible to add a picture inside a text bubble?
Yes, you can insert a picture inside your text bubble. Just select the bubble, click on the Format tab, and choose the Fill option to select a picture.
Can I make my text bubble transparent?
Yes, you can adjust the transparency of your text bubble by selecting it, clicking on the Format tab, and adjusting the transparency slider in the Shape Fill menu.
Creating text bubbles in Microsoft Word is a fantastic way to add a touch of flair and emphasis to your documents. Whether you’re working on a school project, a business report, or just adding some personality to your writing, text bubbles are a versatile tool that can help your documents stand out. Remember to use them appropriately, have fun with customization, and don’t be afraid to experiment with different styles and effects to find the perfect bubble for your needs. With a little practice, you’ll be a text bubble pro in no time!

Matthew Burleigh has been writing tech tutorials since 2008. His writing has appeared on dozens of different websites and been read over 50 million times.
After receiving his Bachelor’s and Master’s degrees in Computer Science he spent several years working in IT management for small businesses. However, he now works full time writing content online and creating websites.
His main writing topics include iPhones, Microsoft Office, Google Apps, Android, and Photoshop, but he has also written about many other tech topics as well.
Read his full bio here.
Share this:
Join our free newsletter.
Featured guides and deals
You may opt out at any time. Read our Privacy Policy
Related posts:
- How to Insert Text Box in Google Docs
- How to Create a Speech Bubble in Photoshop CS5
- How to Draw in Microsoft Word 2013
- How to Remove the Bubbles From My Apple iPhone Screen: A Step-by-Step Guide
- How to Draw a Circle in Word 2010
- How to Create Bubble Letters in Microsoft Publisher: A Step-by-Step Guide
- How to Make a Shape on Microsoft Word 365: A Step-by-Step Guide
- How to Make a Microsoft Word Group of Shapes: 2024 Guide
- How to Insert a Square Root Symbol in Word
- How to Remove Section Breaks in Word Documents
- How to Make 3D Shapes With Microsoft Word: A Step-by-Step Guide
- How to Make All Columns the Same Width in Excel 2013
- How to Place Shapes in a Semi-Circle in PowerPoint: A Step-by-Step Guide
- Creating Flow Charts in Excel: A Guide to Effective Data Visualization
- How to Select All in Word for Office 365
- How to Return to Normal View in Word 2010
- How to Center Text in Word [2023 Guide]
- How to Count Characters in Microsoft Word 2013 (A Quick 3 Step Guide)
- How to Draw a Text Box in Word: A Step-by-Step Guide
- How to Make Four Frames on Microsoft Word: A Step-by-Step Guide

Word: speech bubble create how to
- Aug 02, 2024
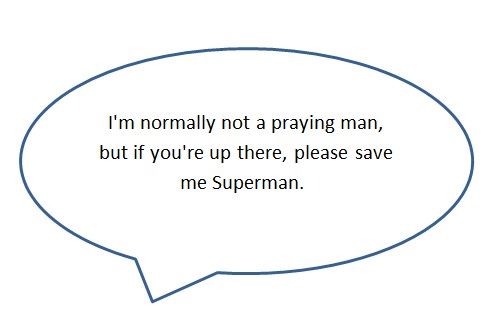
If you want to create picture stories in Word, it is to use speech bubbles. We will show you how to create this.
Speech bubbles in Word to create
- Open Word on your Computer.
- Select the Insert tab.
- Click on "forms". Under the sub-item "legends" you find bubbles has several speech variants.
- Select a speech bubble and you click on your document. The speech bubble is thus created.
- Under "type" you can fill color, and border color of the speech bubble change.
YOU MAY ALSO LIKE

Word: Vertical line - so it goes
- Sat 03, 2024

Outlook: Blocked open attachments - how to
- Wed 07, 2024
LEAVE A COMMENT
Recent posts.

Deciphering the Drive: Understanding the Psychology of Impulse Betting
Thu 08, 2024.

How to Scan to PDF on iPhone? (3 Easy Ways)

Smart Waste Management: How Technology is Revolutionizing Trash Disposal

Beginner Mistakes in the Stock Market and How to Avoid Thement
Subscribe to our newsletter to get notification about new updates, information, etc..
How to make a speech bubble on Word Online?
Speech bubbles are fun and those of you who have read a comic know how important they are. Though speech bubbles are common in comics their function is not limited. This article tutorial looks at How to make a speech bubble on Word Online. It also looks at how to add text to speech bubbles.
To insert a speech bubble into a Word online document click on the Insert tab in the top ribbon of the document. From the options select Shapes. Scroll down to the callouts section and click on the one you would like to add. Once selected simply drag and add the callout to the document.
As Word online has only basic functions and formatting options you do not have too many options when it comes to speech bubbles. Nonetheless, here is how to add a speech bubble if you are using Word online.
- Login to Word online, locate and open the document you would like to work on

- Once you have the document open click on the spot where you would like to add the speech bubble.
- Now go to the Insert tab in the top ribbon of the document
- From the options click on Drawing
You will have a popup window

- Click on Insert and then on Shapes
- You will have a drop-down menu

- You have one shape that looks like a speech bubble, click on it.
- You will then need to drag and add it to the canvas
- After you have formatted it click on Save and close in the top right
- The shape will be added to the document.
- To edit the shape double-click on it, the changes will need to be made from the drawing preview popup.
How to put text in a speech bubble in Word?
On the desktop version of Word online, you have more formatting options. Here is a step-by-step guide on how to insert a callout in Word.
- Locate and open the word document by double-clicking on it
- Scroll through the document and click where you need the speech bubble to appear. The cursor should blink at the spot

- Click on the Insert tab in the top ribbon of the document
- From the options in the tab click on Shapes. You will have a dropdown with the various shapes you can add to the document.

- Scroll down to the callouts section
- From here you can choose the shape and style you like.
To add the callout to the document you will need to click and drag after selecting the shape.
The shape, color, and other aspects of the callout can be changed at any time by clicking on it > selecting it > and then using the formatting tools.
Read How to insert a check box in Word Online?
How to add text to a speech bubble in Word?
Once you add a speech bubble to the document you can add text at any time. Not only can you add text but also format it at any time. This section looks at how to add text to a callout in Word.
- Start by clicking on the callout to select it

- After selecting the callout you can make changes to the shape or color or other aspects using the Shape format option.
- Add text to the callout by clicking
- To format text use the options in the Home tab
How to make a fillable speech bubble in Word?
You can add a speech bubble to a word document and print it without adding text. You can also add multiple speech bubbles and use it at Parties, as activities for kids, and much more. Here is how to insert a blank speech bubble into a document.
- Locate and open the Word document you would like to work on
- Move the cursor to the spot where you would like the bubble
- Click on the Insert tab
- Go to Shapes. You will have a dropdown menu.
- Scroll down to callouts
- Click on the design you like
- Drag and place it in the document.
To duplicate speech bubbles follow these steps.
- Click on the speech bubble and select it
- Use the copy option in the Home tab or use keyboard shortcuts to copy. Ctrl + C on Windows and Command + C on Mac
- Now click where you would like the second bubble
- Use the paste option in the home tab or use keyboard shortcuts. Ctrl + V on Windows and Command + V on Mac.
You can repeat this as many times as you like.
Here is how to print speech bubbles.
Once you have added speech bubbles to the document you can print them easily.
- Click on File in the top ribbon
- From the options click on Print
- Make the desired changes in the page layout or number of copies and print.
You can also use the keyboard shortcut Command + P on Mac and Ctrl + P on Windows for the print menu.
How to create speech bubbles printable pdf in Word?
Speech bubbles created in Word can easily be converted into printable PDFs. Follow these steps
- Start by creating the speech bubble and formatting it the way you need it.
- Now click on File
- You will see Save As or Save a copy.

- Change the file name
- Click on the arrow near File format

- From the options click on PDF
- Now click on Export.
The Word document will convert into a PDF. To print simply open the PDF and click on the print option.
Multiple choice bubbles in Microsoft Word?
Multiple choice bubbles or fill-in bubbles are bubbles that you can use in your Word document. Here is how you can create multiple-choice answer sheets on your Word document. You can use this method for other multiple-choice question-and-answer formats.
- Open the Word document you would like to work on
- Enter the question or questions
There are two ways you can do this using a table or without a table. Here is how to do it using a table

- Click on the Insert tab.
- Go to Table and you will have a dropdown menu. From here you can choose the number of rows and columns you would like to add.
- Once you have the table add the content
After you have added the content you can add bubbles

- Go to Shapes and you will have a drop-down menu

- Go to basic shapes and click on the circle.
As a default, the circle will come filled in. To use it as a bubble remove the existing color.

- Click on the bubble to select. Once the bubble is selected you will have the Shape Format tab.
- Go to shape fill
- From the options click on white or the color of your page

- The bubble should look like this.

To create a multiple-choice sheet you will need to copy the bubble and paste it against the other questions or answers.
This tutorial looked at how to make a speech bubble on Word Online . We went over how to use the limited formatting options in Word online to create speech bubbles. The article then looked at how to add callouts using the desktop version of Word. Finally, it explored how to add bubbles for multiple-choice questions.
You may also like the following word online tutorials:
- How to make Word Online table of contents hyperlink?
- How to change pdf to Word Online?
- How to put spacing between bullet points in Word Online?

My name is Carissa Gudino and I am an expert in word online, using Word Online in my day-to-day tasks. In this blog, I will share with you tips and tutorials on how to use word online to its fullest potential. I work for various clients in various countries like the United States, Canada, the United Kingdom, Australia, New Zealand, etc. My tutorials are designed to help beginners, as well as more experienced users, learn new tricks and tips on Microsoft word online. Check out more .
How to Create Text Bubbles in Microsoft
- Small Business
- Human Resources
- ')" data-event="social share" data-info="Pinterest" aria-label="Share on Pinterest">
- ')" data-event="social share" data-info="Reddit" aria-label="Share on Reddit">
- ')" data-event="social share" data-info="Flipboard" aria-label="Share on Flipboard">
How to Set Line Spacing in WordPad
How to merge xps documents, how to center the text in gimp.
- How to Bullet a Graph in Excel
- How to Get Rid of FFDShow
Speech bubbles or balloons are sometimes referred to as text bubbles. They are labels that display words and emotions of a character in an illustration or depict a phrase about an illustration or text. In business, text bubbles are often referred to as “callouts” as they’re used to call attention to a specific point, word or sentence, or provide instructions in documents, spreadsheets and presentations. The method to create text bubbles is similar across Microsoft Office Word, Excel and PowerPoint. It simply involves inserting a predefined bubble shape into your project and editing it as needed.
Select the “Insert” tab in your Microsoft Office application.
Click “Shapes” in the Illustrations section on the ribbon, and then locate the “Callouts” section near the end of the Shapes drop-down menu.
Select the type of text bubble you want to use, such as a “Rectangular Callout,” “Rounded Rectangular Callout,” “Oval Callout,” “Cloud Callout” or a “Line” callout option.
Position the crosshairs cursor, which appears when you select a callout, near the area where you want to create the text bubble shape.
Press the “Shift” key on your computer keyboard, and then click and drag the cursor to the right or left depending on the direction you want the bubble tail to point until the bubble is the size you want. Release the mouse key.
Roll your cursor over the bubble until it changes into the “Move” four arrows cursor, and then click and drag the text bubble to the position where you want it.
Align the tip of the tail to point at the text, illustration or section that you plan to talk about in the bubble.
Click inside the bubble and type your text. When you’re finished, reposition and edit the text the same way you would in a normal text box.
- Robin Houghton: Using Speech Bubbles to Get Your Point Across
- YouTube: Word 2010 Tutorial Inserting Shapes Microsoft Training Lesson 13.1
- YouTube: MS Excel 2010 Tutorial 6 Adding Pictures and Shapes
- YouTube: PowerPoint 2010: Inserting Shapes
- If you position a text bubble to overlap with text already on a page, the bubble will block the text. To make the bubble transparent so that the text shows through it, select the bubble shape so that the “Format” tab appears above the ribbon. Click the tab, locate the Shape Styles section, click “Shape Fill” and then select “No Fill.”
- To change the outline of the bubble to a different color or to a dashed outline, click “Shape Outline” in the Shape Styles section and select a color option, or roll your cursor over “Dashes” and select a line option.
- To narrow, widen, shorten or lengthen the bubble's tail, select the shape and then click and drag the yellow handle at the end of the tail as desired.
Based in Southern Pennsylvania, Irene A. Blake has been writing on a wide range of topics for over a decade. Her work has appeared in projects by The National Network for Artist Placement, the-phone-book Limited and GateHouse Media. She holds a Bachelor of Arts in English from Shippensburg University.
Related Articles
How to automatically text wrap in powerpoint 2007, how to make diagonal text in word, how to make text bigger on a mac desktop, how to make a 3d cylinder in powerpoint, how to add shading in powerpoint 2003, how to create an invisible button in powerpoint for a callout, how to create bubble letters in microsoft publisher, how to generate text in the shape of a half circle in powerpoint 2007, how to turn off superscript in powerpoint, most popular.
- 1 How to Automatically Text Wrap in PowerPoint 2007
- 2 How to Make Diagonal Text in Word
- 3 How to Make Text Bigger on a Mac Desktop
- 4 How to Make a 3D Cylinder in PowerPoint
- ONLYOFFICE /
- ONLYOFFICE Tips and Tricks
Text bubbles: a big guide
Although a text bubble seems to be a simple element, not everyone knows how to make it. Today we’ll cover what it is and how to do a text bubble from zero or using ready templates.

What a text bubble is and when you can use it
First, it is worth understanding what does it mean. A text bubble, also called a speech bubble, speech balloon, or dialogue balloon is a rounded or irregularly shaped outline filled with text and features a tail pointing toward the speaker.
The concept is well-known thanks to Superman, Batman, and Disney characters who spoke through speech bubbles. In comics, they express the words, thoughts, or emotions of a given character. However, text bubbles have gone far beyond the pages of comic books.
It is widely used in presentations. Want to make your report less boring? Add a text bubble as a design element to your slide, creatively illustrate your words, highlight the main idea, or frame an inspiring quote with it. You can also use them to create memes or cues in visual materials.
In formal documents, text bubbles are often called “callouts” as they are designed to attract the reader’s attention to a specific point or give instructions.
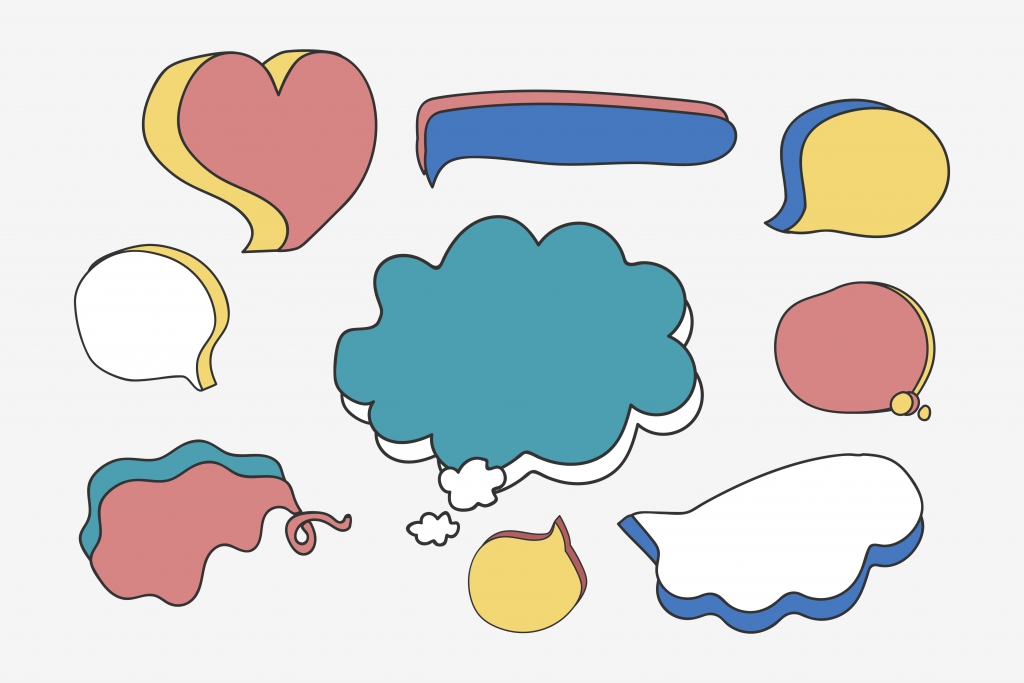
How to create text bubble using ready png
Creating text bubbles for any purpose is not very difficult today. The first and most obvious way is to find a ready speech bubble template in png format on the Internet. For example, download it from Google or find suitable ones on specialized stocks. Many stocks offer free templates for any purpose and to any taste. Then you can add a text bubble to a photo in any image editor.
If you want to use a ready-made speech bubble, make sure it does not violate copyright law.
How to create text bubble online
The easiest and fastest way to create a text bubble is an online service (for example, Phrase it or FlexClip ). It does not require any professional skills. All you need is to follow these steps:
- Choose a background picture (You can add a speech bubble to any stock picture or upload a photo from your device);
- Choose a bubble form;
- Place it on the picture;
- Add and edit the text;
- Download the picture on your devices or send it by email.

How to create speech bubble in Word , Excel, and PowerPoint files
The previous methods describe how to add a text bubble to a photo. However, you may need to add it to a text document, spreadsheet, or presentation to make a note, pay attention to a specific statement or give an example. Another reason you might want to know how to add a text bubble is when you already have an illustration inserted into your document, but you want to enhance it. In this case, creating a new image using online services will take more time than doing it directly in the editors.
Let’s see how to make a speech bubble in Word, Excel, or PowerPoint formats with ONLYOFFICE editors.
- Using ready png image . If you have a ready-made png image to add to your document, go to Insert —> Image —> Image from File and choose the picture from your device.

- Using shapes in editors. It is also possible to create a text bubble from scratch in document, spreadsheet, or presentation editors using shapes. The task is much easier than it may seem.
The shape feature has different shapes of text bubbles: rectangular selection can be used for quotes, oval callouts often serve as speech balloons, and cloud – for thoughts.
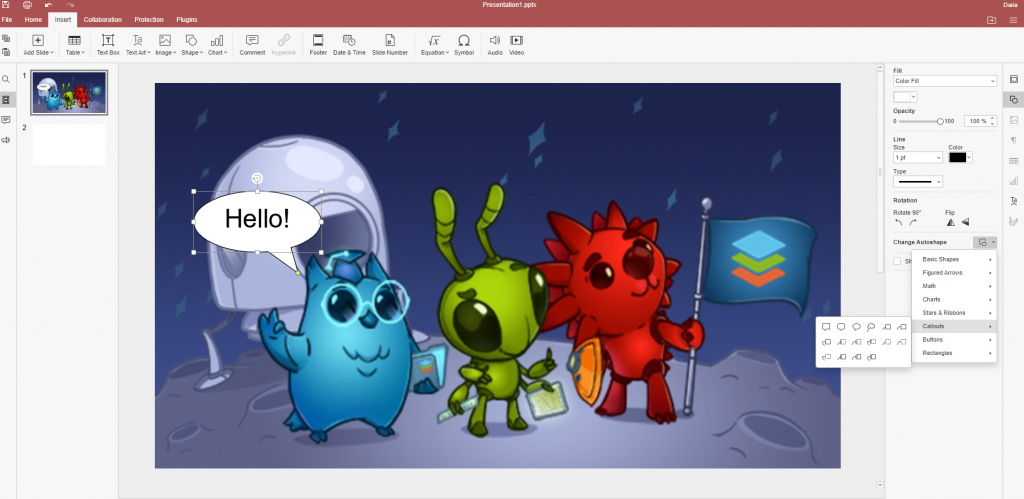
Go to Insert —> Shape —> Callouts and choose the necessary one.
Draw a speech bubble shape on the page. Then, modify its size, make a tail longer or shorter, or change its direction by moving the yellow point. Ideally, the tail should be pointed to the mouth or head of the speaker, if there is an illustration, or to the sentence or part of the text whose brief thought a text bubble expresses.
If you have already set the size and added text to a shape and then decided to choose another shape, there’s no need to delete the shape and start over. Use Change Autoshape option on the right-side toolbar to change the shape but keep the size and text.
How to add text and change font
To add text to a speech bubble, you just need to double-click it and enter the text. To change the font, you can use the usual fonts or apply text art on the right-side toolbar.
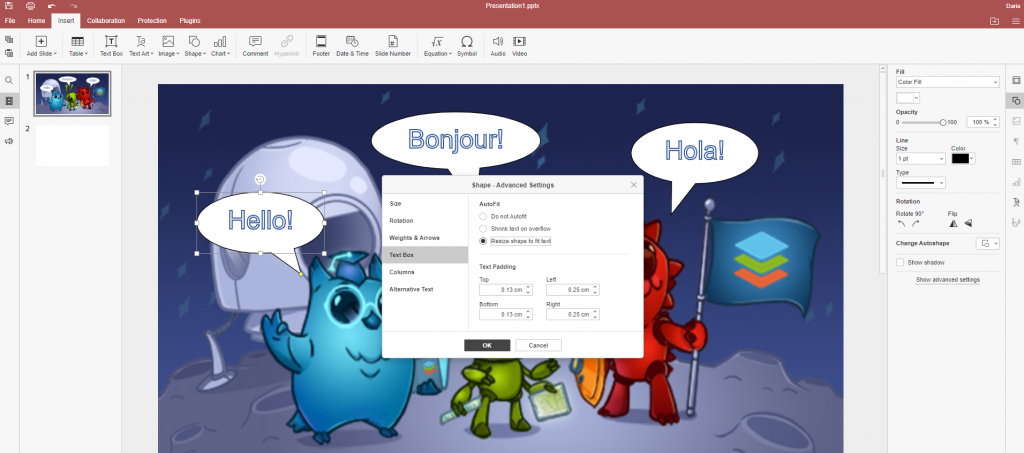
There’s a handy feature here. Instead of manually changing the size of the text bubble so that all the text is visible, you can set the automatic adjustment.
Click the shape, go to Advanced Settings , and choose to Resize shape to fit text . That way, after you enter the text, the bubble will automatically resize.
How to change background color or make it transparent
Speaking about text bubbles, we shouldn’t forget the background color, as it also matters. The bubble color helps to convey emotions or feelings. For example, red implies the speaker’s anger and rage.
You can easily change the default background of the shape. Click it and choose another color on the right-side toolbar. It is possible to choose a pattern for the background or make a text bubble transparent or gradient. Just select the desired option from the drop-down list under Fill on the right-side toolbar.
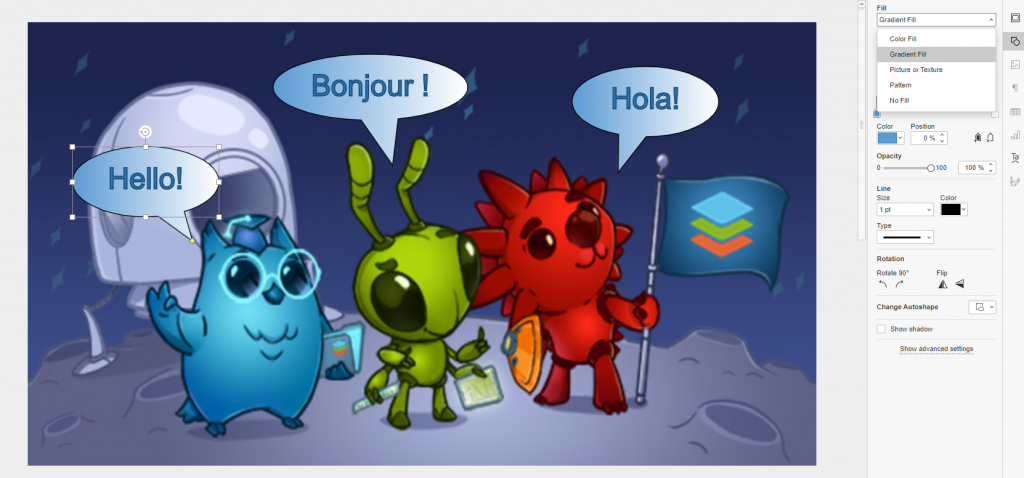
That is how to create a text bubble in different ways. As you noticed, it can be easily done even in document editors, using simple shapes and your imagination. Try it now in ONLYOFFICE Editors:
START ONLINE GET DESKTOP EDITORS
Useful links
New features of ONLYOFFICE Desktop Editors v6.4
How to add Youtube video in presentation
How to create a Gantt chart in Excel sheets
How to save Word document as PDF
Recent posts

ONLYOFFICE DocSpace 2.6 released: Form Filling Rooms, LDAP, polished room and file management, and more

How to copy format in PowerPoint slides

Automate repetitive tasks with the ONLYOFFICE DocSpace and Trello integration using ready Zaps
How to Insert Word Bubbles in Microsoft Word
By adrian grahams / in computers & electronics.

Interesting graphics and illustrations can help bring to life an otherwise dull Microsoft Word document. One way of brightening up a boring block of text is to insert a word- or speech-bubble shape. Word comes with a range of different shape illustrations, and you'll find a selection of speech bubbles listed under Callouts in the shape-picker tool on the Insert tab on the main program menu. Once you've added a word bubble to the document, you can add text to it.
- Interesting graphics and illustrations can help bring to life an otherwise dull Microsoft Word document.
- One way of brightening up a boring block of text is to insert a word- or speech-bubble shape.
Launch Microsoft Word.
Click "File" and then "Open" to open the document in which you want to add the word-bubble shape. Click "New" to create a new Word document.
Click "Shapes" in the "Illustrations" group on the "Insert" tab.
Locate your preferred word-bubble illustration from the thumbnails in the "Callouts" section of the "Shapes" context menu.
Click the shape thumbnail to insert into the document. This launches a cursor that you can drag across the screen to draw the shape to the size that you require.
Click the shape in the document to highlight it. Click inside the speech bubble, and then type the text that you want to include.
In Step 5, you can change the shape of the word bubble by selecting "Change Shape" under "Edit Shape" on the "Insert Shapes" group in the "Format" tab.

How to Make Bubble Letters in Microsoft Word
Make your flyer look all cutesy
If you’re using Microsoft Word to create an event flyer , party invitation, or greeting card, you’re probably looking for upbeat and fun styles. For the text, consider using bubble letters to add some whimsy to your creation.
Bubble letters appear curvy and bouncy with an almost cartoon-style feel, making them ideal for casual creations. You can use one of Word’s built-in font styles or download a bubble typeface from an online source. Then, simply apply the style and spruce it up to your liking. Here’s how to create bubble letters in Word on Windows and Mac.
Use a Word Font Style for Bubble Letters
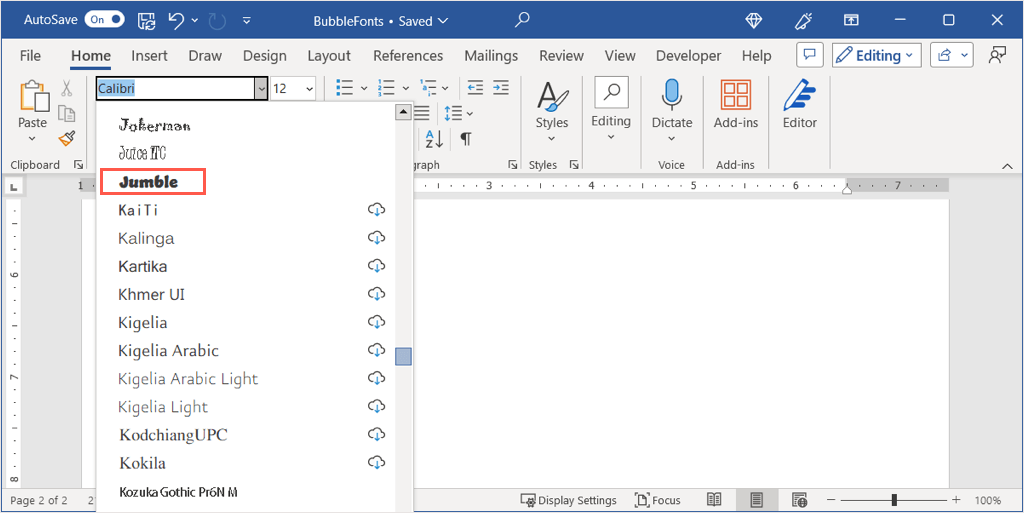
Microsoft Word provides numerous font styles to pick from with one of them being perfect for bubble letters. The style is called Jumble and it’s available in Word on Windows and Mac.
- Select the text you want to turn into bubble letters and head to the Home tab. Tip : Bubble letter words often look better in all uppercase, but you can include lowercase if you prefer.
- Open the Font drop-down box which displays your current font style.
- Select Jumble .
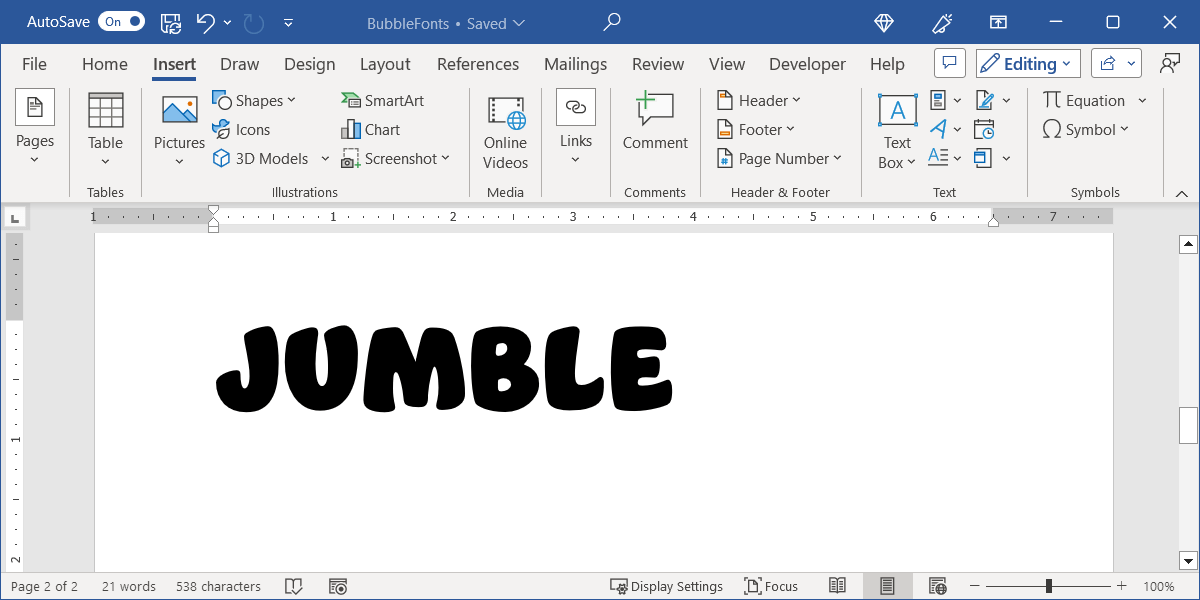
You’ll then see those airy letters that you can leave as-is or add some flair as we’ll describe later.
Download and Install a Bubble Letter Font
If you’ve never added a new font on your computer before, there are many websites offering both free and paid styles. For bubble letters specifically, here are four free sites and a cool option for you to consider from each. We’ll then explain how to install the font on both Windows and Mac.
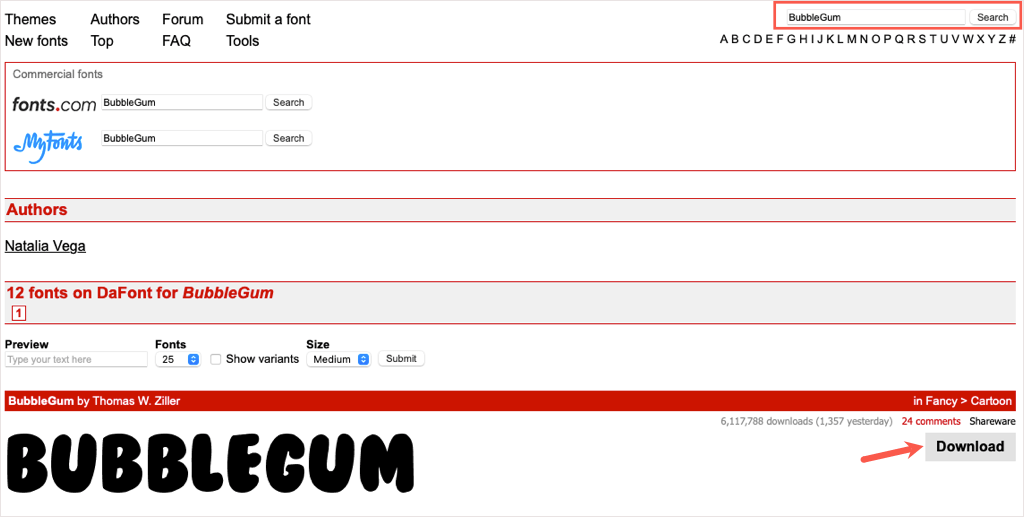
DaFont is a free font site suggested by Microsoft on their Add a Font support page . This site provides over 100 bubble styles for you to choose from. One great bubble font is called BubbleGum.
You can use the Search box at the top to find “BubbleGum” and then select Download to the right.
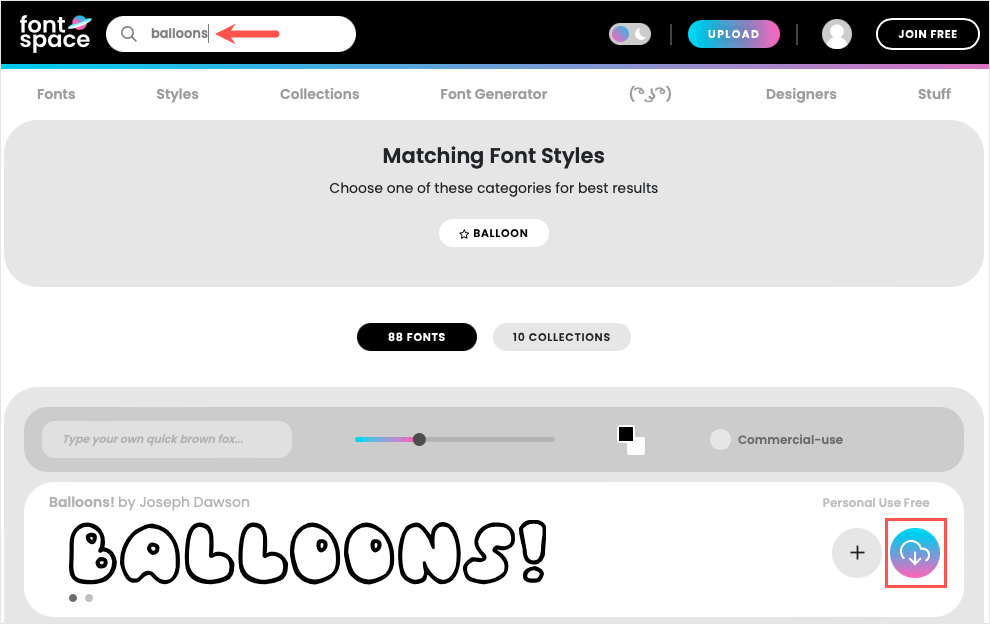
Another terrific source for fonts is FontSpace. They have an entire category dedicated to bubble style fonts with one standout option called Balloons!. This is a cute option if you want a bubble outline style rather than a filled font.
Like DaFont, use the Search box at the top to locate “Balloons” and choose the Download icon (cloud and arrow) on the right.
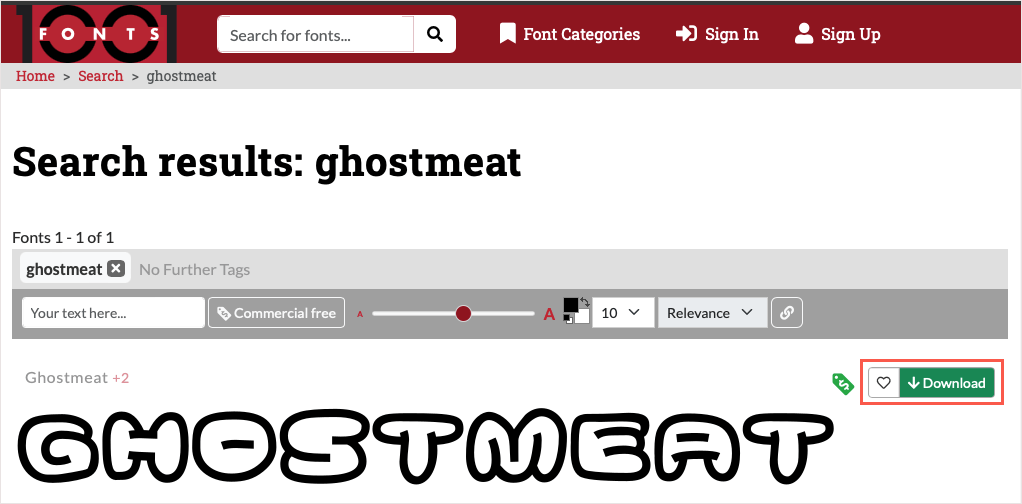
If you’re looking for something unique, take a look at the Ghostmeat bubble font from 1001 Fonts. This one is also outlined with white in the center but emits an almost scribble or hand lettering feel.
Search for “Ghostmeat” in the box at the top and select Download when you see the font.
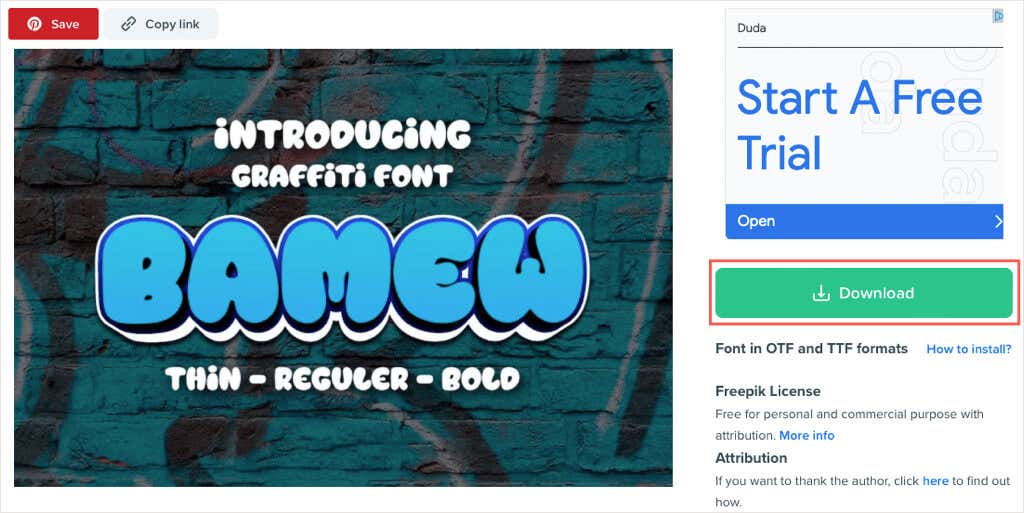
One more site you may want to check out is Freepik. They have three pages of options with a super puffy style called Bamew which resembles a graffiti letter font.
This site’s Search is a bit more difficult when looking for a particular font name. So, it’s best to use this direct link to the Freepik bubble fonts .
Browse through the options for one you like or select the Bamew style and choose Download .
Install Your Bubble Letter Font
Once you find a bubble style you like and download it, you simply need to install the font on your Windows computer or Mac to make it available in Microsoft Word.
Install a Font on Windows
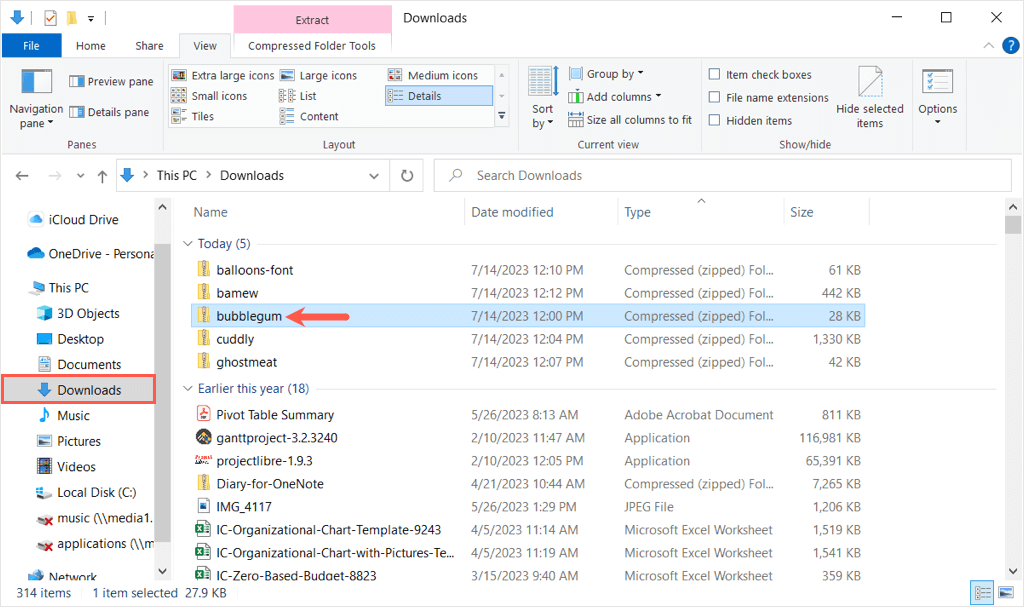
- You can select the Downloads option in the web browser you’re using or launch File Explorer and open your Downloads folder. The file should be in a ZIP format.
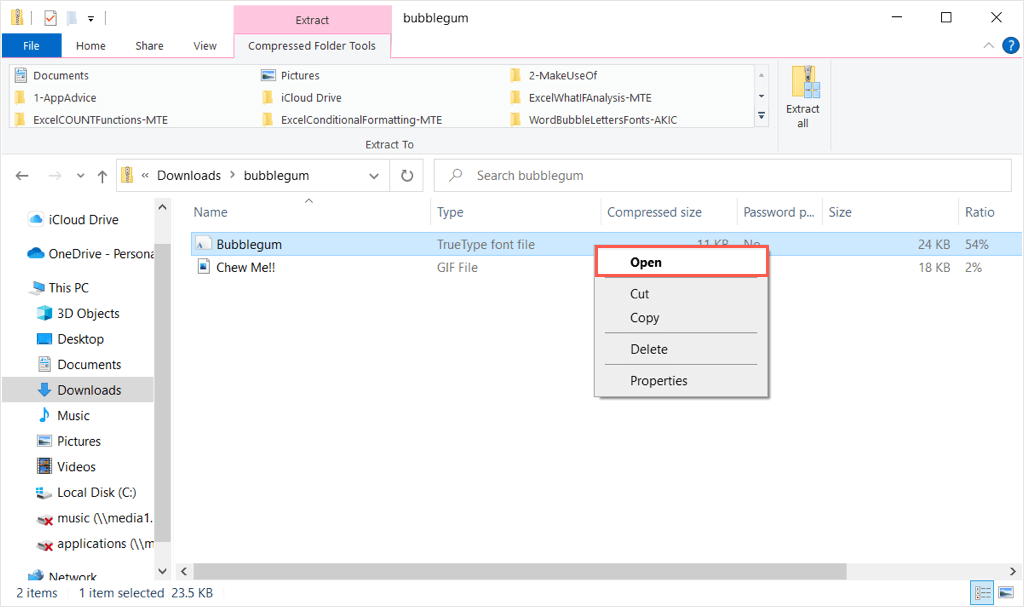
- When you double-click the ZIP file to extract the contents, you’ll see various files, depending on the exact font you picked. You may see TrueType, OpenType, or both file types. Right-click the one you want to install and choose Open .
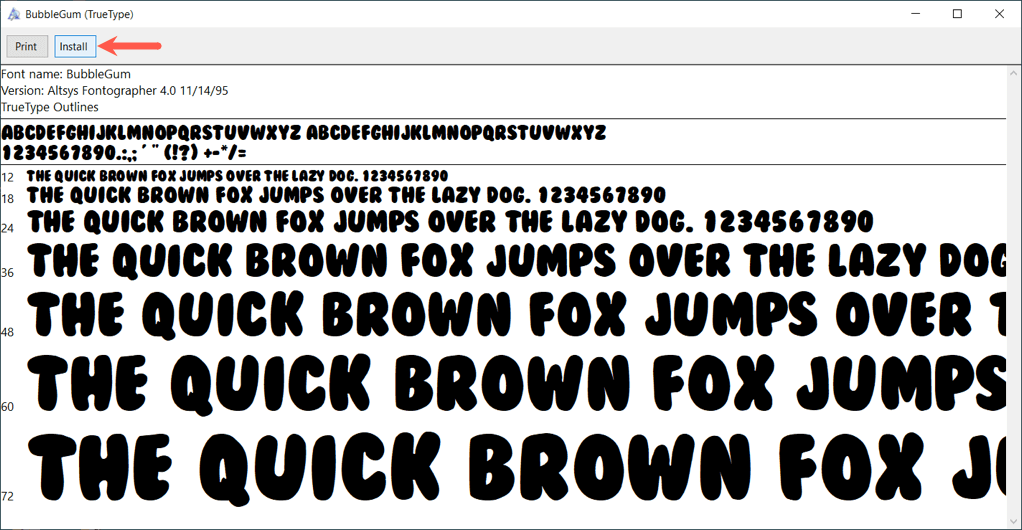
- In the subsequent window, you’ll see a preview of the font. Select Install at the top and then close the window.
When you return to Microsoft Word, you should see your new bubble style in the Font drop-down box on the Home tab.
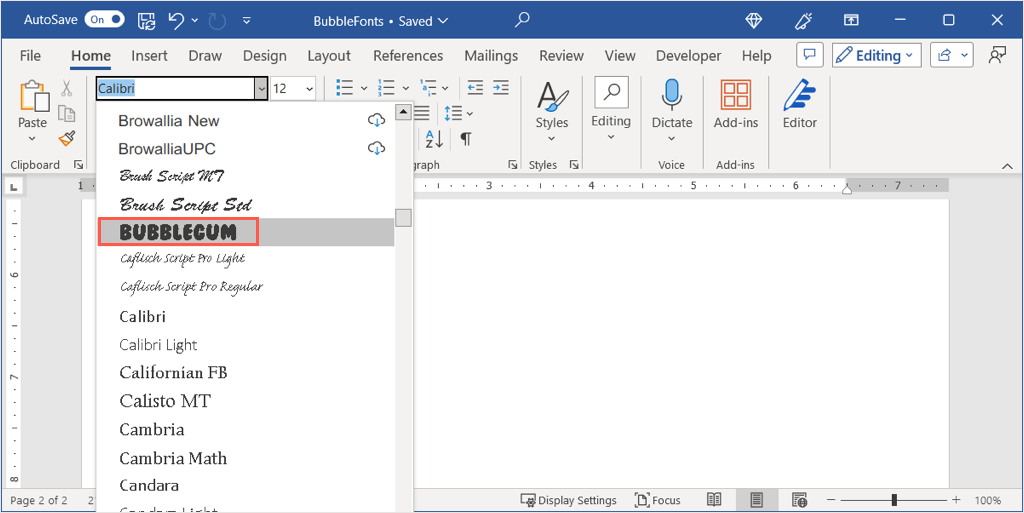
Note : You may need to restart Microsoft Word to display the new font .
Install a Font on Mac
- Like on Windows, you can open the Downloads location for your web browser or launch Finder and open the Downloads folder to install the font on Mac .
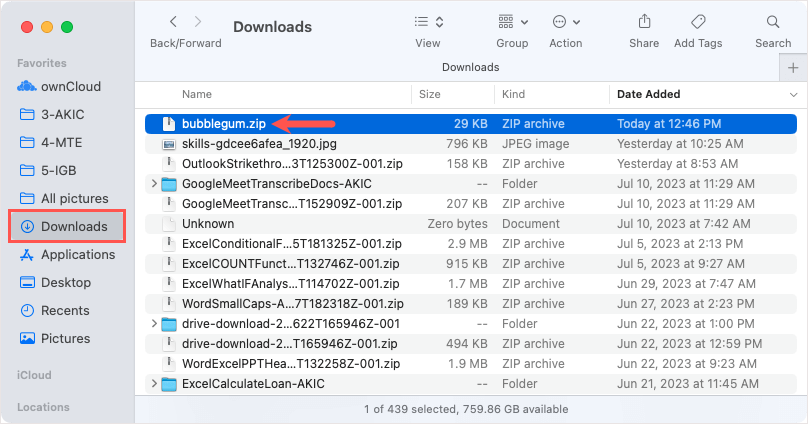
- Double-click the ZIP file and then open the folder inside. You may see more than one file, depending on the font you downloaded.

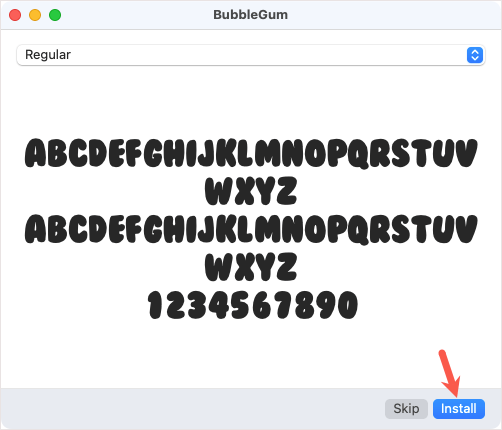
- Then, double-click the file you want to open and you’ll see a preview of it in the macOS Font Book showing the bubble letter alphabet. Select Install and then close the window.
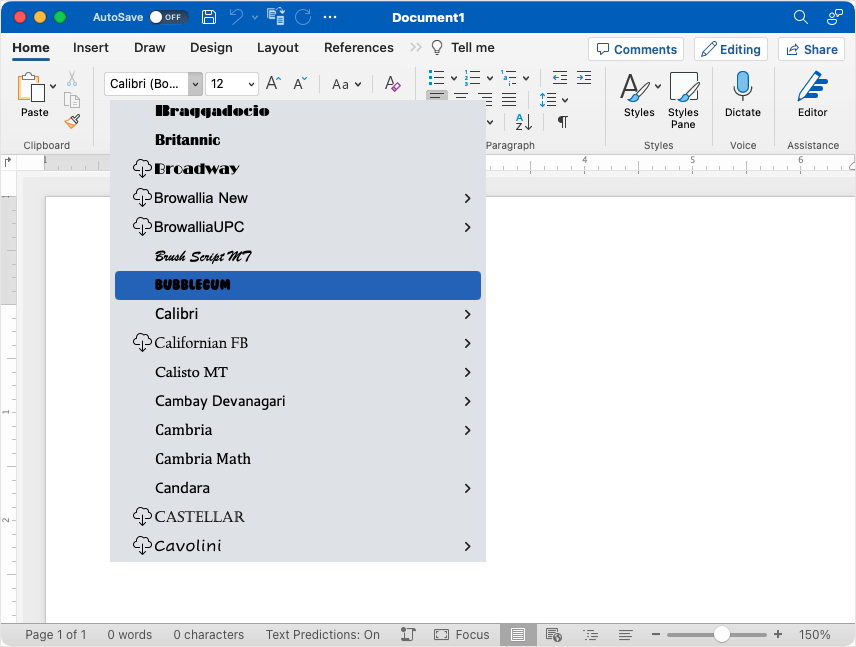
Restart Microsoft Word, go to the Home tab, and you’ll see your new bubble style in the Font drop-down box.
Bonus: Enhance Your Bubble Letters
While you can certainly use the bubble font as-is, whether the Jumble style in Word or the one you install, you can also spruce it up a bit. To make it bubblier or more colorful, here are just a couple of suggestions using Word’s built-in font formatting features.
Add Color to the Font
If you have a color scheme for the item you’re creating, you can easily change the font from basic black.
Select the text, go to the Home tab, and pick the color in the Font Color drop-down menu.
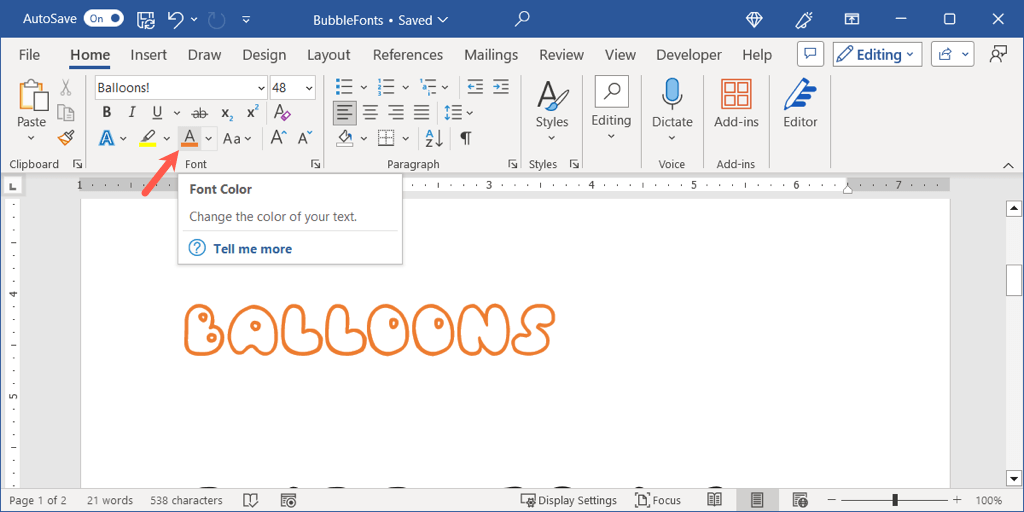
You might want to take it a step further and add some depth to the letters using a text effect.
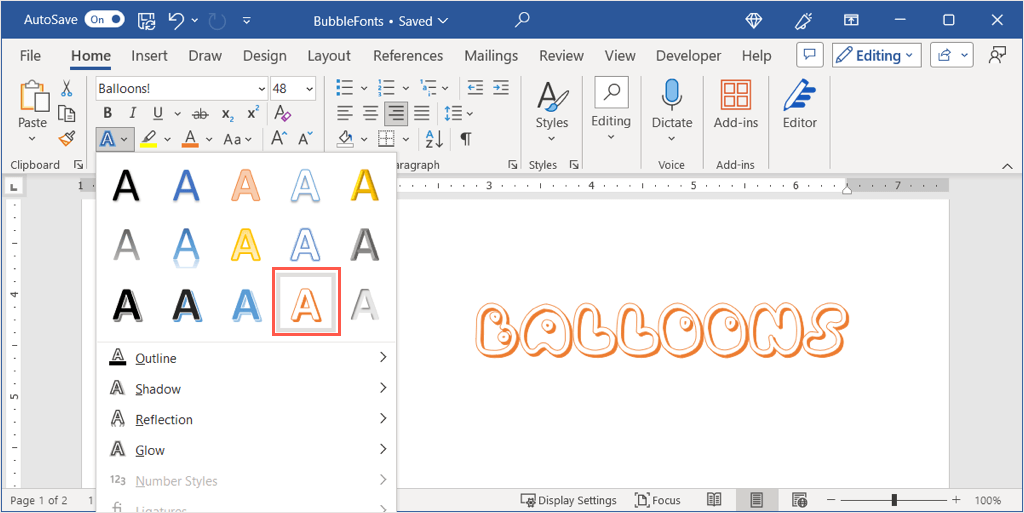
On the Home tab, pick a style in the Text Effects drop-down menu or on the Insert tab use the Word Art menu. Here, we select the orange, white, and shadow option.
Transform the Text to 3D
To make your letters look more like real bubbles, you can apply both a text and 3D effect.
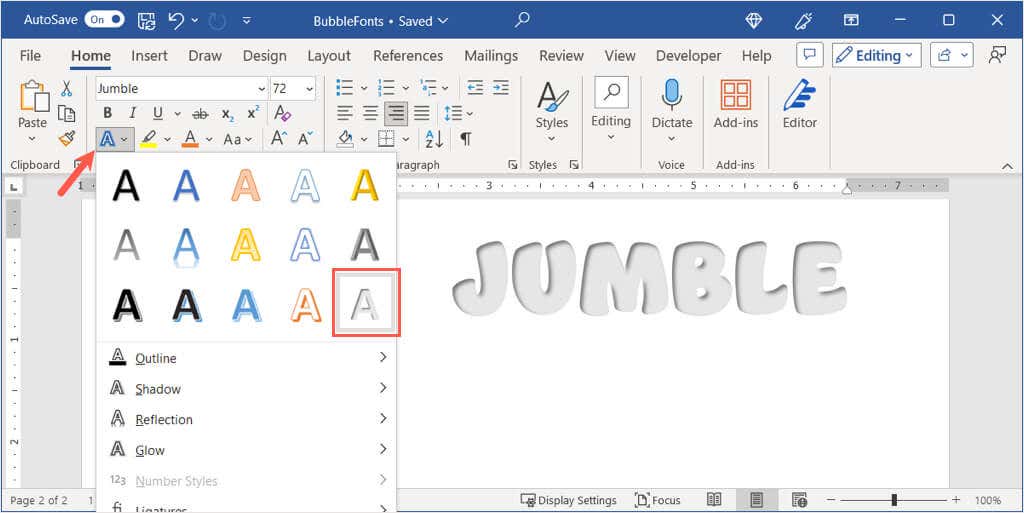
- Go to the Home tab, open the Text Effects , and choose the light gray inner shadow option on the bottom right.
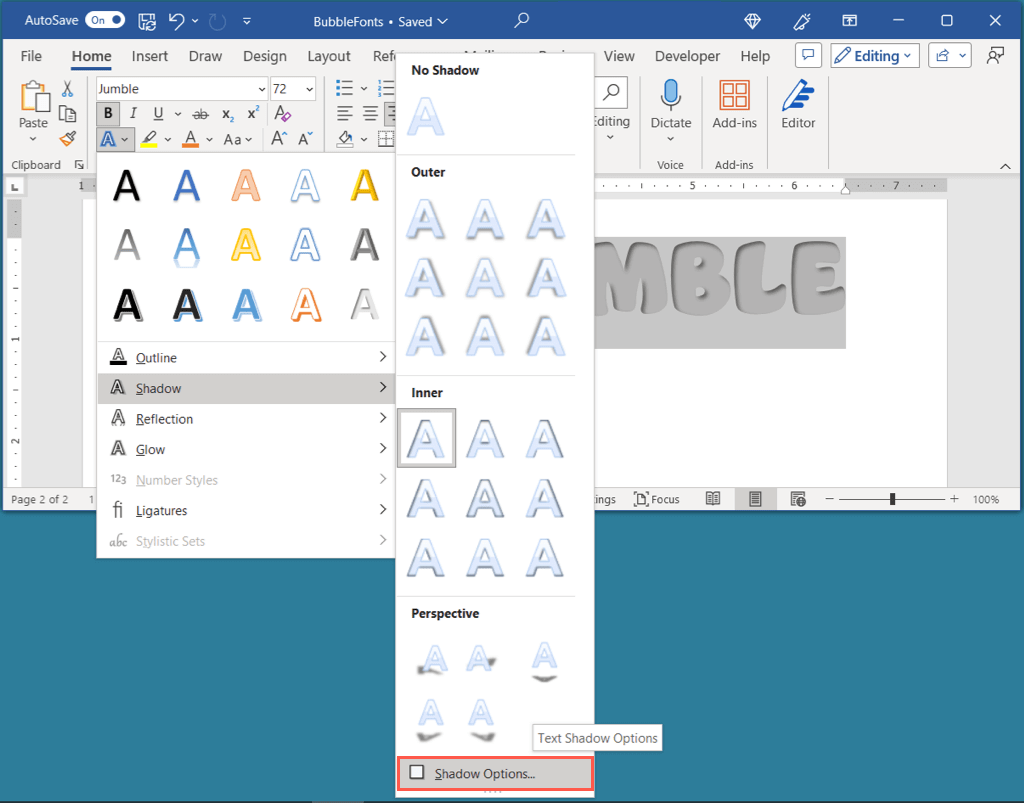
- Return to the Text Effects drop-down menu, move to Shadow , and select Shadow Options to open the formatting sidebar.
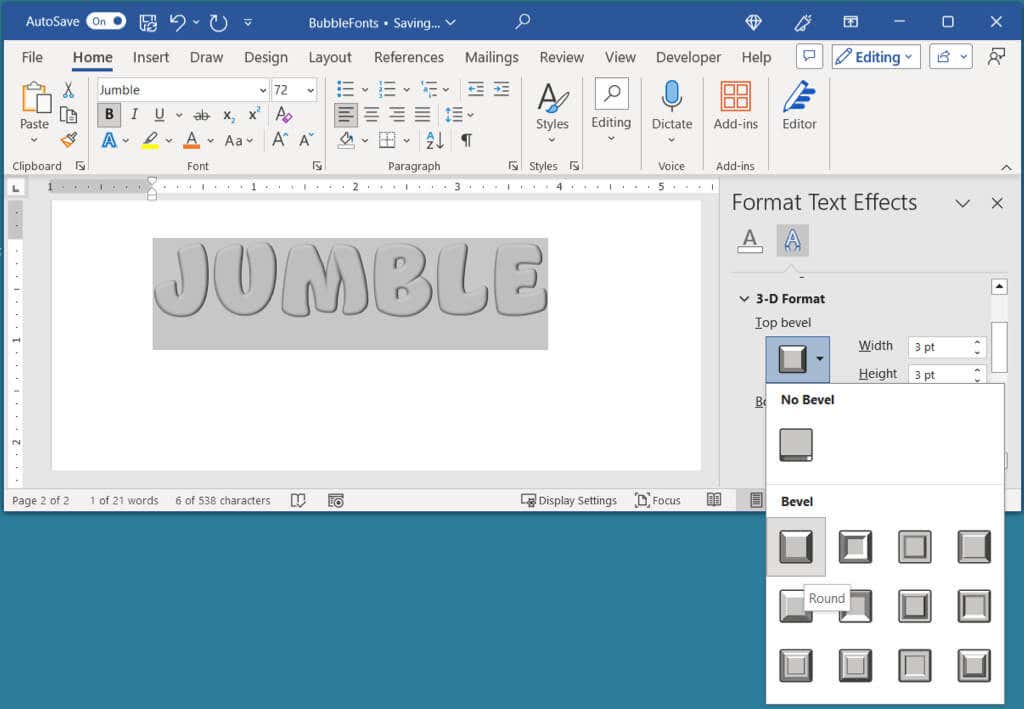
- Then, expand the 3-D Format section, open the Top bevel drop-down menu, and pick Round or Angle. You’ll then see your bubble letters pop.
- You can also apply a different color afterwards, again, using the Font Color menu on the Home tab.
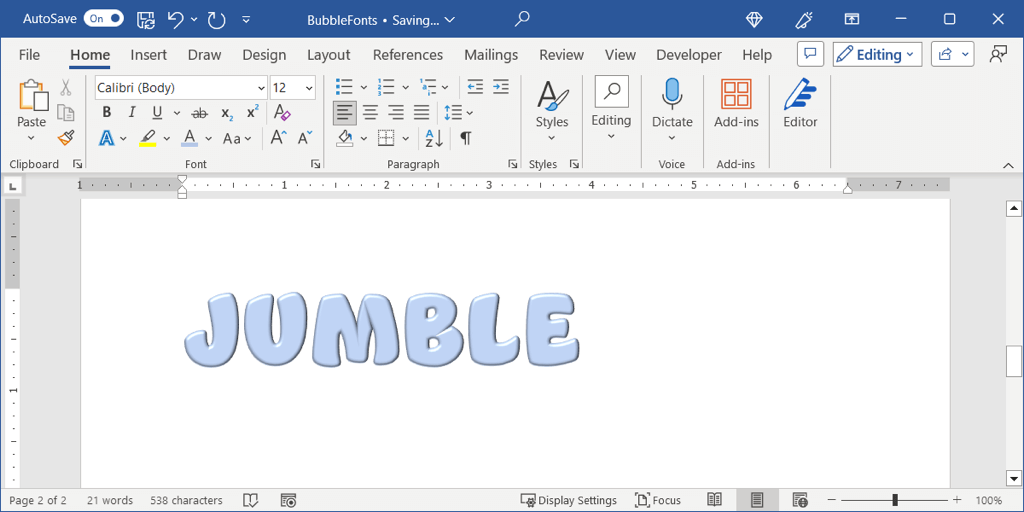
Additionally, you can try out Word’s other font formatting features like Glow, Reflection, or Shadow to apply different unique looks to your letters.
Now that you know how to make bubble letters in Word, check out a related tutorial like how to change the default font in your Microsoft Office apps including PowerPoint.
Sandy Writtenhouse is a freelance technology writer and former Project, Department, and Program Manager. She turned her education, job experience, and love of technology into a full-time writing career. With all sorts of gadgets in her home and her hands, she seeks to help others make life easier through technology. Read Sandy's Full Bio
Read More Posts:

How to Insert Word Bubbles in Microsoft Word

Pictures may be worth a thousand words, but graphics can also hold a thousand words – or just a few. The iconic word bubble, used to represent a person's thoughts or commentary on the page, is a simple way to add design to your Microsoft Word documents. Word calls these graphic touches "callouts," and offers quick insertion options and unlimited formatting for using word bubbles in Word files.
Advertisement
Click the "Insert" tab in the ribbon, then click the "Shapes" button and move to the Callouts section.
Video of the Day
Click one of the word bubbles, such as Rectangular Callout or Rounded Rectangular Callout. Note that the cursor will change to a plus symbol once selected.
Position the cursor on the Word document and press and hold down the left mouse button. Drag until the word bubble is your preferred size, then release. The bubble appears on the page.
Click a corner or border of the bubble and drag it into your preferred place, such as directly over the top of a person's head in an image on the page.
Click the bubble to open the Drawing Tools tab at the top of the screen. By default, the word bubble is a medium blue with a dark blue border.
Click the "Shape Fill" menu on the Drawing Tools tab's ribbon. Click "No Fill" to clear the medium blue for a more traditional white-background.
Click the "Shape Outline" menu and select a different color for the bubble's border, if desired.
Add text to the bubble by clicking the "Draw Text Box" button on the Drawing Tools tab's ribbon. Click and drag the mouse inside the word bubble to create a text area, and then release the button when the desired field appears in the document. Start typing to insert text in the word bubble. You can also format the fill and border of the text box as per the previous steps.
Save the Word document if finished or continue to add additional word bubbles as desired.
- North Carolina State University: Illustrations and Drawing
- Microsoft Office: Add Shapes
- GCF Learn Free: Word 2013 Shapes
Exploring Speech Bubbles Templates
Explore a variety of speech bubble templates to add flair to your designs.
Speech bubbles are an integral part of visual communication, often used in graphic novels, comics, and web design to represent dialogue or thoughts. They add a dynamic element to the narrative, making it more engaging and interactive. The use of speech bubbles isn’t limited to these areas; they are also used in presentations, educational materials, and marketing collateral. This guide will delve into the world of speech bubbles templates, their uses, and how to create them.
Understanding Speech Bubbles
Speech bubbles, also known as speech balloons, are graphical elements that visually represent communication in comics and graphic novels. They have been used since the early 20th century and have become a staple in the comic book industry. The shape, size, and style of a speech bubble can convey different emotions and tones, making them a versatile tool in visual storytelling.
Speech bubbles are not just for comics. They are also used in other forms of media such as web design, advertising, and educational materials. They can make content more engaging and easier to understand , especially when explaining complex concepts or instructions.
Different Types of Speech Bubbles
There are several types of speech bubbles, each with its unique purpose and design. The most common types include the dialogue bubble, thought bubble, scream bubble, whisper bubble, and caption. The dialogue bubble, which is the most common type, is used to represent spoken words. On the other hand, the thought bubble, often cloud-shaped , is used to represent thoughts or internal monologue .
The scream bubble, with jagged edges, represents shouting or loud speech, while the whisper bubble, usually depicted with a dotted line, represents soft or whispered speech. Lastly, the caption is used to provide narration, setting details, or other non-dialogue information.
Creating Speech Bubbles Templates
Creating speech bubbles templates can be a fun and creative process. It allows you to add a personal touch to your comics, presentations, or marketing materials. There are several ways to create speech bubbles templates, from using graphic design software like Adobe Illustrator to online tools and even coding them in HTML and CSS.
When creating speech bubbles templates, it’s important to consider the content that will go inside the bubble. The shape, size, and style of the bubble should complement the tone and message of the text. For instance, if the text is a loud exclamation, a large bubble with jagged edges would be appropriate.
Using Graphic Design Software
Graphic design software like Adobe Illustrator, Photoshop, and InDesign offer tools and features that make it easy to create speech bubbles. These software programs allow you to draw custom shapes, add text, and apply styles to create unique speech bubbles. They also offer templates that you can use as a starting point.
Creating speech bubbles in graphic design software involves drawing the bubble shape, adding the tail, and inserting the text. You can customize the shape and style of the bubble to match the tone of the text. Once you’re happy with the design, you can save it as a template for future use.
Using Online Tools
There are several online tools that allow you to create speech bubbles quickly and easily. These tools offer pre-designed templates that you can customize with your text and style. Some of these tools include Canva, Piktochart, and Bubblr.
These online tools are user-friendly and don’t require any design skills. You simply choose a template, add your text, and customize the design to suit your needs. Once you’re done, you can download the speech bubble as an image file for use in your projects.
Coding Speech Bubbles in HTML and CSS
If you have some knowledge of HTML and CSS, you can code your own speech bubbles. This gives you complete control over the design and functionality of the bubbles. You can create any shape, size, and style of bubble, and even add interactive elements like hover effects.
Coding speech bubbles involves creating a container for the bubble, adding the text, and styling the bubble and text with CSS. The bubble’s tail is created using the CSS pseudo-elements ::before and ::after. You can then save the code as a template for future use.
Speech bubbles templates are a versatile tool in visual communication. They can be used in a variety of media, from comics and graphic novels to web design and advertising. Creating your own speech bubbles templates can be a fun and creative process, whether you’re using graphic design software, online tools, or coding them in HTML and CSS.
Remember, the key to effective speech bubbles is to match the design with the tone and content of the text. With a bit of creativity and practice, you can create engaging and dynamic speech bubbles that enhance your visual storytelling.
Start Creating Your Own Speech Bubbles Today!
Ready to bring your visual stories to life? With Phraseit, you can easily create professional-looking speech bubbles for your comic strips or other visuals. Whether you’re uploading your own images or choosing from our curated stock photos, our free online speech bubble maker at phraseit.net offers a variety of custom bubbles to personalize and add flair to your projects. Don’t wait any longer—check out our bubble maker and start crafting your unique dialogue-filled scenes now!
Leave a Reply Cancel reply
Your email address will not be published. Required fields are marked *
Save my name, email, and website in this browser for the next time I comment.
Turn your images into speech bubble memes with ease!
Drag 'n' drop your image here, or click to select one
Frequenty asked questions
What is Speechmeme?
Speechmeme is a tool that allows you to easily turn images into trendy and popular speech bubble memes, often seen in chat messages on social platforms like discord.
What type of images do you support?
You can currently use any image format such as JPEG, PNG, GIF, BMP, SVG, WEBP, TIFF, AI, PSD, EPS, PDF, SVG, and more.
Why did you make this?
I made this tool because I often found content on Discord and other social media platforms that needed to be turned into a speech bubble meme. However, when I tried to find a reliable speech bubble meme generator on Google, I couldn't find any suitable websites. Let's be honest, nobody wants to search for a template and then go through the trouble of editing it to fit their needs. That's why I created this tool.
Why is the output image always of type '.gif'?
Discord only permits you to star/favorite gifs. Since many people enjoy favoriting speech bubble memes, I concluded it was the optimal choice to make.
Can I delete my images?
Images uploaded to our public gallery can be easily deleted by clicking on the little trash can icon in the top right corner of your post.
Is this free?
This speech bubble meme maker will forever stay free. I hope you enjoy using it!
Add Speech Bubble to Photo
Add a speech bubble to a photo for free. With Pixelied, you can add speech stickers and icons to any image with a few clicks.
Upload image to get started
How to add a speech bubble to a photo in 4 steps.
You don’t have to download an app to add a thought bubble to a photo. Pixelied’s speech bubbles generator helps you achieve your goal directly in your browser.

Upload ypur photo in JPG or PNG format
Upload a photo or drag-n-drop it to the editor in JPG or PNG format.
Click on the “Elements” button
Click on the “Elements” button in the left menu and select “Speech Bubbles” from the dropdown submenu.
Choose your favorite speech bubble object
Choose your favorite speech bubble object, insert it into the photo, and add a caption in the bubble.
Download your image
Click on the “Download” button when you’re done to save your image in multiple file formats.
Add Speech Bubble To Photo Tutorial
The free toolkit for easy, beautiful images
Pixelied is a fast and straightforward solution to add a text bubble to a photo. If you wish to amuse your friends on social media, or you want to create a catchy digital project, you can do so in an instant with our free image editor.
Easily Add Thought Bubble to Photos
Putting speech bubbles on photos doesn’t have to be complicated. You can do it easily with Pixelied.
Our image editor can help you add speech bubbles to images, customize your photos and create share-worthy pictures for social media in minutes.
Instantly Add Text Bubble to Photos
Spark some laughs on social media. Make a lovely photo even more remarkable with a text bubble.
Amuse your friends with your captions. Browse our extensive library of speech bubbles to find one that perfectly matches your photo and emotions.
Easy-to-Use Speech Bubble Generator
Create a narrative around your photo. Use thought bubbles to convey a clear message to your audience.
Our speech bubble generator helps you express your thoughts with ease. Choose a bubble icon that fits your style and let the world know what you think.
Export Image in Multiple High-Res Formats
Produce images that look great and communicate your convictions. Make shareable designs that are perfect for social media.
After customizing your photo and adding text bubbles, you can download it in multiple high-resolution formats, such as JPG, PNG, SVG, and more.
Add Speech Bubble to Photo with More Customizations
Help your audience focus on your image’s message. Crop the image to eliminate distractions.
Direct the viewer’s sight to the text bubble. Use borders to highlight the text.
Drop Shadow
Make your photos look more realistic. Add shadows to enhance their appearance.
Share your image on social media. Resize it so it will match the platform’s size specifications.
Amuse your audience with an inverted perspective. Flip the image to make it funnier.
Adjust the text bubble to avoid blocking the viewer’s sight. Rotate it so it will fit perfectly.
More Than Just a Speech Bubbles Generator Tool
Use Pixelied to add speech bubbles to a photo and more. Our online image editor helps online professionals and business owners create amusing designs starting from scratch or with the help of ready-made templates. Adding a speech bubble on pictures is only one of the multiple free features at your disposal. With Pixelied, you can add captions, borders, icons or use special effects and filters to customize your image to perfection.
Frequently Asked Questions
To add a speech bubble on pictures, upload your photo or drag n drop it to the editor. Next, click on the ‘Elements’ tab at the left sidebar and select “Speech Bubbles” from the dropdown submenu. Select any speech bubble object and add it to your image along with your caption. After you’re done, download the image in multiple file formats.
First, upload your image using the button above. Next, locate the elements section on the left side of the editor and select “Speech Bubbles” from the dropdown menu. Add the thought bubble to your image, along with a catchy caption. Once done editing, download the image in multiple high-res formats.
Pixelied is the best online app to add a thought bubble to a photo without Photoshop or specialized software. This application can help add catchy speech bubbles to your images.
Pixelied is an online photo editing tool that’s easy to use and requires no technical skills of complicated software like Photoshop or Gimp.
Yes, you can fully customize an image by adding text, icons, photos, elements, illustrations, mockups, and much more.
Yes, the downloaded images can be used for personal and commercial purposes without attribution.
Bubble Talk: Turn Your Speech Into Bubbles!

Introduction: Bubble Talk: Turn Your Speech Into Bubbles!
”quod, ut dicitur, si est homo bulla, eo magis senex
(for if, as they say, man is a bubble, all the more so is an old man) ”
- Marcus Terentius Varro (116 BC - 27 BC), De Re Rustica
A soap bubble is ephemeral. It lasts only for a brief moment and quickly disappears even by a light breeze. The bubble's symbolic meaning as a metaphor of human's fragile and insubstantial life was first coined by a Roman writer Varro in the 1st century BC. Also, in 1572 the philosopher Erasmus reintroduced the Latin expression ''Homo bulla'' (''man is a bubble'') in his collection of proverbs, Adagia . This special characteristics of bubble attracted lots of artists in 17th century and also other periods. A paint, ' Cupid Blowing a Soap Bubble (1634) ', by Rembrandt Harmensz van Rijn is one of examples. Metaphor of bubble continues to the modern century and a modern artist, Thomb Kubli , also uses bubbles as a media to transfer invisible and intangible sounds to visible but fleeting form in a 3D space.
The attractiveness of bubble might be coming from its ironical representation of our transient life which reminds us of the value of our existence at a moment and makes us seize the present .
Step 1: Inspiration
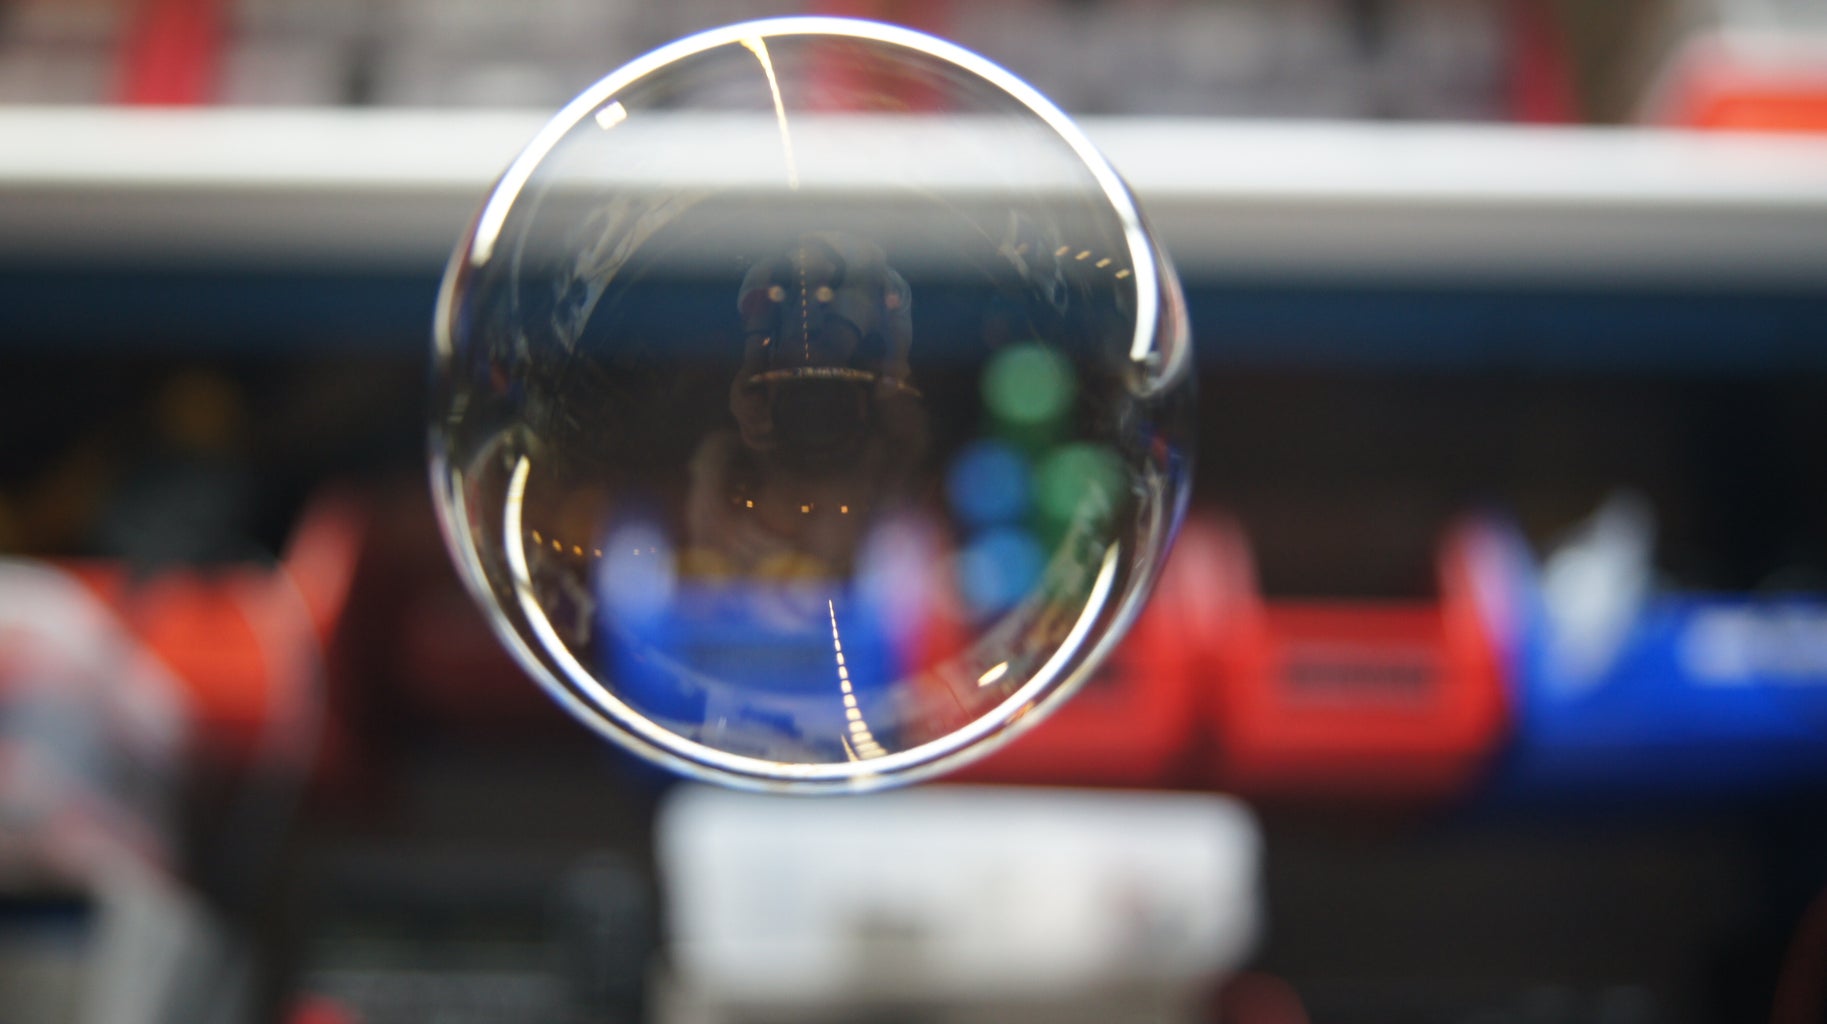
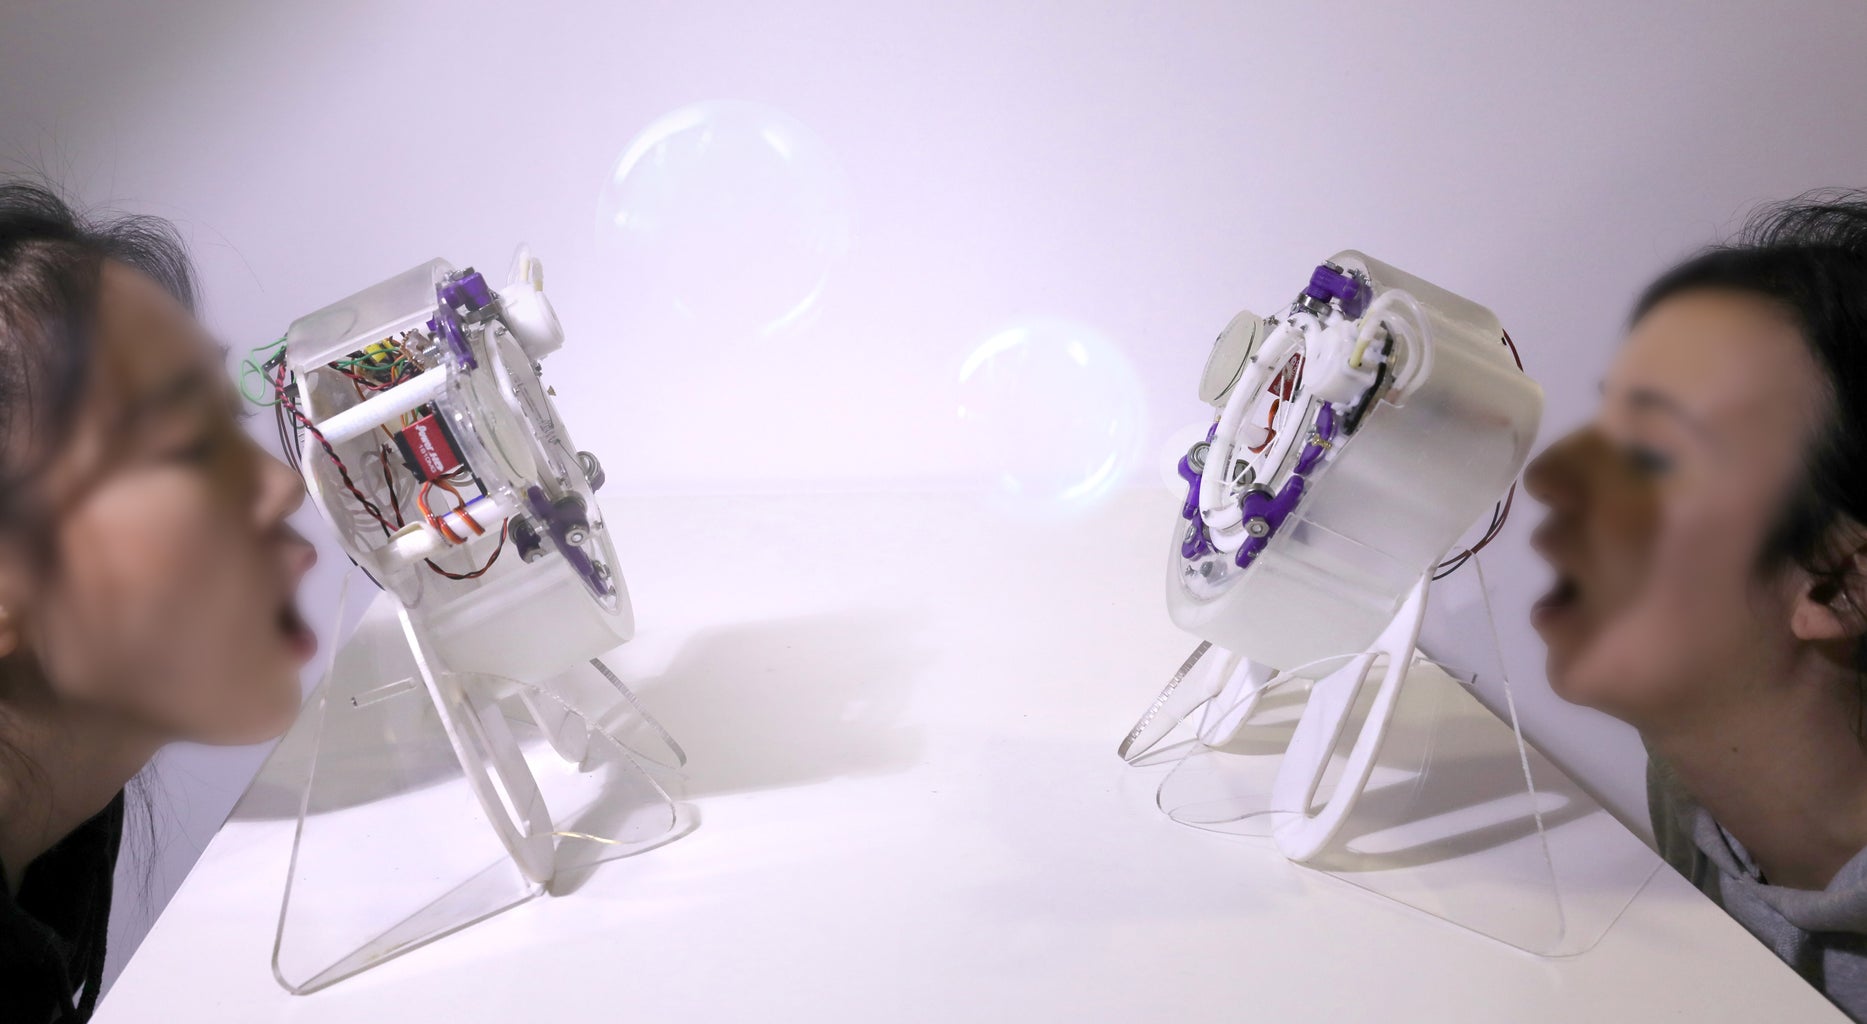
A word and shape of 'bubble' were used as a graphic convention describing a imaginary form of speech and thought of characters in comic books. Inspired from those metaphors of bubble, I introduce an interactive art/ toy project representing the ephemeral and intangible properties of human's communication.
Once speech is shouted out from a speaker, the sound of speech never lasts and it lost its meaning unless there is a listener. Even if the speech is heard by someone, the message will be forgotten as time goes. The shapeless, intangible, and invisible speech is transformed into a semi-tangible yet still insubstantial form of visible bubble. To present this art concept, I created a bubble machine that provides person-to-person and person-to-space interaction.
The machine has a iris mechanism that varies its outlet size reacting to your speech pattern as if it tries to speak something. Once the participant pauses, a fan inside of the machine generates airflow toward a bubble membrane created on the iris outlet and transforms it to various sizes of bubble.
The floating bubble represents the subtle state of a message from interpersonal communications that lies in the middle of real and digital world. Also, it creates a few seconds of delay until it explodes, through which we like to say that it is never possible to have a real-time synchronized communication between two people even in a same space due to the limit of human perceptions.
I'd like to invite all of you guys to be an artist through playful interactions with the 'Bubble Talk' machine! :D
- Iris Mechanism
Inspired by the amazing great work The CNC Bubble Iris by Gordon Kirkwood , this project introduces the way to build a bubble iris machine in smaller and mobile size using 3D printer and Laser cutter, and shows you to make it interactive to your speech to have fun!
As Gordon Kirkwood well explained in his instructables post, the core mechanism of the machine is iris using strings.
Step 2: Materials You Need
Here is the link for the materials I used to build a iris bubble machine.
Material List
I used to a laser cutter to cut the acrylic sheet and a 3D printer to print some components (bearing mounts, servo mount, pulley etc.) For the outer structure components, I used Form2 with Clear V4 material.
Step 3: Schematics and 3D Files
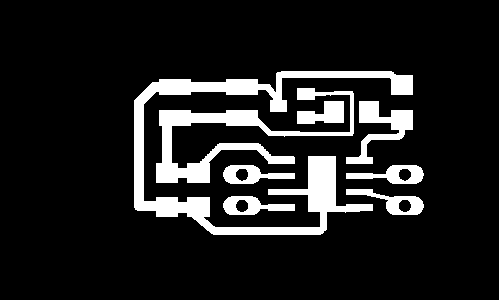
Here are the STL files for 3D printing parts, and PDF file for laser cutting part.
- STL Files for 3D Printing
https://drive.google.com/drive/folders/1EcchA65buvjBsyPmMD-R2n_9MbgLdhrV?usp=sharing
Quantity for each part is stated at the end of the file name. (e.x. Servomount_1EA.STL)
- 2D Schematics for Laser Cutting
https://drive.google.com/drive/folders/1do6HraR7O8gMoUk7EMBF5PTJL62ruPnI?usp=sharing
- PCBs: DC Motor Driver, Microphone amplifier.
At the time I was building this project, in my lab I didn't have a microphone amplifying board and DC Motor driver but an Electret Microphone , several electronic components, so I designed a simple board and milled using CNC machine (Roland Modela MDX20 CNC Mill) with copper board
In case you want to mill your own boards, here I also attached the EAGLE schematics and image file for CNC route. Or you can just use the product from Adafruit or any other provider.
Attachments
Step 4: fabrication.
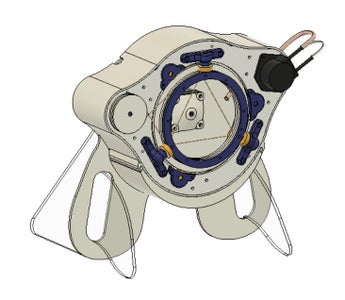
- 3D Printing and Laser Cutting
To meet the purpose of an art toolkit for everyone, I tried to use easily accessible material and fabrication equipment. I laser-cut a acrylic sheet to create a structure of the Bubble Talk machine as shown on figures above. Other parts that requires strength and certain 3D shapes are 3D printed using a customer level filament-fused (Sindoh 3dwox) or stereolithography 3D printer (e.g. Form 2).
- Soap Bubble Liquid Recipes
In the Soap Bubble Wiki Page , it introduces variety of different bubble soap liquid recipes.
I followed the Mike's "Gooey Mix" as Gordon recommended on his post too.
You can also find all the product link for making this liquid in my material list sheet I shared.
Step 5: Assembly
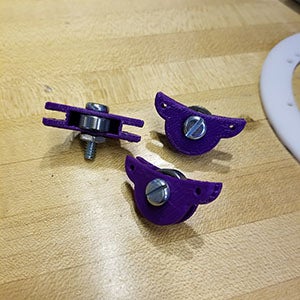
Once you have all the 3D printed parts and acrylic sheet cuts, and assembly components (bearing, cotton thread, spring, fan, MCU, etc.) Follow the process as shown on the pictures above.
- Horizontal (3 ea) and vertical (6 ea) bearing assembly with 3D printed mounts (purple parts on the picture)
- Fix the bearing mounts with bearings on the acrylic sheet for the front face structure
- Insert the white acrylic rings that can be rolling around the bearing smoothly
- Fix the pump and servo motor on the front face structure. (servo should be mounted on the 3D printed servo mount first)
- Assemble 3 pulleys on the front structure (it has three holes matching with the pulley's inner hole diameter)
- Cut the cotton string to be 3 threads and tie them with spring
- Fix the other end of spring on the 3 points and make the thread go around the pulley. (The spring has a role of maintaining the enough tension on each string (always should be tight)
- Tie the string ends to the white acrylic ring's hole. Make sure to have the 3 strings are crossing each other forming a triangle. All the thread should contact each other on the 3 points of triangle.
- Fix the servo pulley (blue part on the picture) on the servo's shaft
- Circle around the pulley with a fishing line about 2 cycle, and make a cross at the end (The fishing line connects the motion of servo and acrylic ring working as a driving belt.
- The each end of the fishing line should go round the white acrylic ring and fixed on it with a spring (this spring works as tension keeper)
- Cut a copper tube and connect it with the pump's outlet to guide the soap liquid around the strings
- Assemble a DC fan in the middle of the back structure of the machine
- Put the outer structure (3D printed) around the back structure and glue it using a epoxy glue
- Cover the top with the front face structure assembled with servo, pump and strings.
Connect the DC motor driver with the pump and DC fan. Connect the microphone with amplifying board and servo to microcontroller (e.g. teensy, Arduino, etc.)
Step 6: Test and Have Fun!
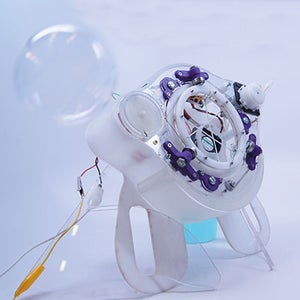
Now it's all assembled and ready to be run!
The input for the machine is your speech and the output is opening of iris creating a soap membrane and running of fan to blow it out.
Make sure all the power is correctly connected, check the polarity before run the machine.
Depending on the fan's speed and the iris size (soap membrane surface area), the size of bubble and its emission motion are varied. I'd recommend to run several times to tune the parameter of fan speed and run timing in relation with the servo actuation for iris mechanism open/close.
Sometimes, the machine makes very funny motions like a teddy bear snoring with bubble coming out from his nose.
The material list I shared also includes the parts needed for making the machine mobile with Lipo battery, so try with that and playing with it walking around outside.
Have fun! and Talk through Bubbles!

Runner Up in the Toys Contest
Recommendations
Woodworking Contest

Outdoor Life Contest

Farm to Table Contest

Photo Editor
Photo effects and tools for enhancing your photos
Collage Maker
Combine multiple photos into one with a grid layout
Graphic Designer
Templates for creating banners, flyers, cards, & more
Getting Started
Master the basics of BeFunky
Learn what all you can do with BeFunky
BeFunky Plus
Unlock our most powerful features
Learn BeFunky
Photo editing and design tips and techniques
Step-by-step guides for all our features
Inspiration
Projects to inspire your creativity
Updates about our new features
Learn Basic Photo Editing
How To Add Speech Bubbles To Your Photos
By Whitney | Basic Photo Editing • Photo Editor Tutorials

There are some photos that are just asking for a speech bubble. The expression on someone’s face usually sets it off. You take one look and instantly think of the perfect caption, then proceed to laugh out loud at the perfectness of it all. They say pictures are worth a thousand words but some can be summed up in just a few hilariously fitting ones.
For all the photos you come across that would be made even better with a speech bubble, we’ve got a little something that will help you get the look in just a few clicks. Whatever the caption, you can add BeFunky’s Speech Bubble overlays to your photos and type away! They’re sure to help you share the fun with all of your friends, all in a matter of minutes.
Speech Bubbles Help Tell A Story
Whether you want to turn your photo into a professional-looking comic or just want to have a little fun, any time is a good time to add a speech bubble. You can make an image hilarious by adding the right caption, or simply say exactly what you were thinking when you took that last selfie. There are many different kinds of speech bubbles that are available in BeFunky to help you tell your story. Here's a little sample of them and when to use each kind:
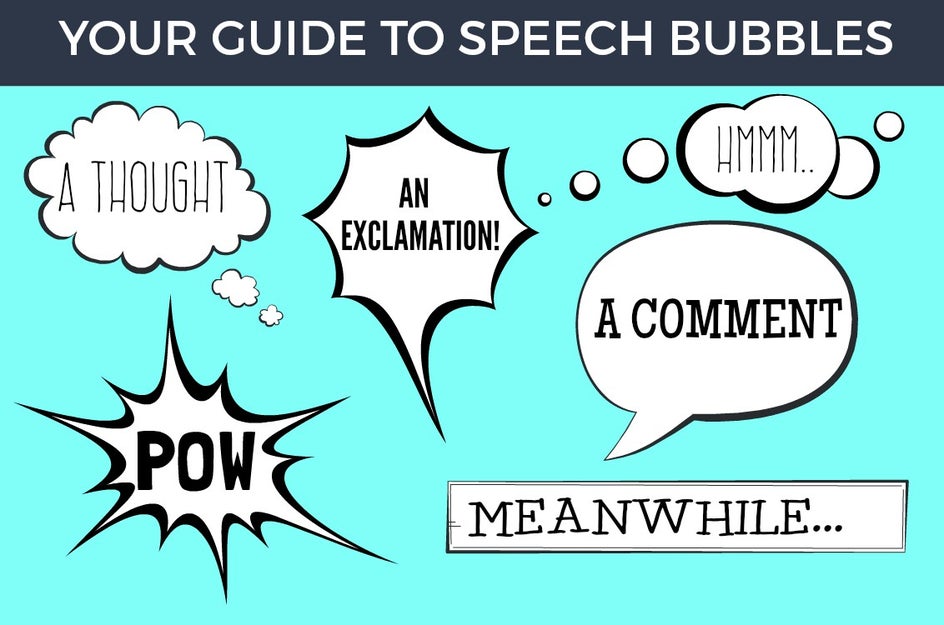
Similar to making memes, speech bubbles can help you get the point across in a unique way. Here are some of the best cases where speech bubbles can make your photos more amusing:
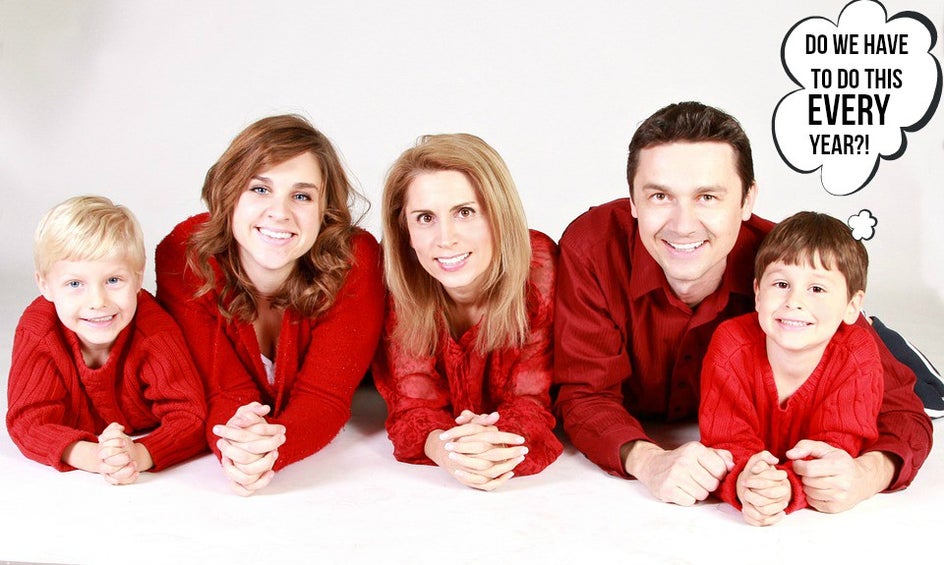
Awkward Family Photos. Family photos can be a great opportunity to add a thought or speech bubble, the more awkward the better!
Pet Photography. Since animals can say so much with their facial expressions and nonverbal cues, you can give them a voice with a speech bubble.
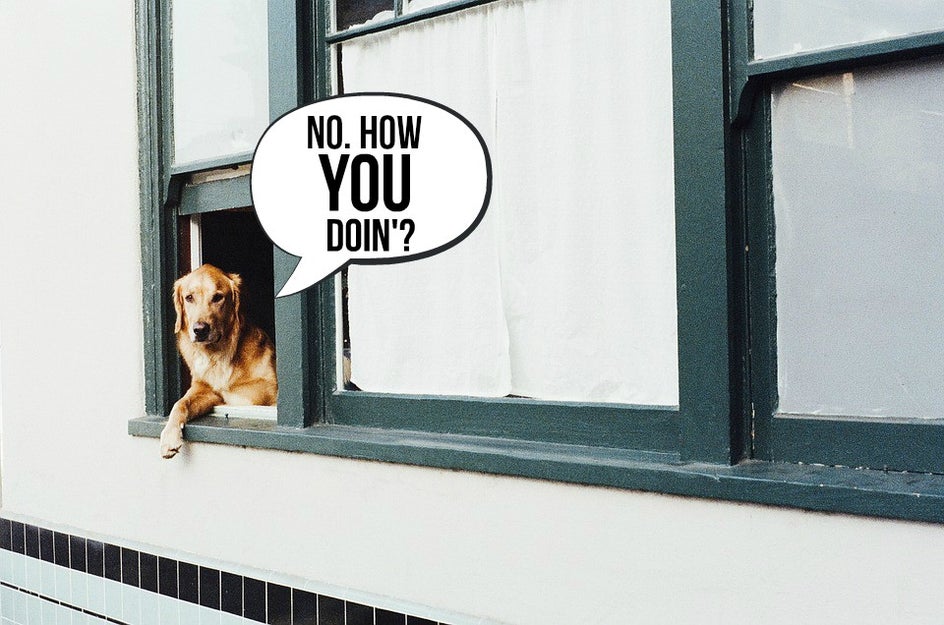
Photos With Your Best Friend. Because you know each other well enough that you have a million inside jokes.

For Stating Facts And Quotes. For a school project or a website, a speech bubble can be an easy and intriguing way to make a point.
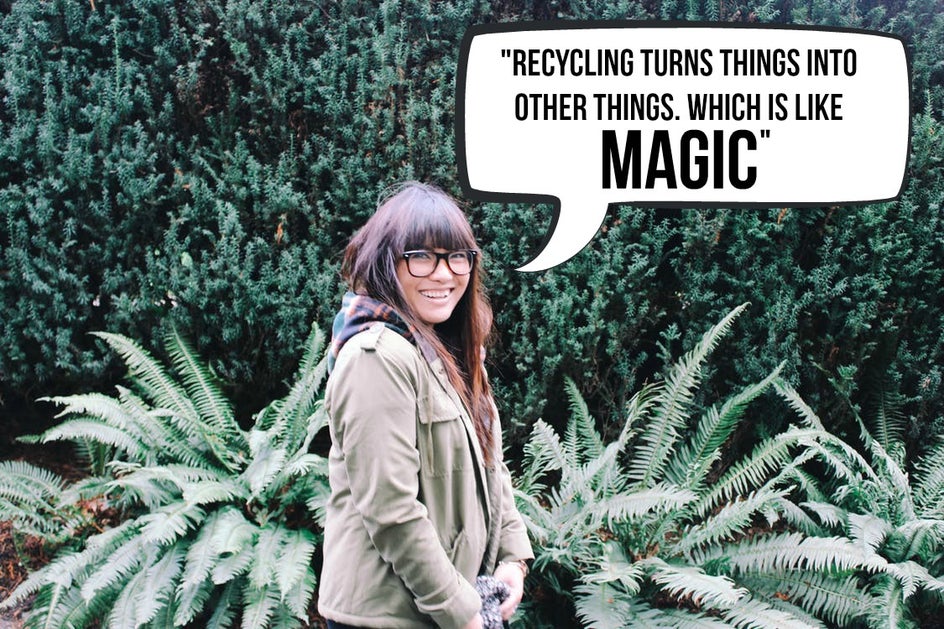
How To Add A Speech Bubble In BeFunky
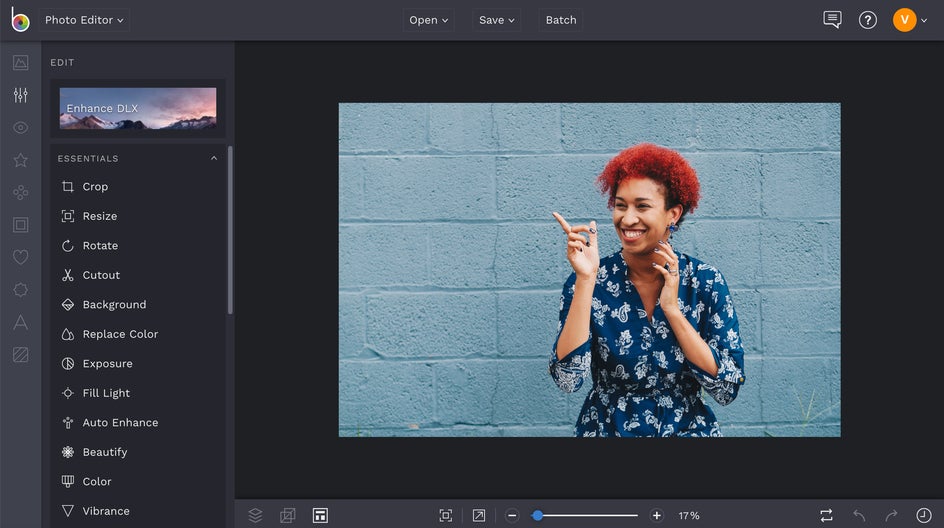
If you’re dying to add a speech bubble or two to your photos, BeFunky makes it incredibly easy. First, head to the Photo Editor and upload a photo.
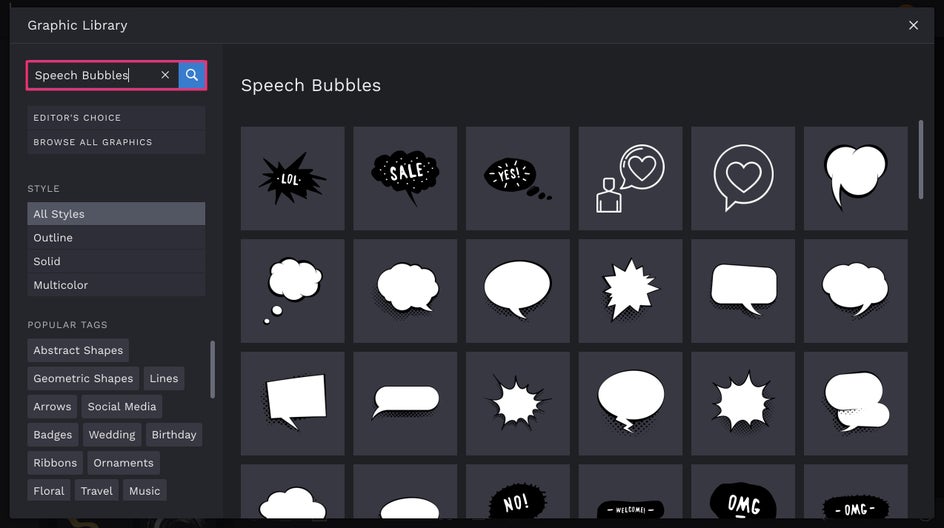
Under the Graphics tab, click Search Graphics and then search for Speech Bubbles. Multiple options will come up, some with pre-filled text and others that are blank for you to type your own messages.
From here, you can click and drag the speech bubble wherever it fits best on your photo, and use the blue circles around it to resize and rotate. If you hold down the Shift key while dragging the blue circles, you’ll be able to resize your speech bubble in freeform!
Notice that when you click on your speech bubble, a Graphic Properties toolbar appears. In this menu, you can flip the orientation of the speech bubble so it’s facing the correct direction, if need be. The Graphic Properties toolbar also presents you with tons of options to change the color, opacity, blend mode, and more!
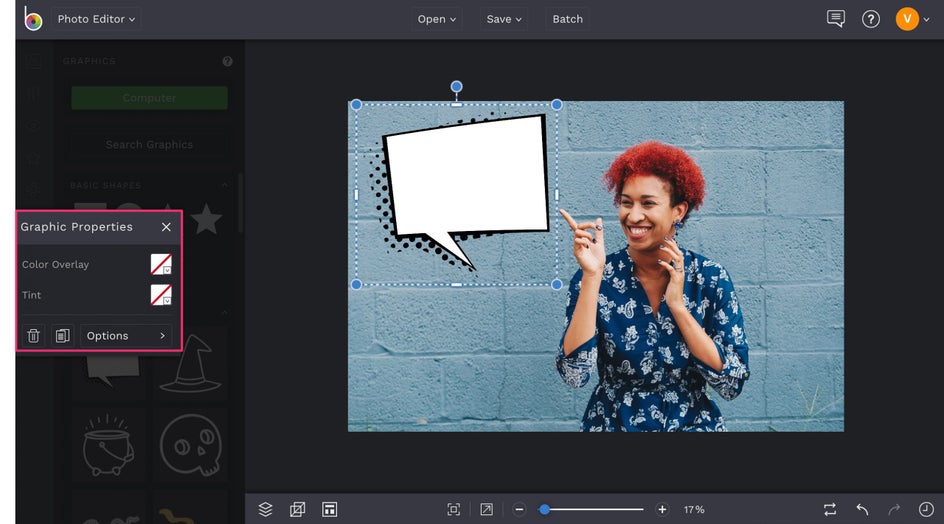
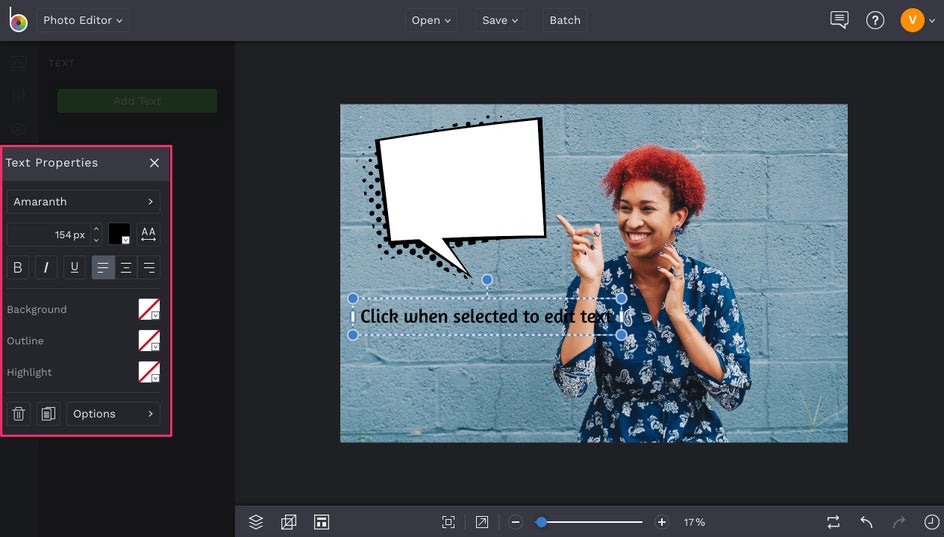
When you’ve got your speech bubble exactly where you want it, it’s time for the fun part: adding some text. Click on the Text tab in the left menu and select Add Text . Select the text box that appears and start typing!
From the Text Properties toolbar that appears when your text box is selected, you can change the font, font color, paragraph orientation, and more. It’s best to start by resizing your text box to fit inside the speech bubble. That way, you’ll know exactly what the end result will look like.
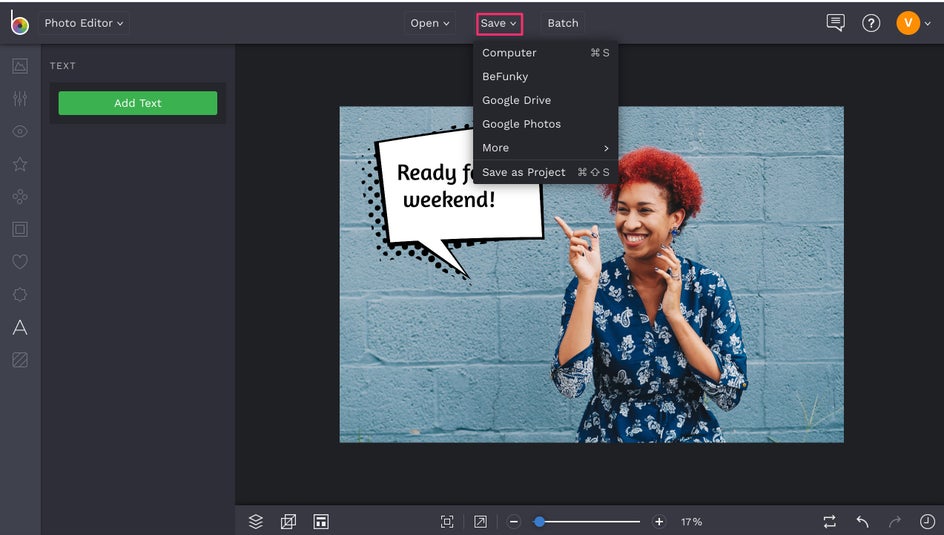
Once you've got your text looking perfect, you're ready to save and share your photo! Using the Save button at the top of the Photo Editor, you'll be able to save your photo to your computer, Dropbox, and more.
If you're ready to share it on social media right away, select the Share button at the top of the Photo Editor and automatically post it to your Facebook, Pinterest, Tumblr, or Twitter!

Take It To The Next Level With Cartoonizer
If you’re going for more of a comic book feel, we’ve got some really cool effects that will take your photo to the next level! Clicking on the Artsy tab will open a huge library of photo to art effects that will transform your photo into something that looks like it came from the pages of a graphic novel. One of the best effects for this is BeFunky’s Cartoonizer .
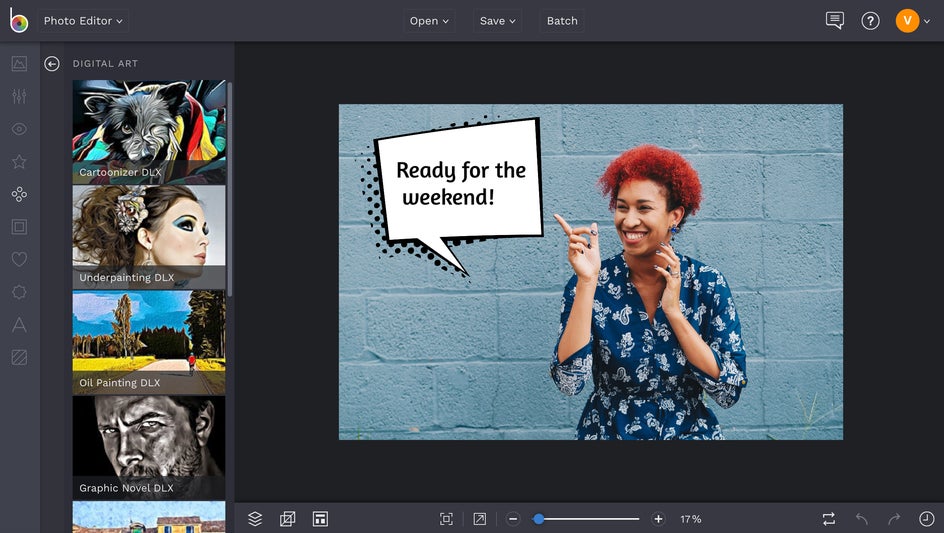
When you click on the Cartoonizer category, you’ll find several effects that will take you from photo to cartoon in a single click. Preview each effect on your photo until you find one you love.
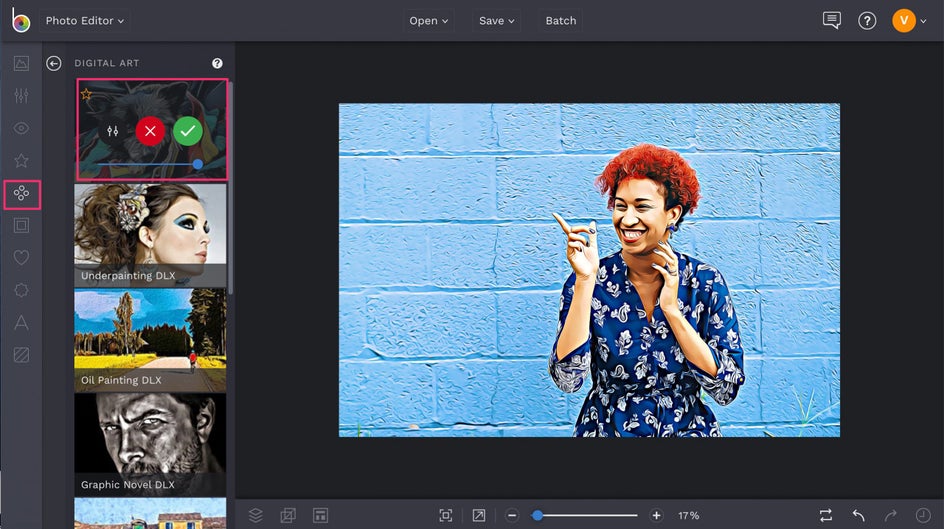
Notice that each Cartoonizer effect has it’s own Settings Menu where you can control the strength of the effect, colors, and detail level. Once you're satisfied, click Save.
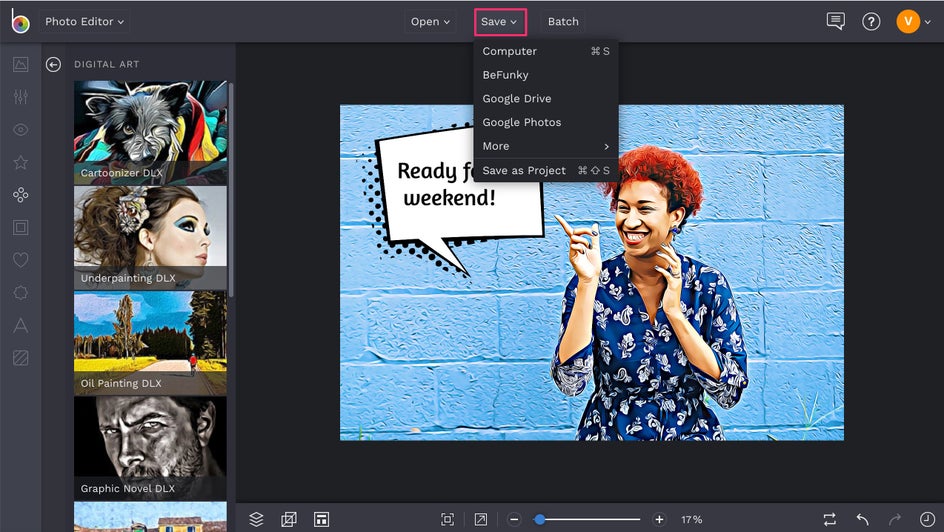
The best part about these Photo To Art effects is that they’re completely exclusive to BeFunky - you can’t find them anywhere else. That means you’ve got yourself a photo that’s truly unique. And just look at that detail!

Ready to start adding speech bubbles to your photos or turning them into comics? Our Photo Editor has everything you could ever need and then some. Follow the link below to get started!
Photo Editing, Simplified.
Please enable JavaScript to view the comments powered by Disqus.
Recommended Posts
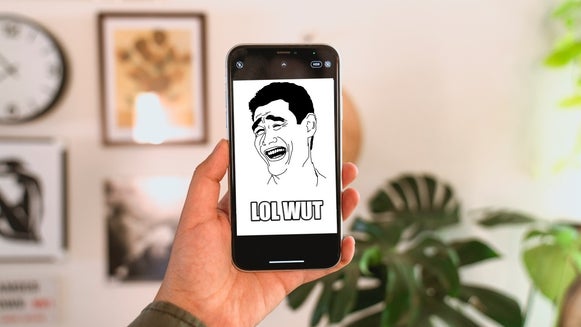
Turn BeFunky Into Your Own Meme Generator
Think you have what it takes to create a viral meme? With these tips and tools…

Introducing Our DELUXE EDITION Digital Art Effects
Our brand new Deluxe Edition Digital Art effects are here to take you from photo to…

Now You Can Wrap And Align Your Text and Graphics Easier Than Ever
Perfecting the appearance of your layers can be tricky and tedious, we know that…
Photo Editing. Simplified
Welcome back please sign in.
New to BeFunky? Register here
Forgot your password?
Register with BeFunky
Already registered? Sign in here
The emails you've entered do not match
Please enter a password of at least six characters
By creating an account you agree to our Terms of Use
Reset Your Password
Enter your email and we'll send you a link to reset your password
If you remember your password you can sign in here
Test photos to life: How to add speech, thoughts, and word bubbles to a photo
Discover how to make your photos speak with Photoleap's easy-to-use speech and thought bubble tools!

Test the world of visual communication, a picture is worth a thousand words. But what if you could make your photos speak for themselves? With Photoleap's intuitive tools, you can easily add speech, thought, and word bubbles to your images, transforming them into engaging and expressive masterpieces. Whether you're creating comic strips, crafting memes, or adding a personal touch to your photos, text bubbles are a powerful way to convey emotions, thoughts, and dialogue. In this guide, we'll explore how to add text bubbles to photos, unleash your creativity, and bring your images to life.
Adding text bubbles in Photoleap
Photoleap offers two convenient ways to add speech bubbles to photos. First, let's explore the layering method. After uploading your photo to edit, hit the layer button in the top left corner next to the home screen button. From there, tap on "Shapes" to access a variety of bubble options. Choose the perfect bubble shape that complements your image. Once you've positioned the bubble, head to the "Text" tool to add your desired words, customizing the font, size, and color to match your creative vision.
Alternatively, you can use the stickers library to quickly add pre-designed dialogue bubbles to your photos. Under the layering tool, you'll find the "Stickers" option. Browse through the collection of bubble stickers, each with its own unique style. Simply select the one that fits your message and place it on your image. While this method doesn't allow for text editing within the app, it's perfect for those who want to add word bubbles to photos in a snap.

Customization tips
One of the joys of adding text bubbles to your photos is the ability to customize them to match your creative vision. Photoleap provides a range of customization options to help you tailor your message. When it comes to font choices, consider the tone and style you want to convey. A comic-style font can add a playful touch, while a sleek, modern font can bring sophistication to your design. Experiment with different bubble shapes, from classic ovals to quirky rectangles, to find the perfect fit for your image. Don't be afraid to play with colors, too! Choose hues that complement your photo and enhance the overall impact of your message.
Creative uses
The possibilities are endless when it comes to using text bubbles in your photos. Let your imagination run wild!
Comic Strips:
Unleash your inner storyteller by turning photos into comics , using Photoleap's text bubble tools. Combine multiple images, each with its own speech bubbles, to weave a narrative that engages your audience. Experiment with different panel layouts and bubble placements to bring your comic to life. Whether you're creating a humorous tale or a thought-provoking story, the power of comic strips lies in their ability to convey emotions and ideas through a sequence of images and words.
In the digital age, memes have become a universal language of humor and social commentary. With Photoleap, you can easily create your own memes by adding witty captions or relatable thoughts to your photos. Use the text bubble tools to place your text strategically, ensuring that it complements the image and enhances the comedic effect. Play around with popular meme formats or create your own original designs. The key to a successful meme is a clever combination of image and text that resonates with your audience.
Personalized announcements
Make your special moments even more memorable by using Photoleap's text bubble tools to create personalized announcements. Whether you're sharing news of a new baby, a wedding engagement, or a milestone birthday, adding a speech bubble to a photo adds a touch of creativity and personality. Use the customization options to match the style and tone of your announcement. You can even incorporate themed stickers or backgrounds to enhance the overall design. Your friends and family will appreciate the extra effort you put into making the announcement truly unique.
Educational content
Text bubbles aren't just for entertainment purposes; they can also be used to create engaging educational content. Use Photoleap to add explanatory captions, fun facts, or thought-provoking questions to images related to your educational topic. By presenting information in a visually appealing way, you can capture your audience's attention and make learning more enjoyable. Whether you're creating study aids, classroom posters, or social media posts, the combination of images and text bubbles can help reinforce key concepts and stimulate critical thinking.
Advanced techniques
To take your text bubble game to the next level, try these advanced editing techniques. Layering is a powerful tool that allows you to create depth and dimension in your images. Place your speech bubbles strategically, taking into account the positioning of your subjects and the overall composition of your photo. Experiment with blending modes to seamlessly integrate the text bubbles into the background, creating a natural and cohesive look. Pay attention to context matching, ensuring that the style and color of your text bubbles align with the theme and mood of your image. With these techniques, you'll be able to create stunning, professional-looking results.
Adding speech, thought, and word bubbles to your photos is a fun and creative way to express yourself and engage your audience. With Photoleap's user-friendly tools, you can easily turn your photos into comic strips, memes, or personalized messages. So why not unleash your inner storyteller and experiment with the power of text bubbles? Let your photos speak for themselves and watch as your creative vision comes to life. Whether you're a seasoned artist or just starting out, Photoleap empowers you to turn your photos into captivating works of art. Get ready to add a whole new dimension to your images and let your creativity soar!
Unlock more editing magic with Photoleap

You’ll never believe what you can create on your phone
Bring your photos to life with photoleap, related articles.

Pictures and pawtraits: Creating funny dog portraits with Photoleap's AI
Turn your pup into a work of art!
Craft your perfect avatar for your profile picture with Photoleap
Create standout profile pictures with Photoleap: Your gateway to unique, custom avatars

The best photo editor apps in 2022
Find the best photo editor: Photoleap shines with AI tools & all-in-one editing features.
Empowering the creator in everyone
Picsart is the world’s largest digital creation platform. Its AI-powered tools give creators of all levels the ability to design, edit, draw and share photo and video content anywhere. It’s used by consumers, marketers and content creators for both personal and professional.
More categories
- View Articles
- Create Article
- Create Blog
- Answers not accepted
- Solved answers
- Create Question
- Create Tips
- Photoshop CS5
- Adobe After Effects
- Adobe Premiere
- Microsoft 3D Builder
- Techyv Hardware reviews
- TechyV’s Best Pick
- TechyV Software Tips & Tricks
- Windows Tips & Tricks
- Administrators & Moderators
- Site-wide Activity
- Frequently Asked Questions
- Terms and Conditions
- Privacy Policy

How to make speech bubbles for word documents?

I need to make comic-style word document for a school project. How do I create a comic speech bubbles for word documents? I'm on Windows Vista 64 bit and Microsoft Office 2003. Does Microsoft Word 2003 have this option? Thanks.
- Status: Open
- Question Views: 3024
- Answer Count: 2
- Vote Up 0 Vote Down
- Answer Accepted: Yes
- Question Category: MS Word

Hi Brenda Lopez,
its possible to add speech bubbles in ms-word 2003.
1. Open Ms-Word Application
2. Once it opens create a new document.
3. On the standard toolbar, click on insert
4. select picture
5. on the dropdown menu that appears, select autoshapes
6. select the relevant shape to use as a speech bubble
if you want better speech bubbles, use ms-word 2007
Ford Smithkings
- Posted on - 03/03/2013
Hello brenda,
Inserting speech bubbles can be achieved by using default shapes in Microsoft Word. To do this please follow the steps mentioned below:
1. In Microsoft Word, open your document click shapes and illustration tab
2. Find the desired speech bubble from the list of shapes.
3. Click on it to insert.
4. To type inside the bubble just click inside the speech bubble and type your text.
5. You can also resize it by clicking on the bubble.
That will do your job.
- Posted on - 03/11/2013
Login/Register to Answer
Problems with sage businessvision Mac edition
Search arcgis wind rose (drawing wind rose), related questions.

Net Objects 9 import error

Failed to convert Microsoft Office 2003 Word document to Microsoft Office 2010

Getting Errors on My Macro Settings

Enable click and type option has been checked

Our office is sharing a document on a network drive

How can i make secret word template in office 10 ?
Latest articles.
Safeguarding Digital Spaces: The Power Of Visual Content Filtering

5 Threat Hunting Methods Every IT Professional Should Know

Tips To Utilize The Power Of ROR Services In Custom Website Development
Latest blogs.

Top 10 New Laptop Entrants That Shook The Public

10 Facts About The Dark Web

Top 10 Latest Steam Cleaner Machines
Latest tips.

Top 10 Internet Monitoring Software

Top 10 Best Partition Manager Software

Top 10 Best Online Music Production Software
- Terms And Conditions
- Stack Overflow for Teams Where developers & technologists share private knowledge with coworkers
- Advertising & Talent Reach devs & technologists worldwide about your product, service or employer brand
- OverflowAI GenAI features for Teams
- OverflowAPI Train & fine-tune LLMs
- Labs The future of collective knowledge sharing
- About the company Visit the blog
Collectives™ on Stack Overflow
Find centralized, trusted content and collaborate around the technologies you use most.
Q&A for work
Connect and share knowledge within a single location that is structured and easy to search.
Get early access and see previews of new features.
How to make a speech bubble with CSS?
Is it possible to style the following HTML structure to the image shown below with CSS only?
<div class="xyz-dialog"> <div class="title"><span> Tip Title</span></div> <div class="body"> <span>Description</span></div> </div>
Required design:

3 Answers 3
- You can do it as below if we can add a container div in the HTML:
.container{ background: gray; padding: 16px 10px; width:max-content; } .xyz-dialog { background: white; padding: 1rem; border-radius: 8px; position: relative; width: 300px; } .xyz-dialog::after { content: ""; width: 0; height: 0; border-left: 10px solid transparent; border-right: 10px solid transparent; border-top: 10px solid white; position: absolute; top: 100%; } .body { margin-top:8px; color: gray; font-size: 15px } <div class= "container"> <div class="xyz-dialog"> <div class="title"><span> Tip Title</span></div> <div class="body"> <span>Description</span></div> </div>
- You can do it as below if we cannot touch the HTML structure:
.xyz-dialog { padding: 1rem; border-radius: 8px; position: relative; width: 300px; } .xyz-dialog::after { content: ""; width: 0; height: 0; border-left: 10px solid transparent; border-right: 10px solid transparent; border-top: 10px solid white; position: absolute; top: calc(100% -1rem); left: 2rem; } .xyz-dialog::before { content: ""; width: 100%; height: 100%; position: absolute; top: 0; left: 0; background: gray; z-index: -1; } .title { padding: 1rem; background: white; border-radius: 10px 10px 0 0; margin: 0 0 -5px 0; } .body { color: gray; font-size: 15px; background: white; margin: 0; padding: 1rem; border-radius: 0 0 10px 10px; } <div class="xyz-dialog"> <div class="title"><span> Tip Title</span></div> <div class="body"> <span>Description</span></div> </div>
You can use after and border.
.xyz-dialog::after{ content: ""; border-top: 12px solid #f1f1f1; border-right: 8px solid transparent; border-left: 8px solid transparent; position: absolute; bottom: -12px; left: 4%; } .xyz-dialog{ width: 50%; background: #f1f1f1; border-radius: 0.3em; padding: 5px 30px; position: relative; display: flex; justify-content: center; align-items: center; text-align: center; box-sizing: border-box; flex-direction: column; } <div class="xyz-dialog"> <div class="title"><span> Tip Title</span></div> <div class="body"> <span>Description</span></div> </div>
Little late. Two Boxes. For the small noise you use the css pseudo class after.
body { background-color: #999; } .wrapper { padding:20px; } h3 { margin:0; color: #000; } .bubble { position: relative; background: white; color: #999; font-family: Arial; font-size: 16px; text-align: left; width: 250px; height: 120px; border-radius: 10px; padding: 0px; } .bubble:after { content: ''; position: absolute; display: block; width: 0; z-index: 1; border-style: solid; border-width: 0 20px 20px 0; border-color: transparent #fff transparent transparent; bottom: -16px; left: 17%; margin-left: -10px; } <div class="bubble"> <div class="wrapper"> <h3>title</h3> <div>content</div> </div> </div>
Your Answer
Reminder: Answers generated by artificial intelligence tools are not allowed on Stack Overflow. Learn more
Sign up or log in
Post as a guest.
Required, but never shown
By clicking “Post Your Answer”, you agree to our terms of service and acknowledge you have read our privacy policy .
Not the answer you're looking for? Browse other questions tagged html css or ask your own question .
- The Overflow Blog
- This developer tool is 40 years old: can it be improved?
- Unpacking the 2024 Developer Survey results
- Featured on Meta
- We've made changes to our Terms of Service & Privacy Policy - July 2024
- Introducing an accessibility dashboard and some upcoming changes to display...
- Tag hover experiment wrap-up and next steps
Hot Network Questions
- Why is a datetime value returned that matches the predicate value when using greater than comparison
- Closed form of an integral using Mathematica or otherwise
- How to get InverseMatrix for large size Matrix in Mathematica?
- Are these friction shifters?
- Schengen visa expires during my flight layover
- When are these base spaces isomorphic?
- cd 'old' 'new' with multiple "whole directory-name" substitutions
- Why don't aircraft use D.C generators?
- How does one find historic prices for goods?
- TopologyException: side location conflict while intersects on valid polygons
- What's "unregulated baggage"?
- Applying a Little Artificial Intelligence to a Patched Titlecaps Algorithm
- When did software only engines overtake custom hardware?
- adding data to a CSV file for it to be read
- Fantasy book in which a joker wonders what's at the top of a stone column
- GND plane on both sides?
- How to measure out fresh herbs when the recipe calls for 'a tablespoon of chopped herb'?
- Make a GCSE student's error work
- Tritone substitution in Haydn string quartet?
- What is this notion of differentiability?
- Does a cancellation of an accepted review request before the due date happen often?
- How do the Fremen harvest spice?
- Who is sitting at the banker's left?
- Solar System Replacement?

IMAGES
VIDEO
COMMENTS
Make A Speech Bubble In Word Speech bubbles are a good way to help your document deliver its message. You'd be surprised at just how easy it is to make a speech bubble in Word. Let's get straight to it and add one now. On the Insert tab, click Shapes (in the Illustrations group) > Oval Callout.
Creating text bubbles in Microsoft Word is a breeze once you get the hang of it. You'll be using the Shapes feature, found in the Insert tab, to draw a text box and then customize it to look like a speech or thought bubble. Here's a quick rundown: click on the Insert tab, choose a shape that resembles a bubble, draw it onto the document, and then type your text inside it. Simple, right?
Speech bubbles in Word to create This guide was created with Microsoft Word 2010: Open Word on your Computer. Select the Insert tab. Click on "forms". Under the sub-item "legends" you find bubbles has several speech variants. Select a speech bubble and you click on your document. The speech bubble is thus created.
Speech bubbles are a fun way yo represent text. This article tutorial takes you through how to make a speech bubble on Word Online.
Speech bubbles or balloons are sometimes referred to as text bubbles. They are labels that display words and emotions of a character in an illustration or depict a phrase about an illustration or ...
How to create callout or speech balloon in word: How to Insert Word Bubbles in Word Vishap TVplus 30.5K subscribers Subscribed 4 2.1K views 3 years ago
Learn how to easily create text bubbles online or in Word, Excel, and PowerPoint files, how to change font, set background color, or make it transparent.
Interesting graphics and illustrations can help bring to life an otherwise dull Microsoft Word document. One way of brightening up a boring block of text is to insert a word- or speech-bubble shape.
The style is called Jumble and it's available in Word on Windows and Mac. Select the text you want to turn into bubble letters and head to the Home tab. Tip: Bubble letter words often look better in all uppercase, but you can include lowercase if you prefer. Open the Font drop-down box which displays your current font style.
The iconic word bubble, used to represent a person's thoughts or commentary on the page, is a simple way to add design to your Microsoft Word documents. Word calls these graphic touches "callouts," and offers quick insertion options and unlimited formatting for using word bubbles in Word files.
Adjusting shape of speech bubble I want to make a speech bubble that is more rectangular than the default while still being more oval than the rectangular option.
Speech bubbles are an integral part of visual communication, often used in graphic novels, comics, and web design to represent dialogue or thoughts. They add a dynamic element to the narrative, making it more engaging and interactive. The use of speech bubbles isn't limited to these areas; they are also used in presentations, educational ...
Why did you make this? I made this tool because I often found content on Discord and other social media platforms that needed to be turned into a speech bubble meme. However, when I tried to find a reliable speech bubble meme generator on Google, I couldn't find any suitable websites.
Add a speech bubble to a photo online for free. With Pixelied's speech bubbles generator, you can add speech stickers and icons to any photo in an instant.
From your description, we kindly assume your concern is unable to delete your previous comment in Word that was exported by a PDF. If so, we would like to suggest you: 1.Open the PDF file. 2. Remove the comment on the original PDF file. 3.Re- export the PDF to Word to check the outcome.
A word and shape of 'bubble' were used as a graphic convention describing a imaginary form of speech and thought of characters in comic books. Inspired from those metaphors of bubble, I introduce an interactive art/ toy project representing the ephemeral and intangible properties of human's communication.
In this video, I showed how to make word bubbles and flashes in Clip Studio Paint.I'm Japanese who are learning manga and anime style drawing. In this channe...
Learn how easy it is to add speech bubbles to photos, customize the caption, and even use our Cartoonizer to turn your photo into a cartoon masterpiece!
Discover how to make your photos speak with Photoleap's easy-to-use speech and thought bubble tools!
I need to make comic-style word document for a school project. How do I create a comic speech bubbles for word documents? I'm on Windows Vista 64 bit and Microsoft Office 2003. Does Microsoft Word 2003 have this option? Thanks.
How to make a speech bubble with CSS? Asked 2 years, 8 months ago Modified 2 years, 1 month ago Viewed 973 times
Two-Tier Keir showed his true colours years ago. We should have seen the warning signs Far-right rioters are worthy of condemnation, but accusations of two-tier policing are becoming harder to deny
If you get too into your internet bubble, you can feel like Warrenmentum is sweeping the whole nation, whereas in fact it is topping out in the low double digits.